from pyspark.sql import SparkSession spark=SparkSession.builder.appName('data_processing').getOrCreate() import pyspark.sql.functions as F from pyspark.sql.types import *
for col in df.columns: if col !='Avg_Salary': print(f" Aggregation for {col}") df.groupBy(col).count().orderBy('count',ascending=False).show(truncate=False)
The following are some of the valid targets for this Makefile: ... all (the default if no target is provided) ... clean ... depend ... edit_cache ... rebuild_cache ... hello-world ... hello-world.o ... hello-world.i ... hello-world.s
2. Switching generators
Choose Ninja:
1
2
3
4
$ mkdir -p build $ cd build $ cmake -G Ninja .. # must install Ninja first $ cmake --build .
Single command:
1
cmake -H. -Bbuild -GNinja
3. Building and linking static and shared libraries
CmakeLists.txt
1 2 3 4 5 6 7 8 9 10 11 12 13 14
cmake_minimum_required(VERSION 3.5 FATAL_ERROR)
project(recipe-03 LANGUAGES CXX)
# generate a library from sources add_library(message STATIC Message.hpp Message.cpp )
add_executable(hello-world hello-world.cpp)
target_link_libraries(hello-world message)
add_library(message STATIC Message.hpp Message.cpp): add_library’s first param is target name, available for entire CMakeLists.txt to be refered. Actually name will be prefixed with lib and suffixed withbash proper extension by cmake, determined by (STATIC or SHARED) and OS
target_link_libraries(hello-world message): link library to executable and make sure hello-world depends correctly on library. Must after add_library.
After build, we get libmessage.a together with executable hello-world.
# set minimum cmake version cmake_minimum_required(VERSION 3.5 FATAL_ERROR)
# project name and language project(recipe-05 LANGUAGES CXX)
# expose options to the user option(USE_LIBRARY "Compile sources into a library" OFF)
message(STATUS "Compile sources into a library? ${USE_LIBRARY}")
include(CMakeDependentOption)
# second option depends on the value of the first cmake_dependent_option( MAKE_STATIC_LIBRARY "Compile sources into a static library" OFF "USE_LIBRARY" ON )
# third option depends on the value of the first cmake_dependent_option( MAKE_SHARED_LIBRARY "Compile sources into a shared library" ON "USE_LIBRARY" ON )
set(CMAKE_WINDOWS_EXPORT_ALL_SYMBOLS ON)
# list sources list(APPEND _sources Message.hpp Message.cpp)
if(USE_LIBRARY) message(STATUS "Compile sources into a STATIC library? ${MAKE_STATIC_LIBRARY}") message(STATUS "Compile sources into a SHARED library? ${MAKE_SHARED_LIBRARY}")
# set minimum cmake version cmake_minimum_required(VERSION 3.5 FATAL_ERROR)
# project name and language project(recipe-06 LANGUAGES C CXX)
message(STATUS "Is the C++ compiler loaded? ${CMAKE_CXX_COMPILER_LOADED}") if(CMAKE_CXX_COMPILER_LOADED) message(STATUS "The C++ compiler ID is: ${CMAKE_CXX_COMPILER_ID}") message(STATUS "Is the C++ from GNU? ${CMAKE_COMPILER_IS_GNUCXX}") message(STATUS "The C++ compiler version is: ${CMAKE_CXX_COMPILER_VERSION}") endif()
message(STATUS "Is the C compiler loaded? ${CMAKE_C_COMPILER_LOADED}") if(CMAKE_C_COMPILER_LOADED) message(STATUS "The C compiler ID is: ${CMAKE_C_COMPILER_ID}") message(STATUS "Is the C from GNU? ${CMAKE_COMPILER_IS_GNUCC}") message(STATUS "The C compiler version is: ${CMAKE_C_COMPILER_VERSION}") endif()
# we use the IN LISTS foreach syntax to set source properties message(STATUS "Setting source properties using IN LISTS syntax:") foreach(_source IN LISTS sources_with_lower_optimization) set_source_files_properties(${_source} PROPERTIES COMPILE_FLAGS -O2) message(STATUS "Appending -O2 flag for ${_source}") endforeach()
# we demonstrate the plain foreach syntax to query source properties # which requires to expand the contents of the variable message(STATUS "Querying sources properties using plain syntax:") foreach(_source ${sources_with_lower_optimization}) get_source_file_property(_flags ${_source} COMPILE_FLAGS) message(STATUS "Source ${_source} has the following extra COMPILE_FLAGS: ${_flags}") endforeach()
Word separation can be indicated by underscores (‘_’), but use of underscores is discouraged unless the name would be hard to read otherwise.
Names of Types and Modules begin with a capital letter and word separation is shown with upper camel case instead of underscores.
Names of functions and macros are in lower case, without underscores.
Functions that write to their arguments have names that end in !. These are sometimes called “mutating” or “in-place” functions because they are intended to produce changes in their arguments after the function is called, not just return a value.
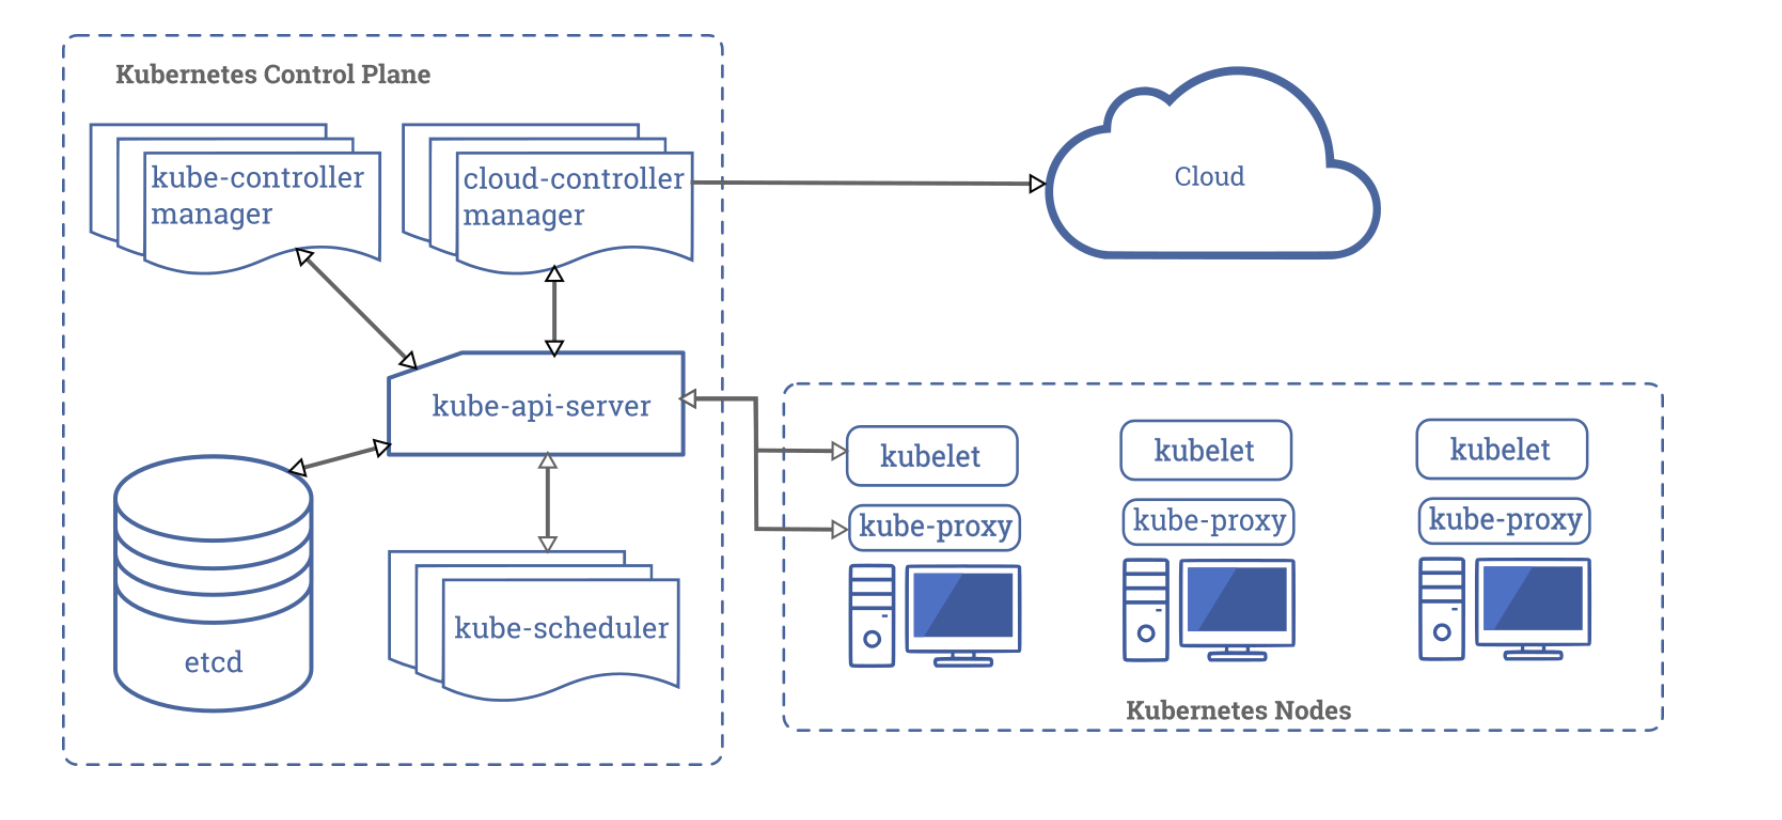
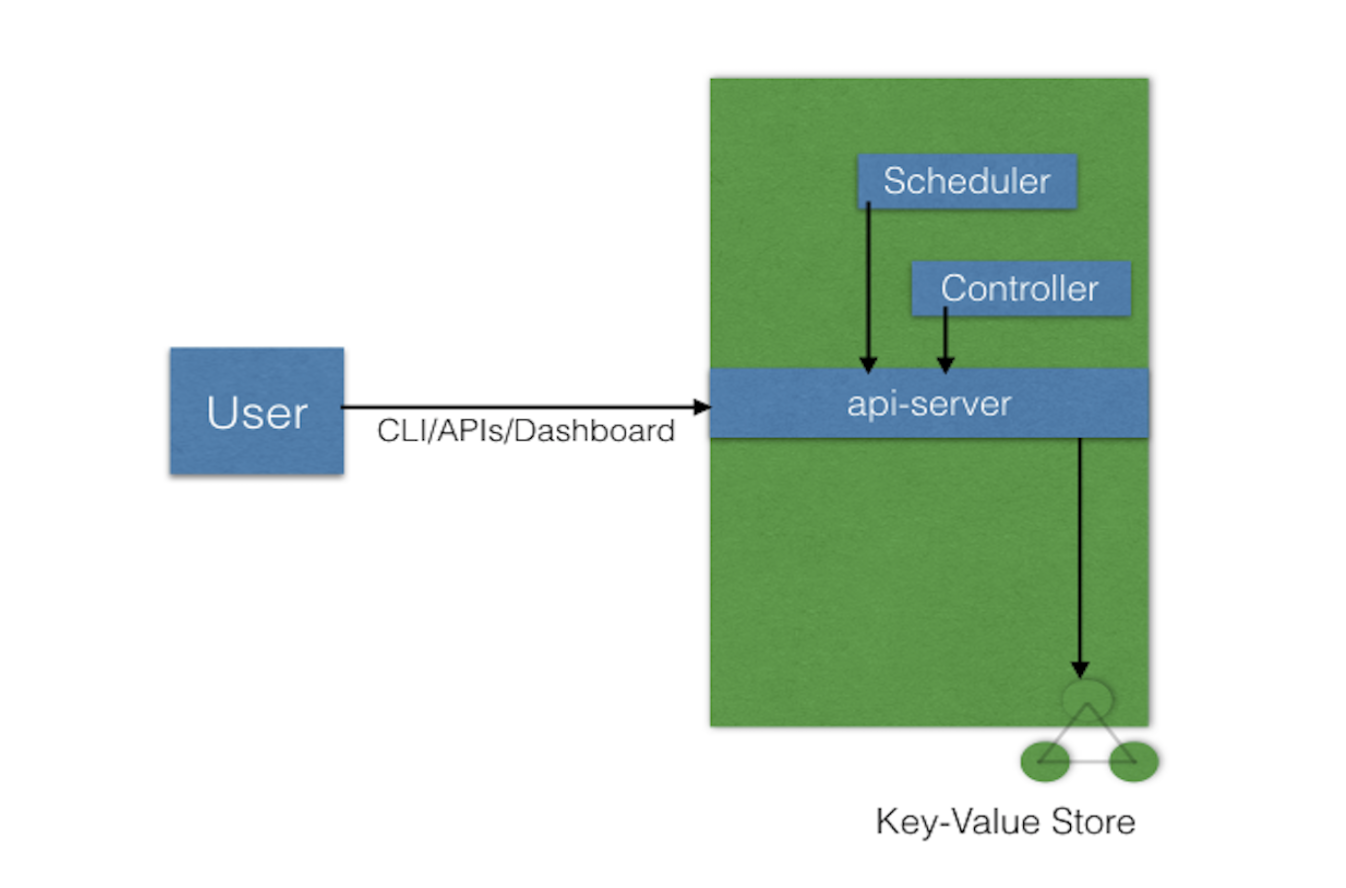
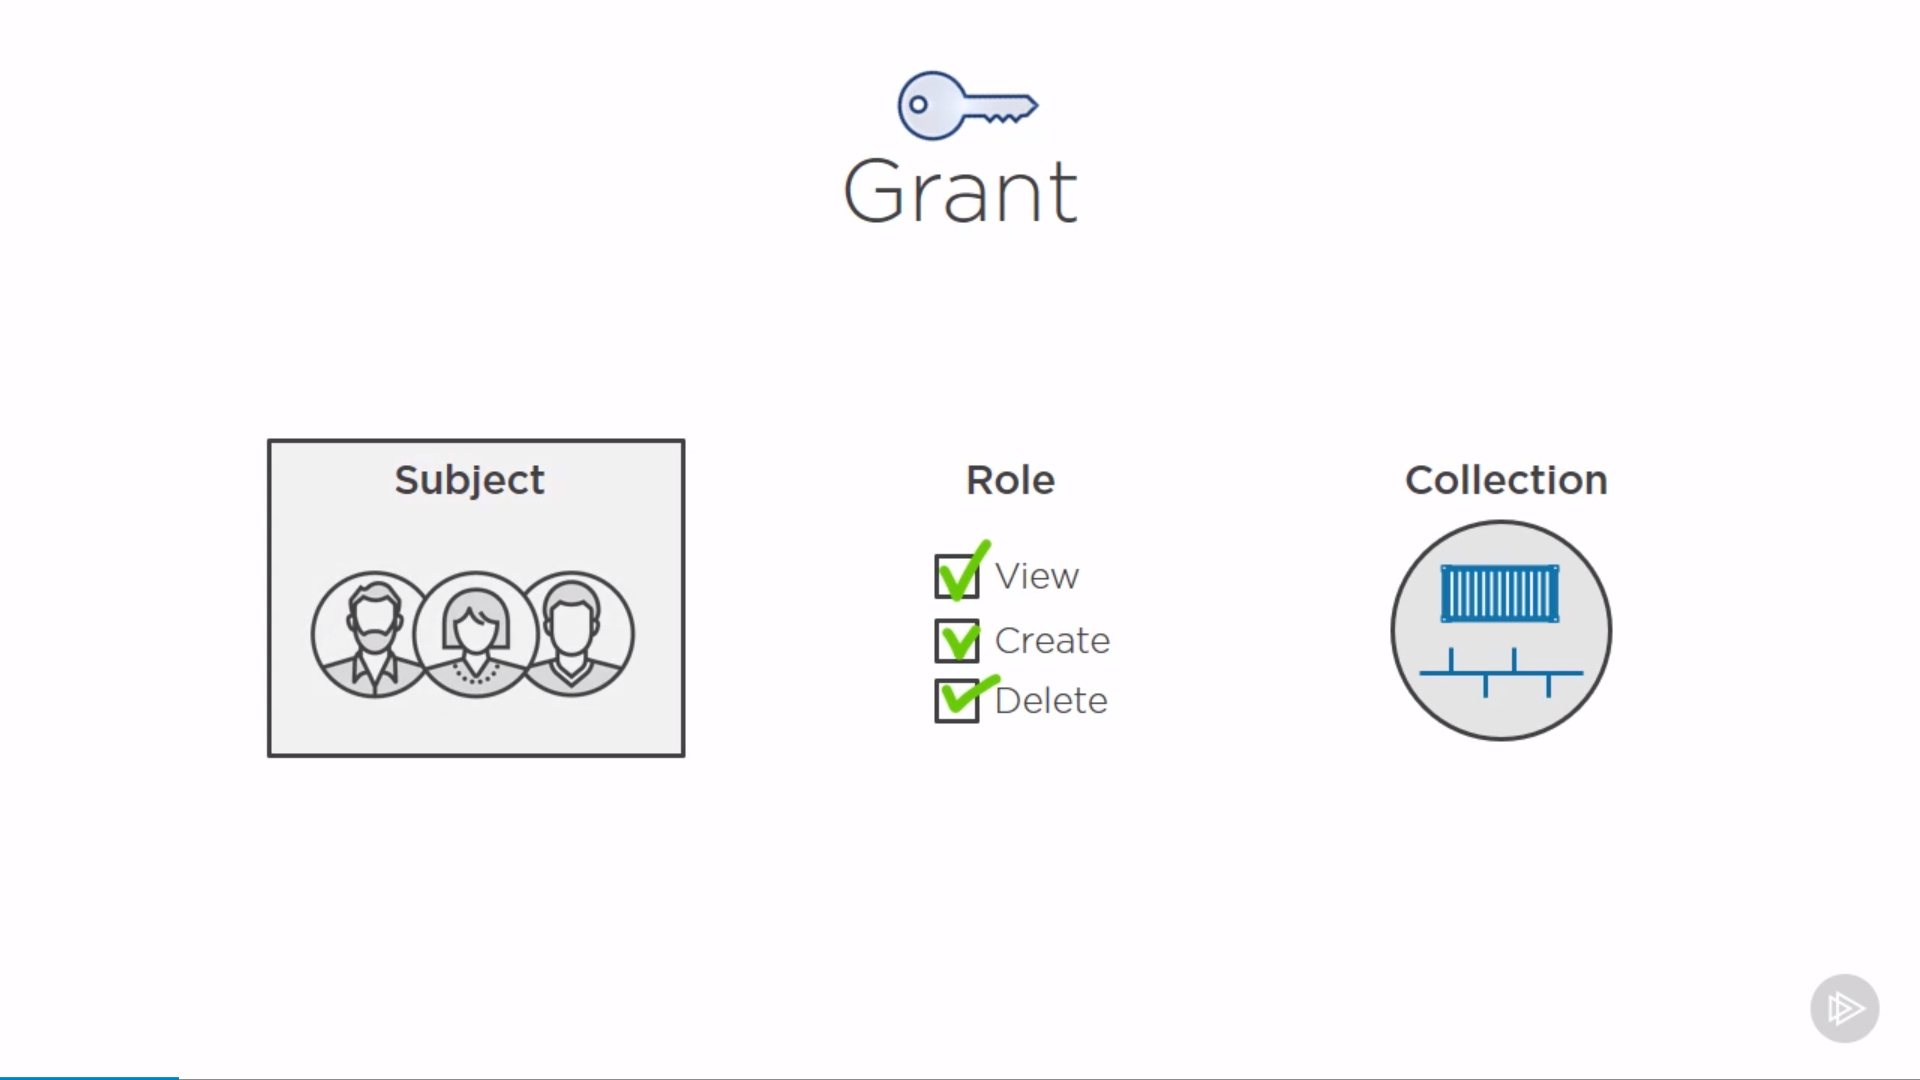
control plane responsible for managing the state of a Kubernetes cluster(brain)
users send requests to the master node via a Command Line Interface (CLI) tool, a Web User-Interface (Web UI) Dashboard, or Application Programming Interface (API)
master node replicas are added to the cluster, configured in High-Availability (HA) mode to ensure the control plane’s fault tolerance. While only one of the master node replicas actively manages the cluster, the control plane components stay in sync across the master node replicas
4 components:
API server
Scheduler
Controller managers
etcd
API Server
a central control plane component, coordinating all the administrative tasks
reads the Kubernetes cluster’s current state from the etcd, and after a call’s execution, saves the resulting state of the Kubernetes cluster in etcd(only master plane component talks to etcd)
designed to scale horizontally: it scales by deploying more instances to balance traffic between those instances
highly configurable and customizable, supports the addition of custom API servers
Scheduler
assign new objects, such as pods, to nodes, based on current Kubernetes cluster state and new object’s requirements
takes into account: individual and collective resource requirements, hardware/software/policy constraints, affinity and anti-affinity specifications, data locality, inter-workload interference, and deadlines.
highly configurable and customizable, supports additional custom schedulers (specify the name of the custom scheduler in object 's configuration data)
Controller Managers
run controllers to regulate the state of the Kubernetes cluster
controllers are watch-loops continuously running and comparing the cluster’s desired state (provided by objects’ configuration data) with its current state (obtained from etcd data store via the API server), includes:
Node controller: Responsible for noticing and responding when nodes go down.
Replication controller: Responsible for maintaining the correct number of pods for every replication controller object in the system.
Endpoints controller: Populates the Endpoints object (that is, joins Services & Pods).
Service Account & Token controllers: Create default accounts and API access tokens for new namespaces.
corrective action is taken in the cluster until its current state matches the desired state.
kube-controller-manager: runs controllers responsible to act when nodes become unavailable, to ensure pod counts are as expected, to create endpoints, service accounts, and API access tokens.
cloud-controller-manager: runs controllers responsible to interact with the underlying infrastructure of a cloud provider when nodes become unavailable, to manage storage volumes when provided by a cloud service, and to manage load balancing and routing.
Node controller: For checking the cloud provider to determine if a node has been deleted in the cloud after it stops responding
Route controller: For setting up routes in the underlying cloud infrastructure
Service controller: For creating, updating and deleting cloud provider load balancers
a distributed key-value store which holds cluster state related data, to persist the Kubernetes cluster’s state
either configured on the master node (stacked) or on its dedicated host (external)
when stacked: HA master node replicas ensure etcd resiliency.
when external: etcd hosts have to be separately replicated for HA mode configuration.
based on Raft Consensus Algorithm, written in Golang, besides storing the cluster state, also used to store configuration details such as subnets, ConfigMaps, Secrets, etc.
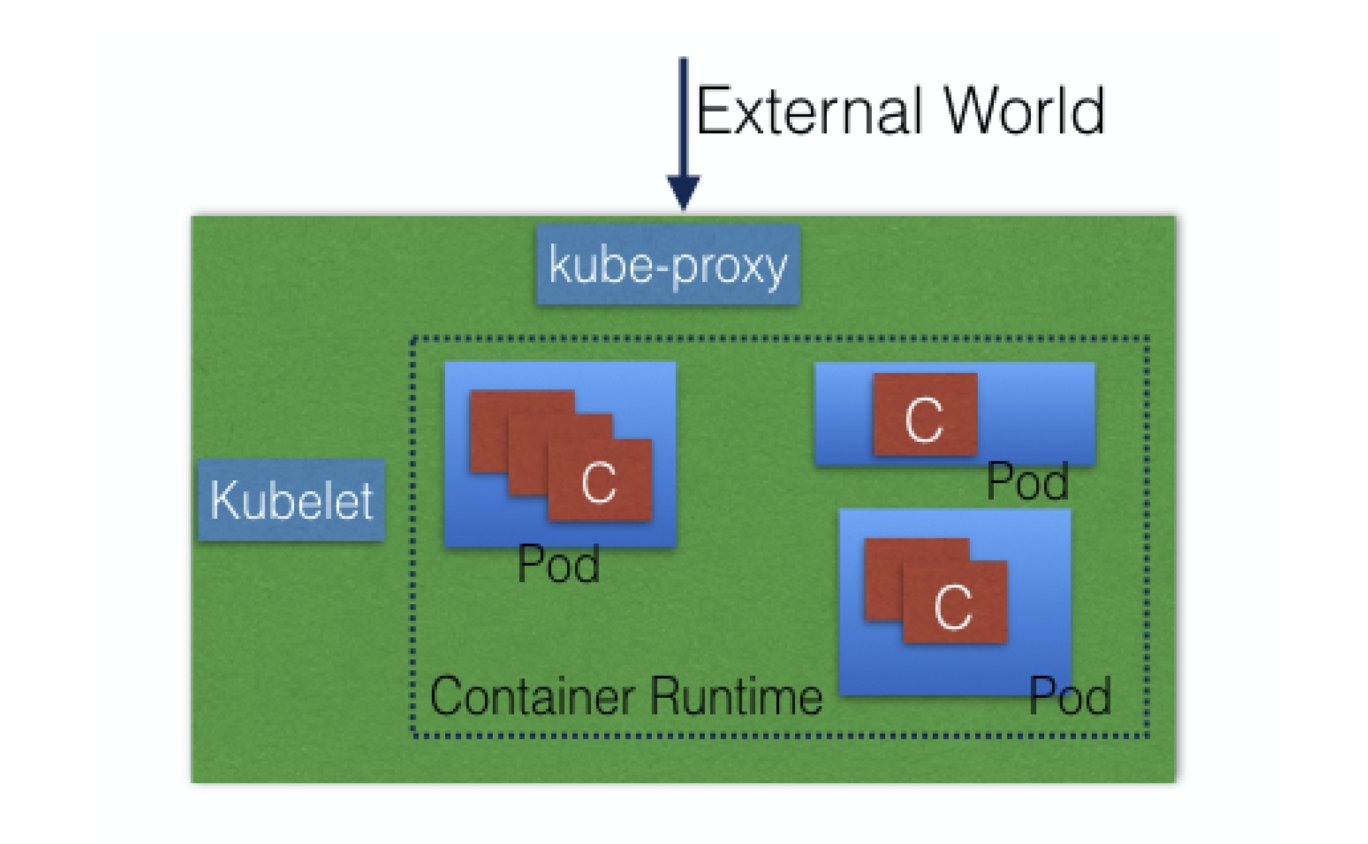
Worker Node
provides a running environment for client applications, which are encapsulated in Pods, controlled by the cluster control plane agents running on the master node
Pods are scheduled on worker nodes, where they find required compute, memory and storage resources to run, and networking to talk to each other and the outside world.
A Pod is the smallest scheduling unit in Kubernetes, a logical collection of one or more containers scheduled together.
to access the applications from the external world, we connect to worker nodes and not to the master node.
4 parts:
Container runtime
kubelet
kube-proxy
Addons for DNS, Dashboard, cluster-level monitoring and logging.
Container Runtime
responsible for running containers, e.x. Docker, containerd, CRI-O
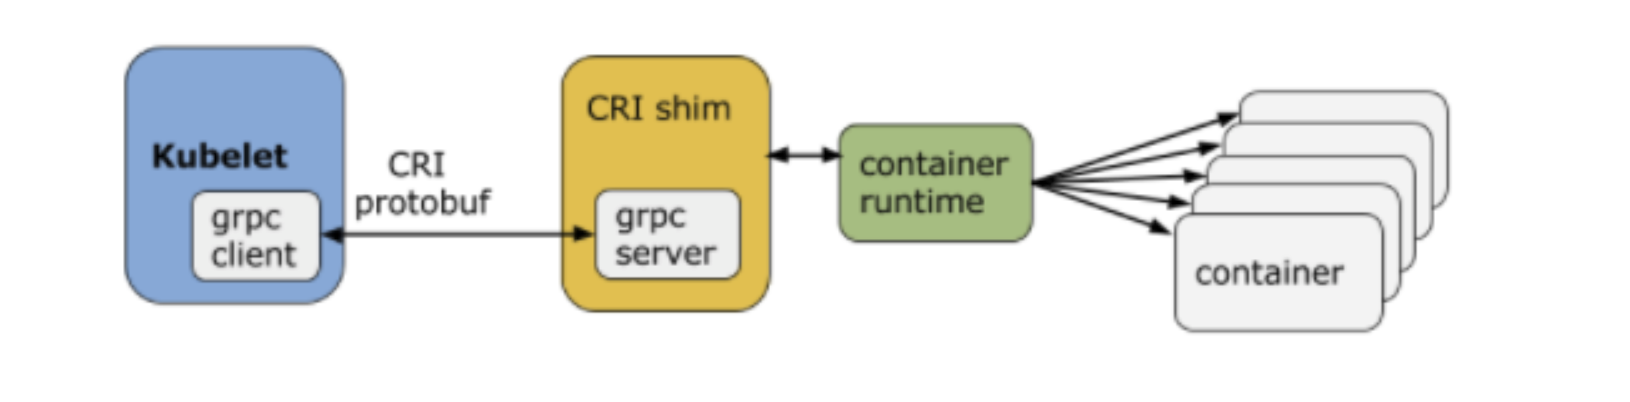
Kubelet
an agent running on each node, communicates with the control plane components from the master node, makes sure containers are running in a Pod.
receives Pod definitions, primarily from the API server, and interacts with the container runtime on the node to run containers associated with the Pod.
monitors the health of the Pod’s running container
connects to the container runtime using Container Runtime Interface (CRI). which consists of protocol buffers, gRPC API, and libraries.
CRI implements two services:
ImageService: responsible for all the image-related operations
RuntimeService: responsible for all the Pod and container-related operations.
some examples of CRI shims:
dockershim: with dockershim, containers are created using Docker installed on the worker nodes. Internally, Docker uses containerd to create and manage containers.
cri-containerd: with cri-containerd, we can directly use Docker’s smaller offspring containerd to create and manage containers.
cri-o: cri-o enables using any Open Container Initiative (OCI) compatible runtimes with Kubernetes. At the time this course was created, CRI-O supported runC and Clear Containers as container runtimes. However, in principle, any OCI-compliant runtime can be plugged-in.
Kube-proxy
network agent which runs on each node, responsible for dynamic updates and maintenance of all networking rules on the node, abstracts the details of Pods networking and forwards connection requests to Pods.
implements part of the Kubernetes Service concept.
maintains network rules on nodes. These network rules allow network communication to your Pods from network sessions inside or outside of your cluster.
uses the operating system packet filtering layer if there is one and it’s available. Otherwise, forwards the traffic itself.
Addons
use Kubernetes resources (DaemonSet, Deployment, etc) to implement cluster features and functionality not yet available in Kubernetes, therefore implemented through 3rd-party pods and services.
DNS: cluster DNS is a DNS server for Kubernetes services, required to assign DNS records to Kubernetes objects and resources
Web UI(Dashboard): a general purposed web-based user interface for cluster management
Container Resource Monitoring: records generic time-series metrics about containers in a central database, and provides a UI for browsing that data.
Cluster-level Logging: responsible for saving container logs to a central log store with search/browsing interface.
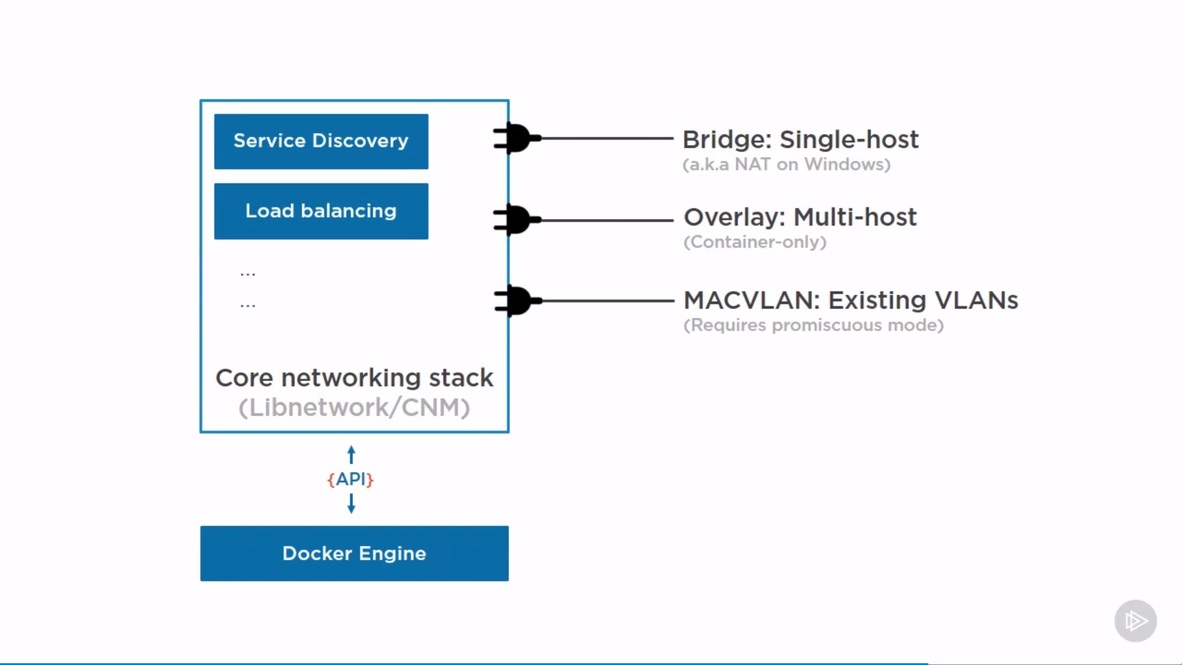
Networking Challenges
Container-to-Container Communication Inside Pods
When a Pod is started, a network namespace is created inside the Pod, and all containers running inside the Pod will share that network namespace so that they can talk to each other via localhost.
Pod-to-Pod Communication Across Nodes
Kubernetes network model “IP-per-Pod”
containers are integrated with the overall Kubernetes networking model through the use of the Container Network Interface (CNI) supported by CNI plugins.
Pod-to-External World Communication
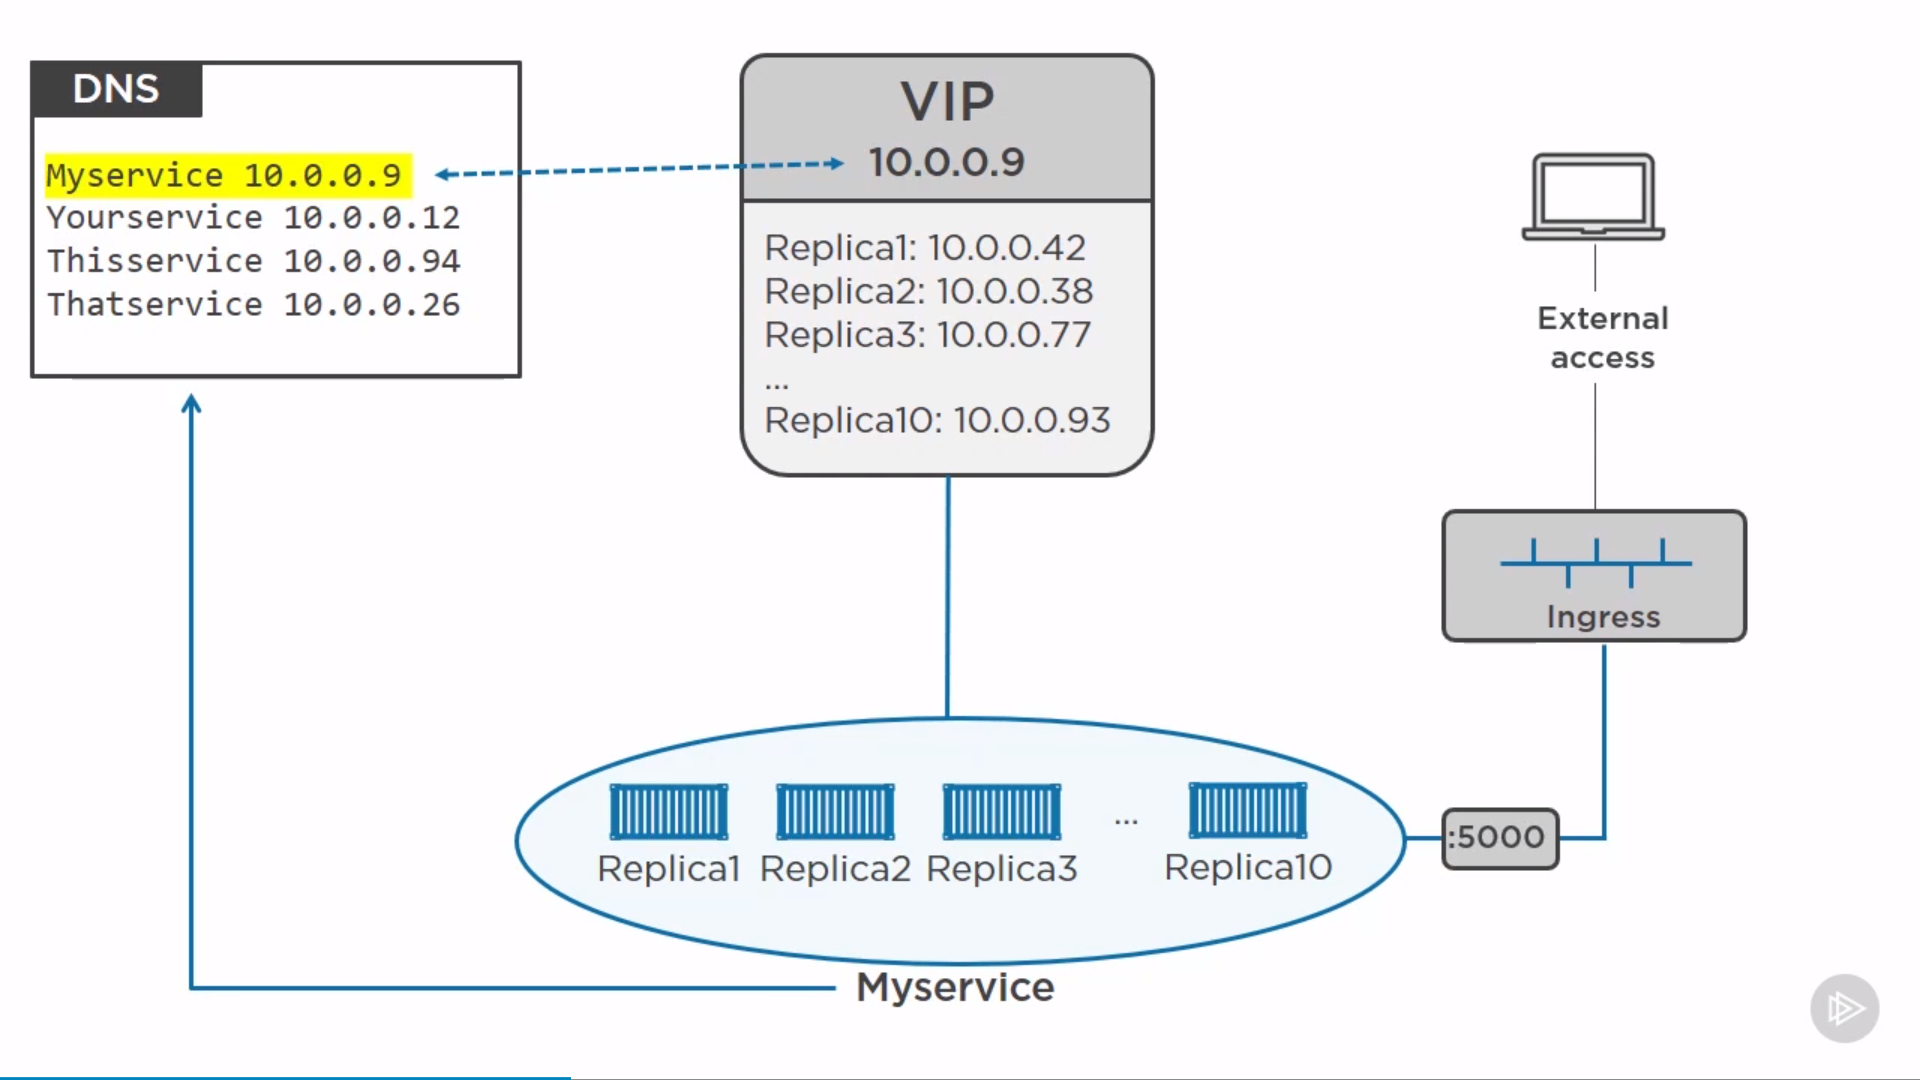
by services, complex constructs which encapsulate networking rules definitions on cluster nodes. By exposing services to the external world with kube-proxy, applications become accessible from outside the cluster over a virtual IP.
Installing Kubernetes
Kubernetes Configuration
four major installation types:
All-in-One Single-Node Installation:
In this setup, all the master and worker components are installed and running on a single-node. While it is useful for learning, development, and testing, it should not be used in production. Minikube is one such example, and we are going to explore it in future chapters.
Single-Node etcd, Single-Master and Multi-Worker Installation:
In this setup, we have a single-master node, which also runs a single-node etcd instance. Multiple worker nodes are connected to the master node.
Single-Node etcd, Multi-Master and Multi-Worker Installation:
In this setup, we have multiple-master nodes configured in HA mode, but we have a single-node etcd instance. Multiple worker nodes are connected to the master nodes.
Multi-Node etcd, Multi-Master and Multi-Worker Installation:
In this mode, etcd is configured in clustered HA mode, the master nodes are all configured in HA mode, connecting to multiple worker nodes. This is the most advanced and recommended production setup.
Localhost Installation
localhost installation options available to deploy single- or multi-node Kubernetes clusters on our workstation/laptop:
Minikube: single-node local Kubernetes cluster
Docker Desktop: single-node local Kubernetes cluster for Windows and Mac
CDK on LXD: multi-node local cluster with LXD containers.
On-Premise Installation
Kubernetes can be installed on-premise on VMs and bare metal.
On-Premise VMs:
Kubernetes can be installed on VMs created via Vagrant, VMware vSphere, KVM, or another Configuration Management (CM) tool in conjunction with a hypervisor software. There are different tools available to automate the installation, such as Ansible or kubeadm.
On-Premise Bare Metal:
Kubernetes can be installed on on-premise bare metal, on top of different operating systems, like RHEL, CoreOS, CentOS, Fedora, Ubuntu, etc. Most of the tools used to install Kubernetes on VMs can be used with bare metal installations as well.
Cloud Installation
Kubernetes can be installed and managed on almost any cloud environment:
Hosted Solutions:
With Hosted Solutions, any given software is completely managed by the provider. The user pays hosting and management charges. Some of the vendors providing hosted solutions for Kubernetes are:
Google Kubernetes Engine (GKE)
Azure Kubernetes Service (AKS)
Amazon Elastic Container Service for Kubernetes (EKS)
DigitalOcean Kubernetes
OpenShift Dedicated
Platform9
IBM Cloud Kubernetes Service.
Turnkey Cloud Solutions:
Below are only a few of the Turnkey Cloud Solutions, to install Kubernetes with just a few commands on an underlying IaaS platform, such as:
Google Compute Engine (GCE)
Amazon AWS (AWS EC2)
Microsoft Azure (AKS).
Turnkey On-Premise Solutions:
The On-Premise Solutions install Kubernetes on secure internal private clouds with just a few commands:
GKE On-Prem by Google Cloud
IBM Cloud Private
OpenShift Container Platform by Red Hat.
kubeadm is a first-class citizen on the Kubernetes ecosystem. It is a secure and recommended way to bootstrap a single- or multi-node Kubernetes cluster. It has a set of building blocks to setup the cluster, but it is easily extendable to add more features. Please note that kubeadm does not support the provisioning of hosts.
kubespray
With kubespray (formerly known as kargo), we can install Highly Available Kubernetes clusters on AWS, GCE, Azure, OpenStack, or bare metal. Kubespray is based on Ansible, and is available on most Linux distributions. It is a Kubernetes Incubator project.
kops
With kops, we can create, destroy, upgrade, and maintain production-grade, highly-available Kubernetes clusters from the command line. It can provision the machines as well. Currently, AWS is officially supported. Support for GCE is in beta, and VMware vSphere in alpha stage, and other platforms are planned for the future. Explore the kops project for more details.
kube-aws
With kube-aws we can create, upgrade and destroy Kubernetes clusters on AWS from the command line. Kube-aws is also a Kubernetes Incubator project.
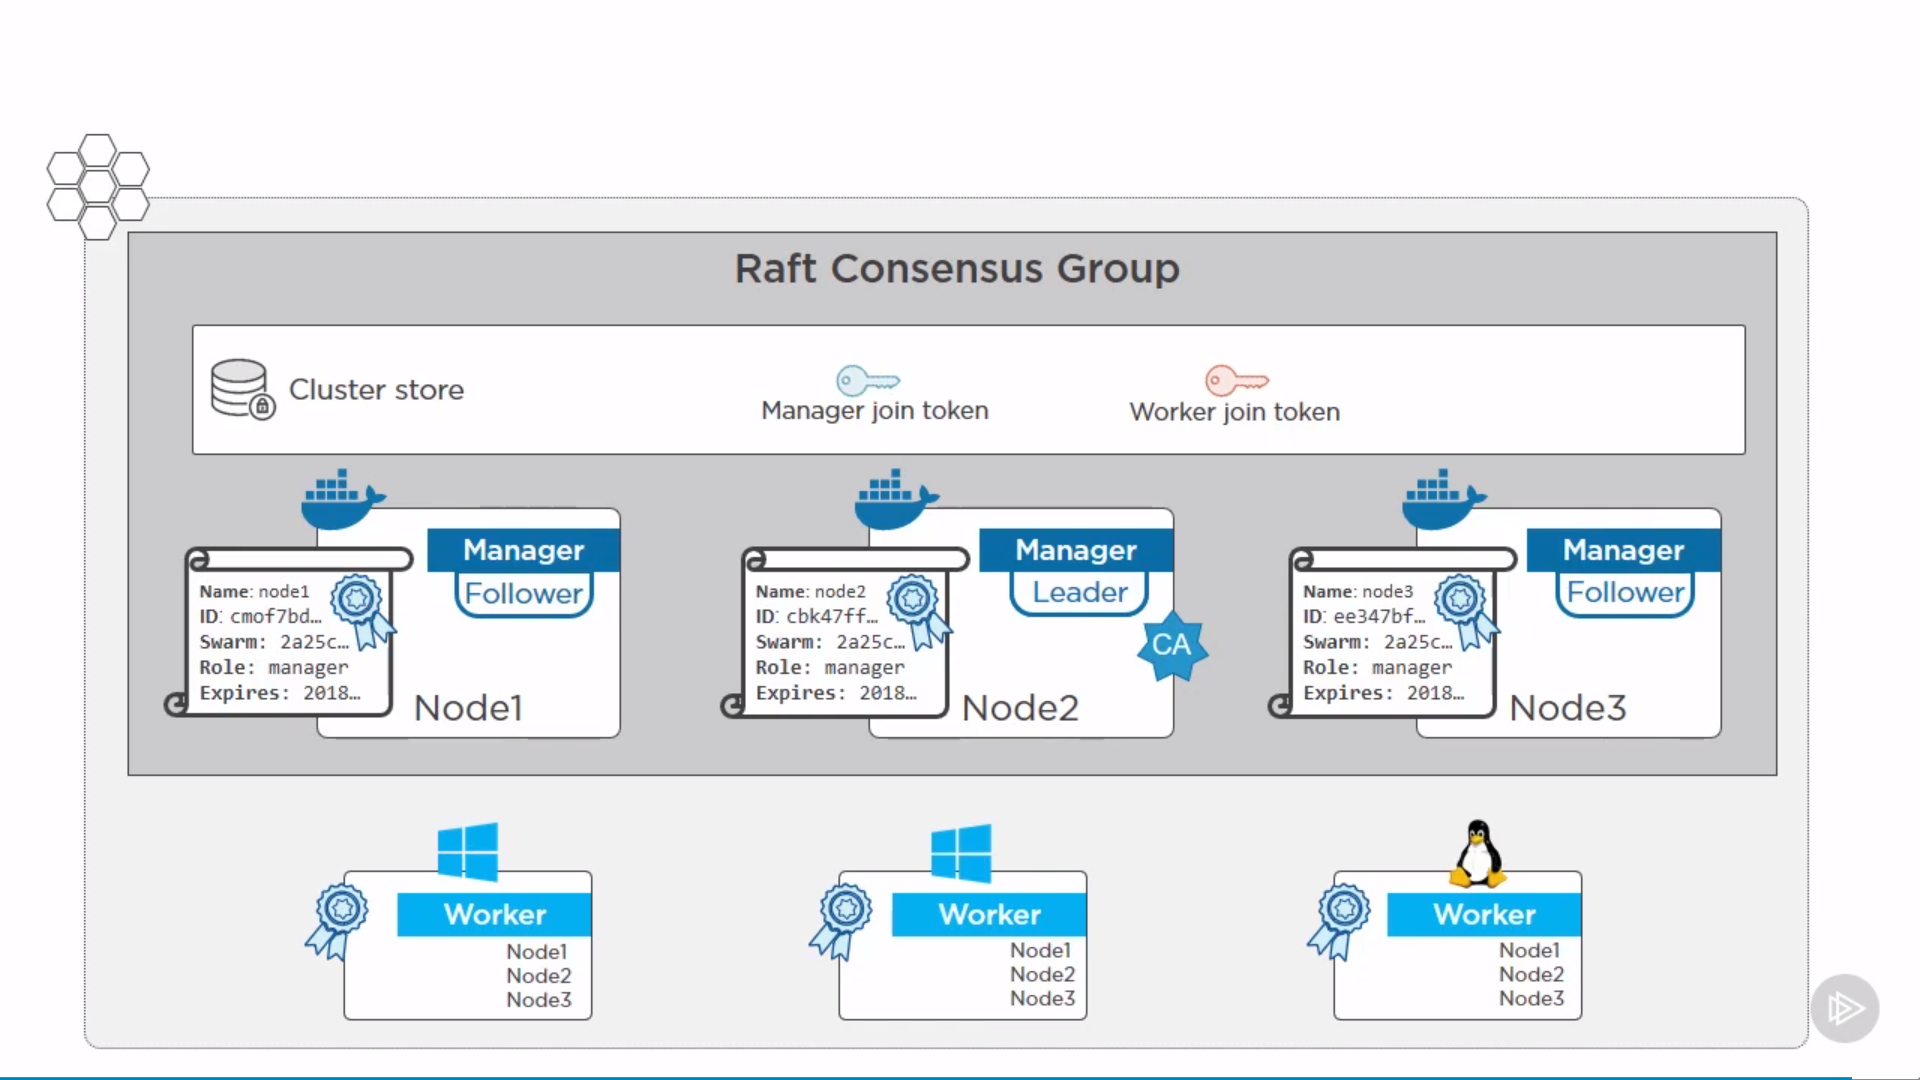
Raft Consensus Algorithm to make sure all the manager nodes in charge of managing and scheduling tasks in the cluster, are storing the same consistent state.
Having the same consistent state across the cluster means that in case of a failure, any Manager node can pick up the tasks and restore the services to a stable state.
Raft tolerates up to (N-1)/2 failures and requires a majority or quorum of (N/2)+1 members to agree on values proposed to the cluster.
validate secrets were created and stored correctly:
1
2
3
4
5
6
7
# Get the username $ kubectl get secret mariadb-user-creds -o jsonpath='{.data.MYSQL_USER}' | base64 --decode - kubeuser
# Get the password $ kubectl get secret mariadb-user-creds -o jsonpath='{.data.MYSQL_PASSWORD}' | base64 --decode - kube-still-rocks
ConfigMap
create a file named max_allowed_packet.cnf:
1 2
[mysqld] max_allowed_packet = 64M
create configmap by:
1 2 3
$ kubectl create configmap mariadb-config --from-file=max_allowed_packet.cnf # could add multiple --from-file=<filename> $ kubectl create configmap mariadb-config --from-file=max-packet=max_allowed_packet.cnf # set max-packet as key rather than the file name configmap/mariadb-config created
the following minimum requirements for Docker UCP 2.2.4 on Linux:
• UCP Manager nodes running DTR: 8GB of RAM with 3GB of disk space
• UCP Worker nodes: 4GB of RAM with 3GB of free disk space
Recommended requirements are:
• UCP Manager nodes running DTR: 8GB RAM, 4 vCPUs, and 100GB disk space
• UCP Worker nodes: 4GB RAM 25-100GB of free disk space
A Swarm backup is a copy of all the files in directory /var/lib/docker/swarm:
Stop Docker on the Swarm manager node you are performing the backup from(not a good idea to perform the backup on the leader manager). This will stop all UCP containers on the node. If UCP is configured for HA, the other managers will make sure the control plane remains available.
1
$ service docker stop
Backup the Swarm config, e.x.:
1 2 3 4 5 6
$ tar -czvf swarm.bkp /var/lib/docker/swarm/ tar: Removing leading `/' from member names /var/lib/docker/swarm/ /var/lib/docker/swarm/docker-state.json /var/lib/docker/swarm/state.json <Snip>
Verify that the backup file exists. rotate, and store the backup file off-site according to your corporate backup policies.
1 2
$ ls -l -rw-r--r-- 1 root root 450727 Jan 29 14:06 swarm.bkp
Restart Docker.
1
$ service docker restart
recover Swarm from a backup:
stop docker:
1
$ service docker stop
Delete any existing Swarm configuration:
1
$ rm -r /var/lib/docker/swarm
Restore the Swarm configuration from backup:
1
$ tar -zxvf swarm.bkp -C /
Initialize a new Swarm cluster:
1 2
$ docker swarm init --force-new-cluster Swarm initialized: current node (jhsg...3l9h) is now a manager.
check by:
1 2
$ docker network ls $ docker service ls
Add new manager and worker nodes to the Swarm, and take a fresh backup.
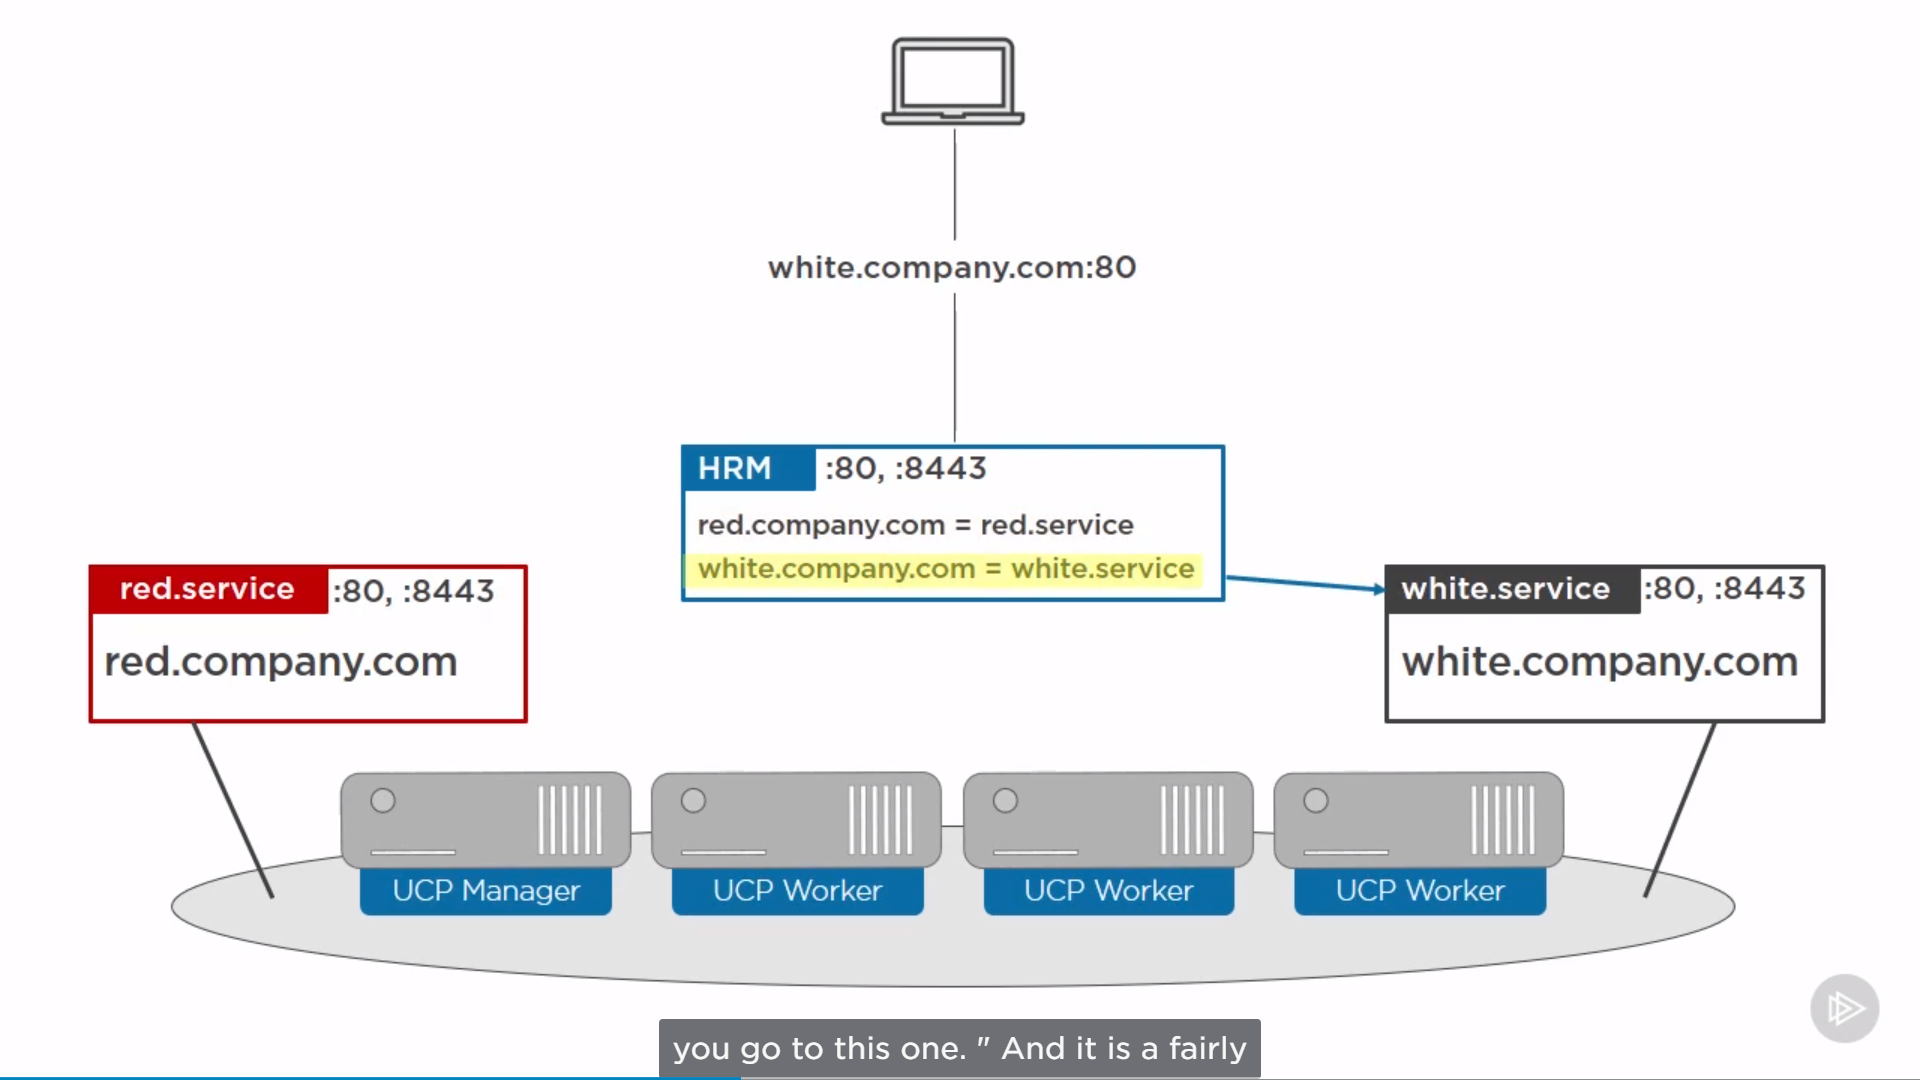
If possible, you should run your DTR instances on dedicated nodes. You definitely
shouldn’t run user workloads on your production DTR nodes.
As with UCP, you should run an odd number of DTR instances. 3 or 5 is best for fault
tolerance. A recommended configuration for a production environment might be:
3 dedicated UCP managers
3 dedicated DTR instances
However many worker nodes your application requirements demand
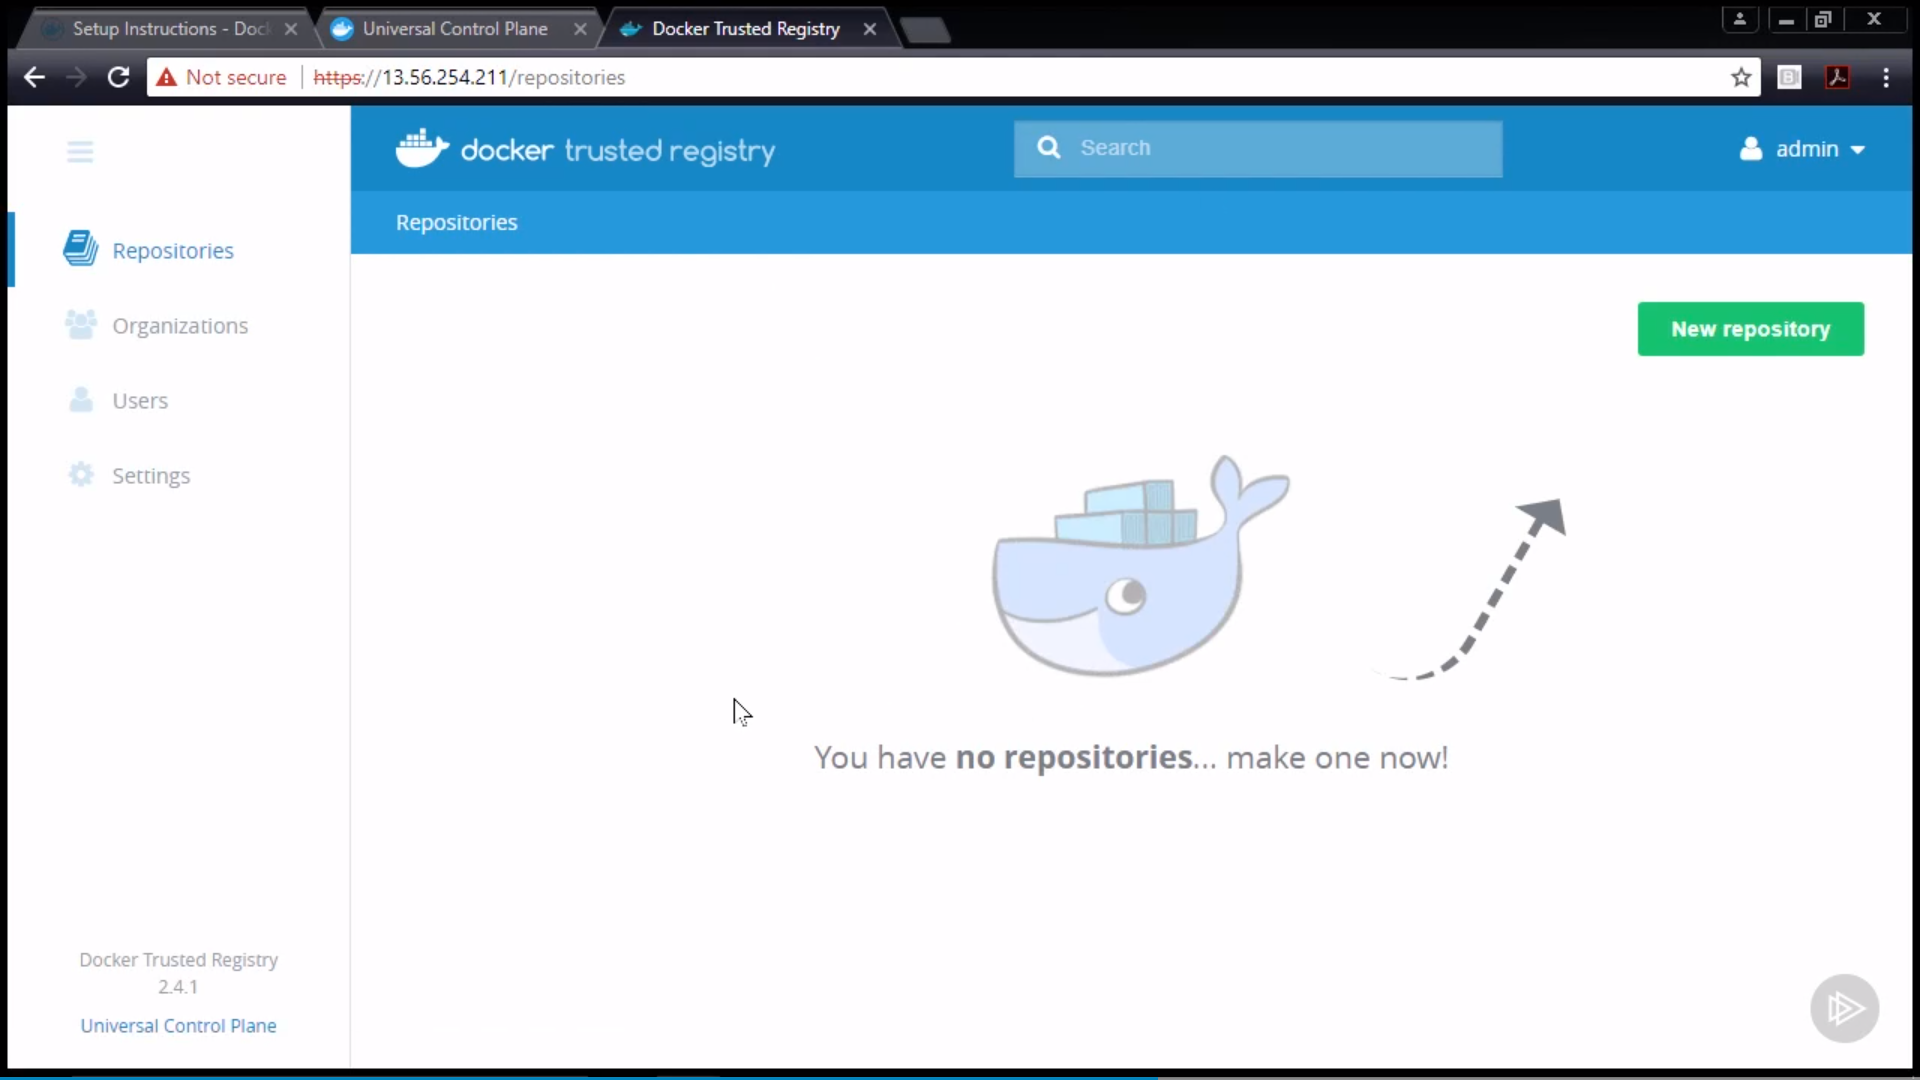
Install DTR:
Log on to the UCP web UI and click Admin > Admin Settings > Docker
Trusted Registry.
Fill out the DTR configuration form.
DTR EXTERNAL URL: Set this to the URL of your external load balancer.
UCP NODE: Select the name of the node you wish to install DTR on.
Disable TLS Verification For UCP: Check this box if you’re using
self-signed certificates.
Copy the long command at the bottom of the form.
Paste the command into any UCP manager node.
The command includes the --ucp-node flag telling UCP which node to
perform the install on.
The following is an example DTR install command that matches the configuration
in Figure 16.10. It assumes that you already have a load balancer
configured at dtr.mydns.com
Enter the UCP URL and port, as well as admin credentials when prompted.
Describe and demonstrate how to configure backups for UCP and DTR
You can run the backup from any UCP manager node in the cluster, and you only
need to run the operation on one node (UCP replicates its configuration to all
manager nodes, so backing up from multiple nodes is not required).
Backing up UCP will stop all UCP containers on the manager that you’re executing
the operation on. With this in mind, you should be running a highly available UCP
cluster, and you should run the operation at a quiet time for the business.
Log on to the UCP web UI and ensure that the user created earlier is still present
(or any other UCP objects that previously existed in your environment).
Backup DTR:
As with UCP, DTR has a native backup command that is part of the Docker image
that was used to install the DTR. This native backup command will backup the DTR
configuration that is stored in a set of named volumes, and includes:
DTR configuration
Repository metadata
Notary data
Certificates
Images are not backed up as part of a native DTR backup. It is expected that
images are stored in a highly available storage backend that has its own independent
backup schedule using non-Docker tools.
Run the following command from a UCP manager node to perform a DTR backup:
Restoring DTR from backups should be a last resort, and only attempted when the
majority of replicas are down and the cluster cannot be recovered any other way.
If you have lost a single replica and the majority are still up, you should add a new
replica using the dtr join command.
restore from backup, the workflow is like this:
Stop and delete DTR on the node (might already be stopped)
1 2 3
$ docker run -it --rm \ docker/dtr:2.4.1 destroy \ --ucp-insecure-tls
Restore images to the shared storage backend (might not be required)
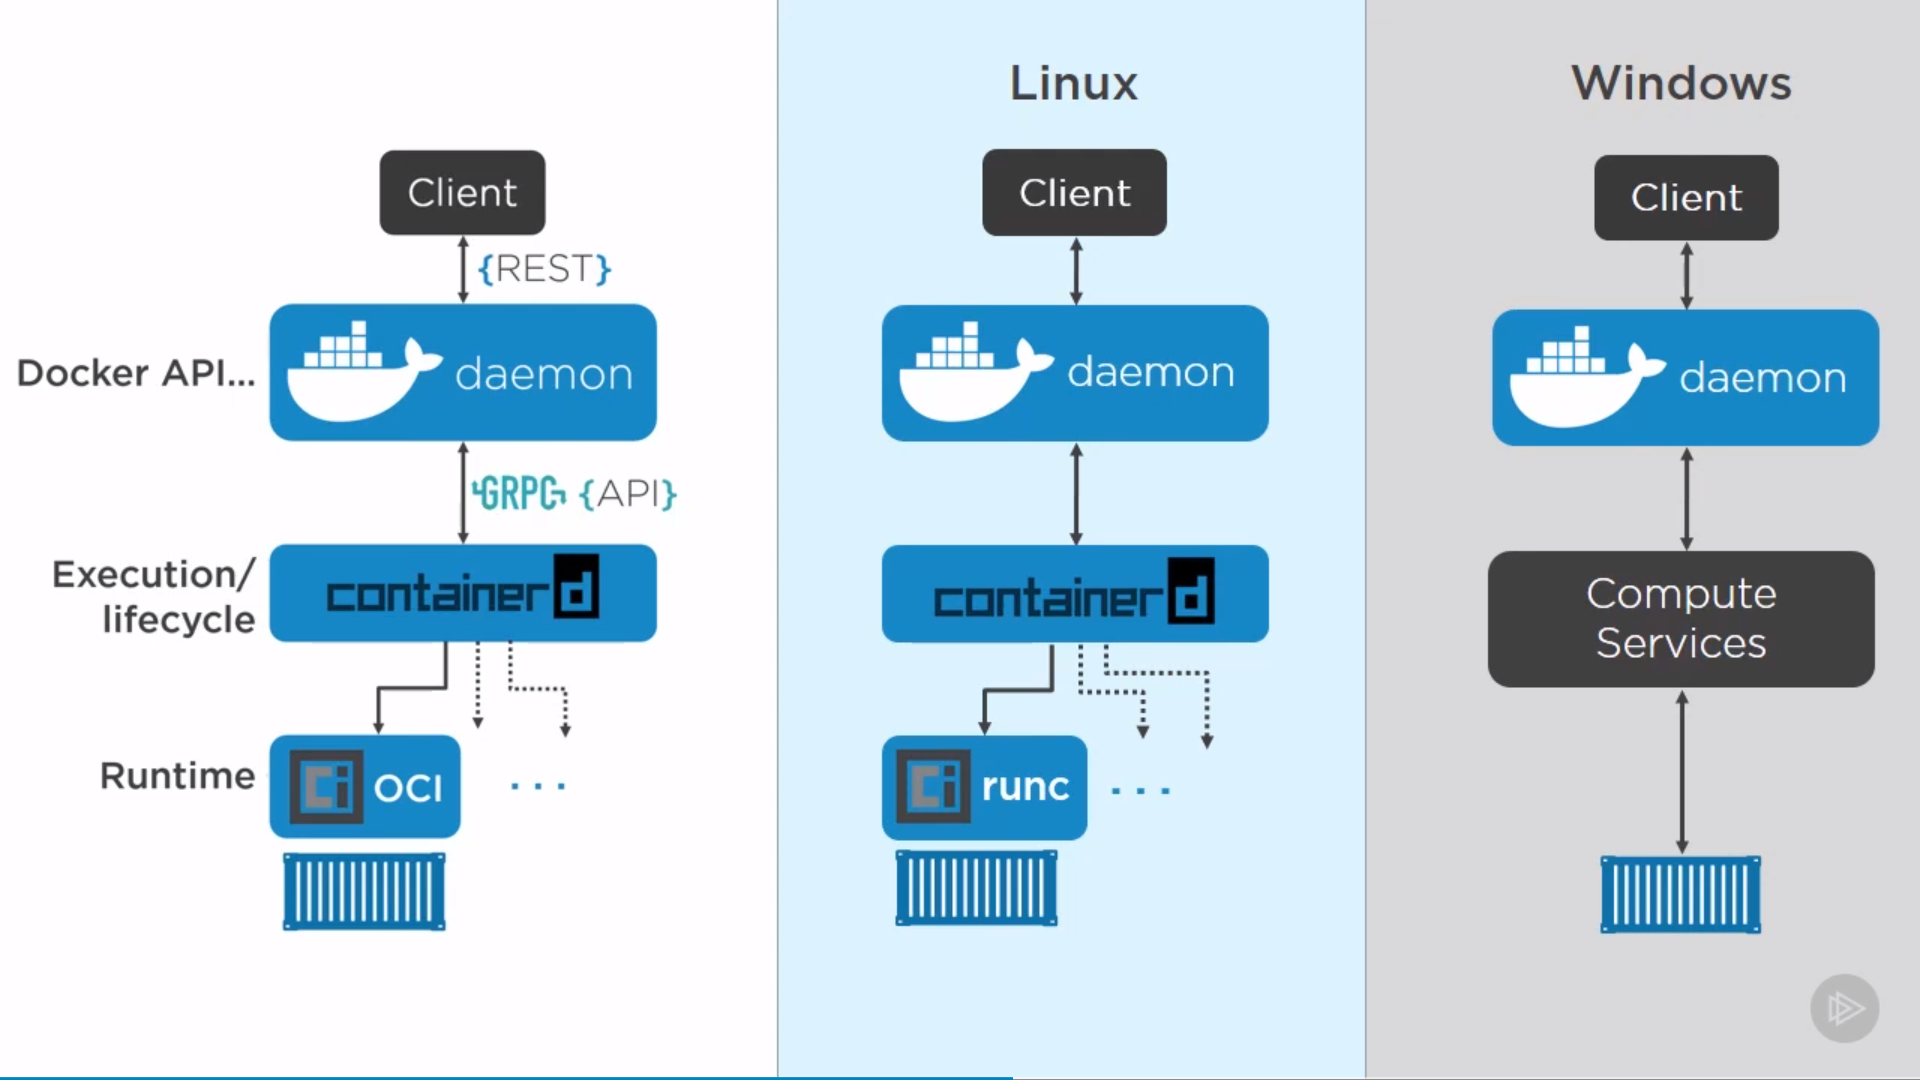
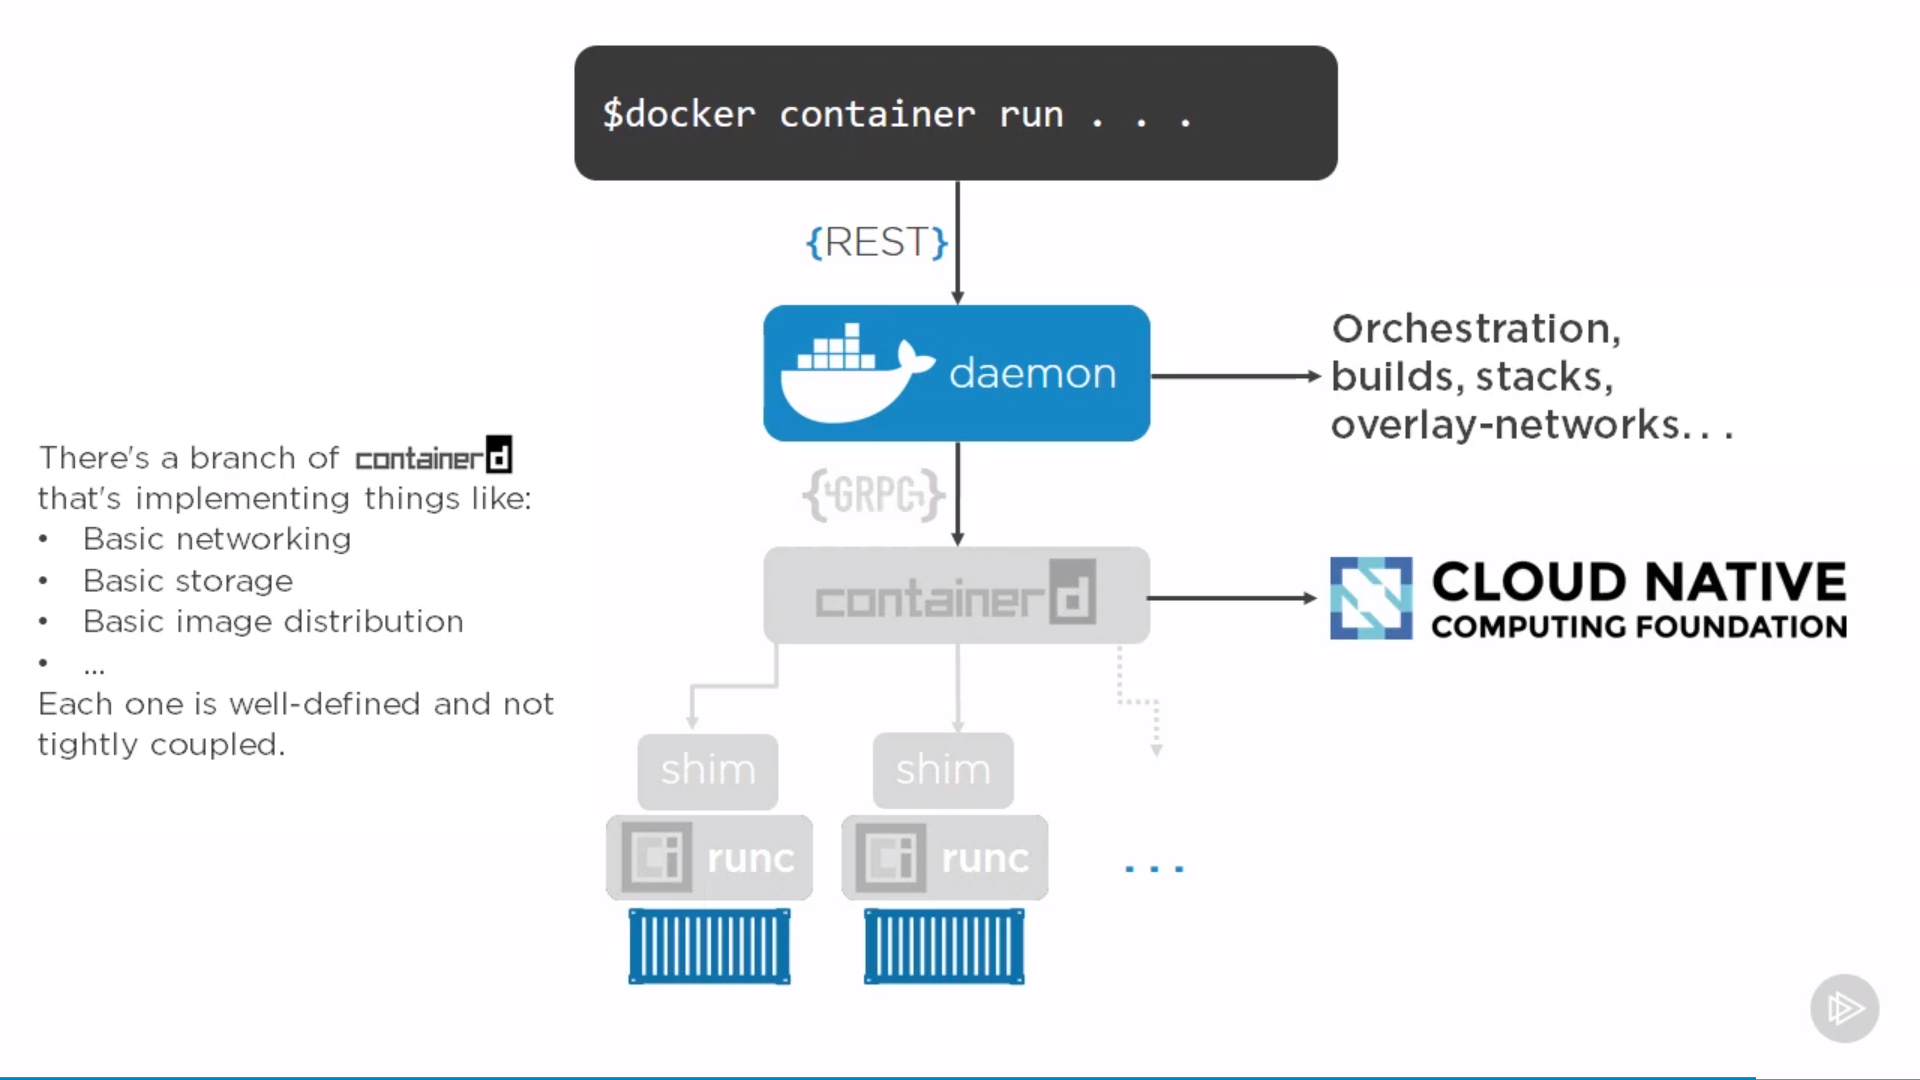
“Daemon” can restart without affecting on containers, which means upgrading doesn’t kill containers, same for “containerd”. Can restart them, leaving all containers running, when come back, they re-discover running containers and reconnect to the shim.
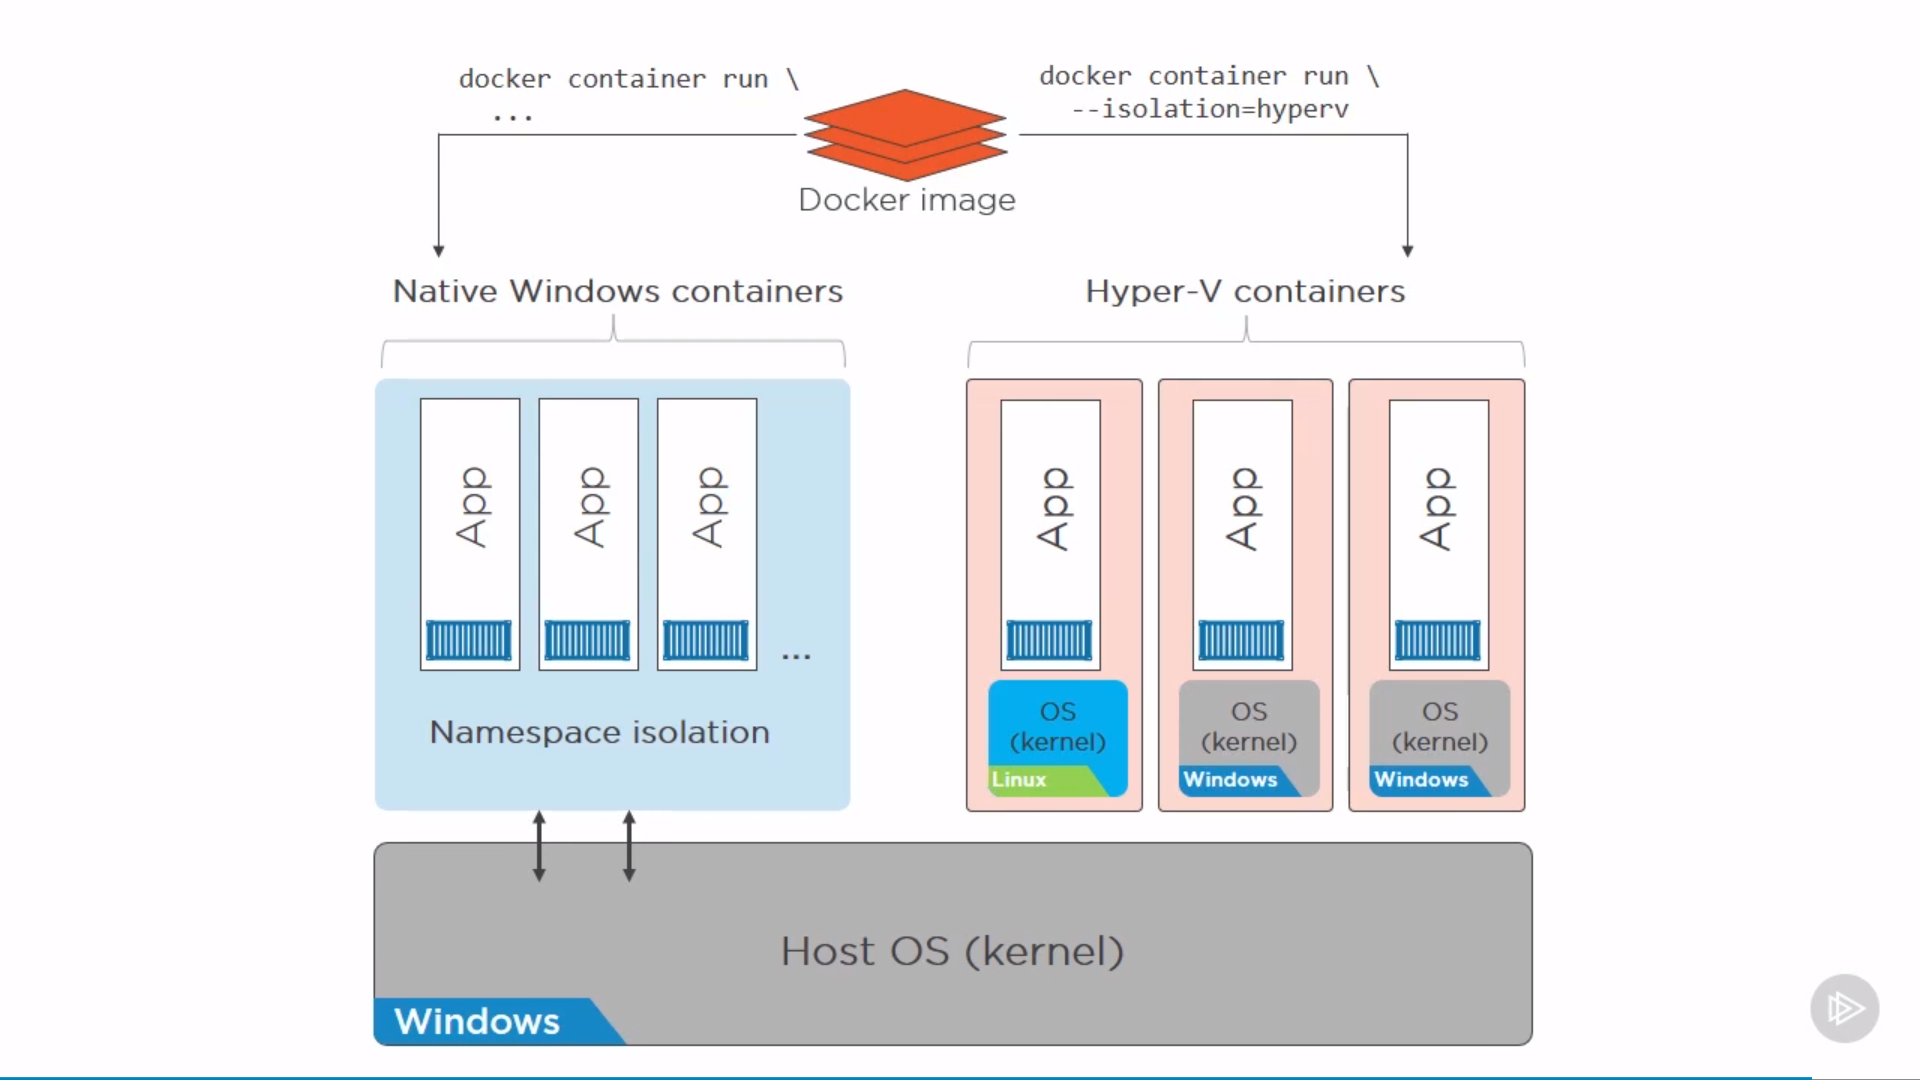
Docker on Windows: Native and Hyper-V
only low level difference, APIs for users are the same.
The idea is by VM isolation of Hyper-V(lightweight VM) might be better or more secure than Namespaces. Also, can run different OS in VM.
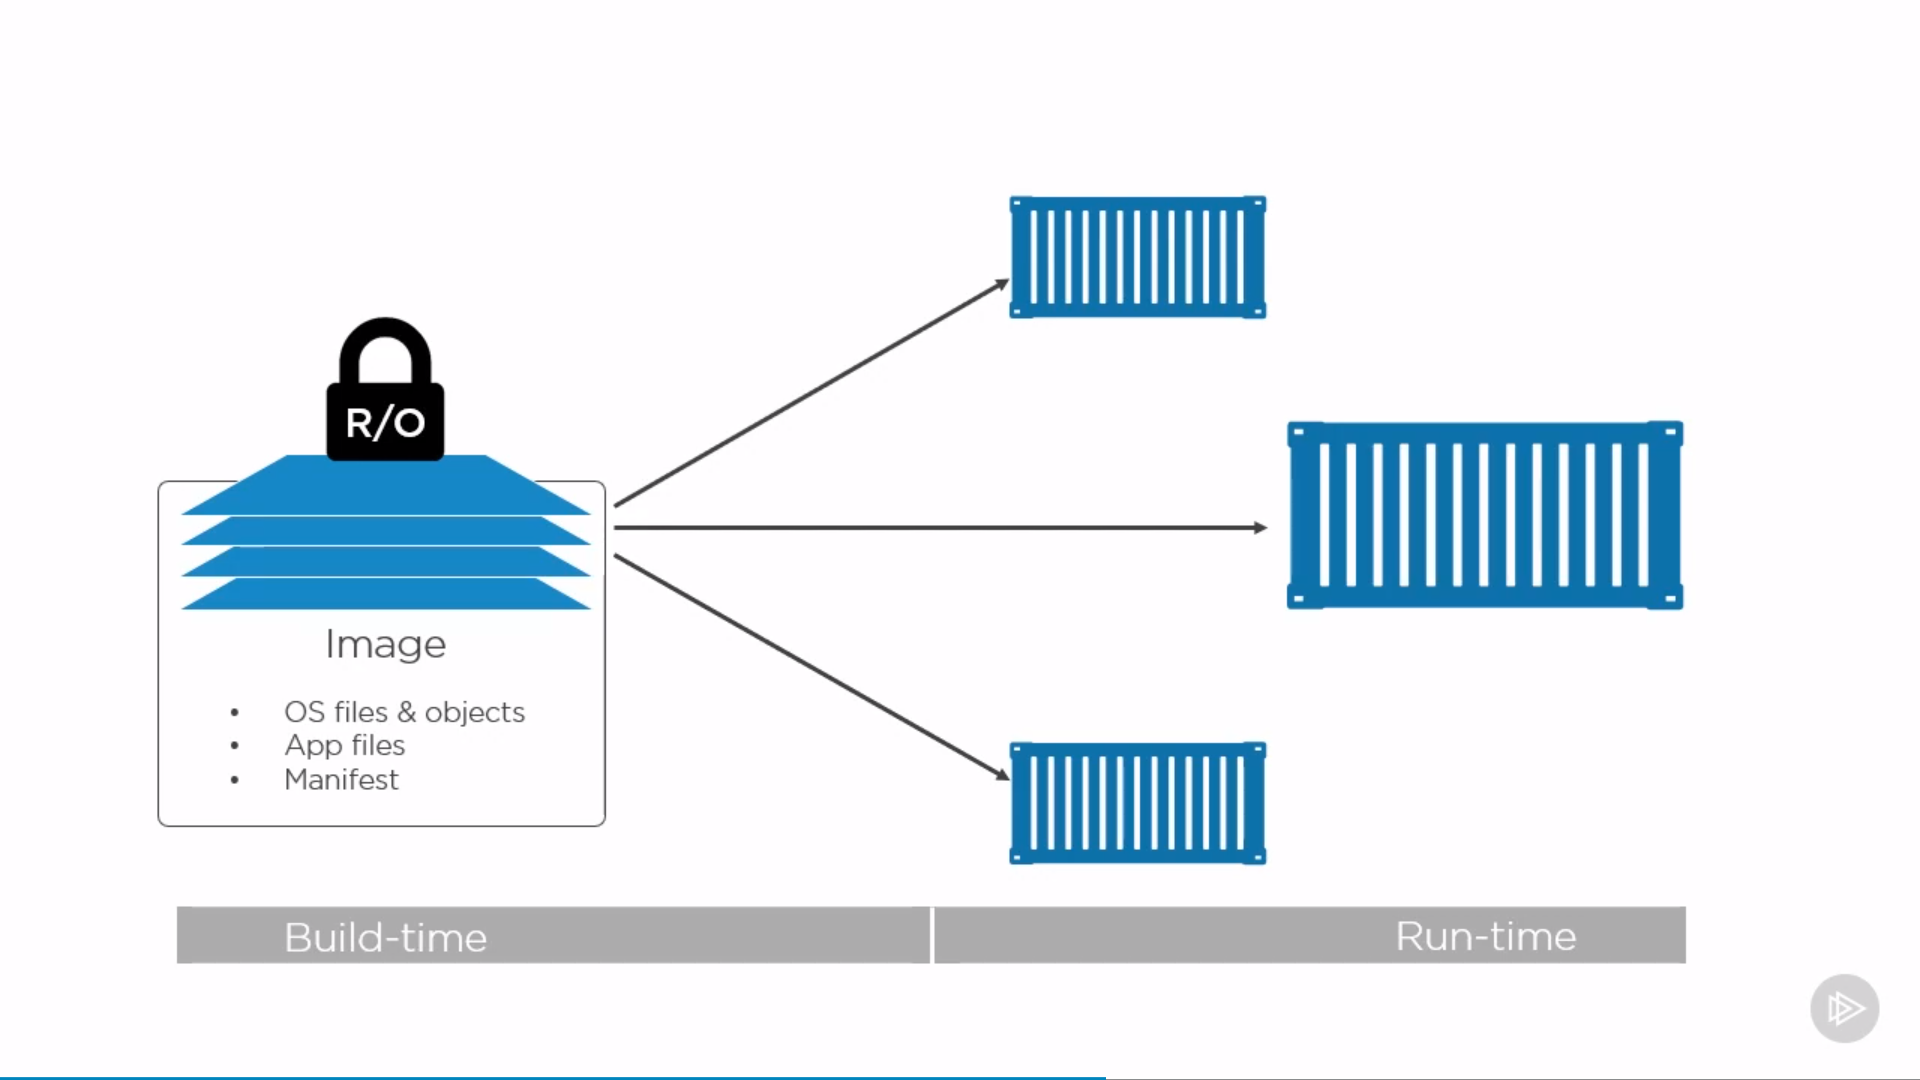
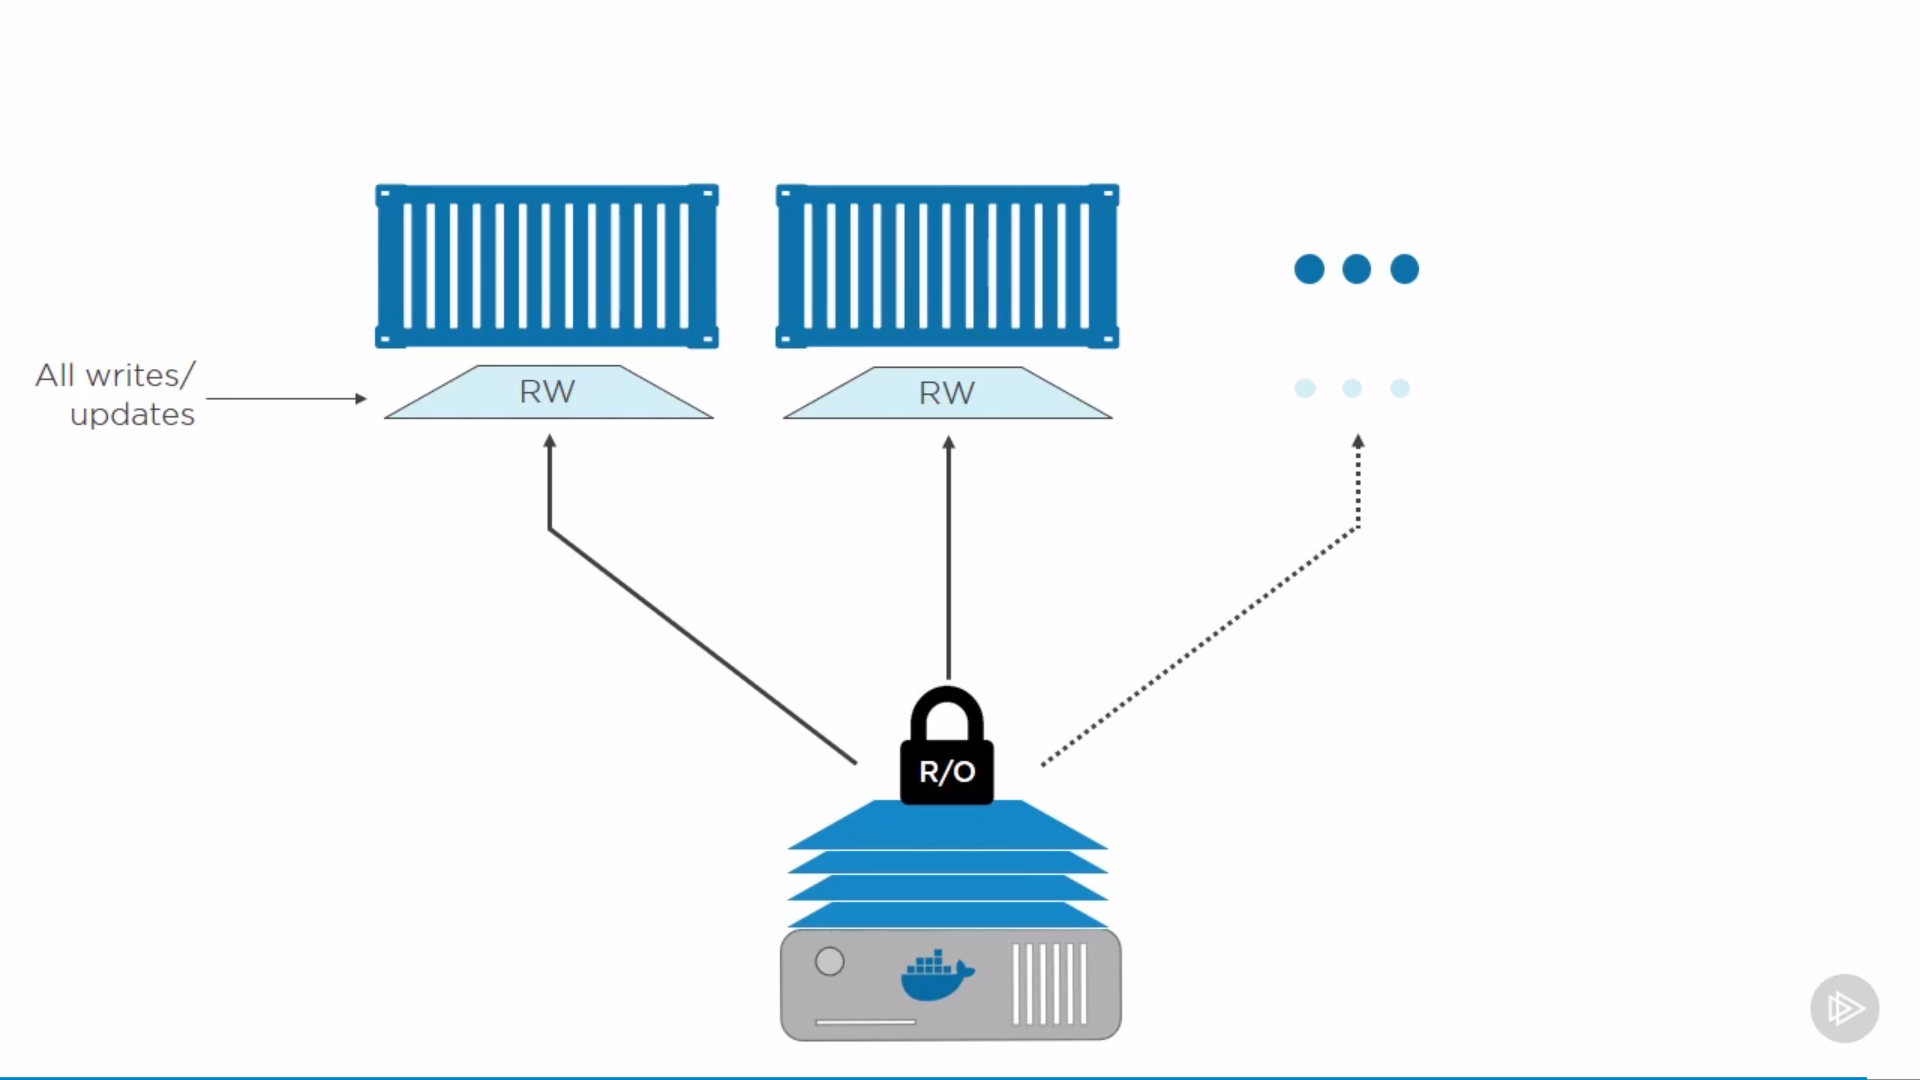
Docker Images
Image is read-only template for creating application containers. Independent layer loosely connected by a manifest file(config file).
Every container can also write by copying read-only layer(files in it) to its writable layer, and do changes there.
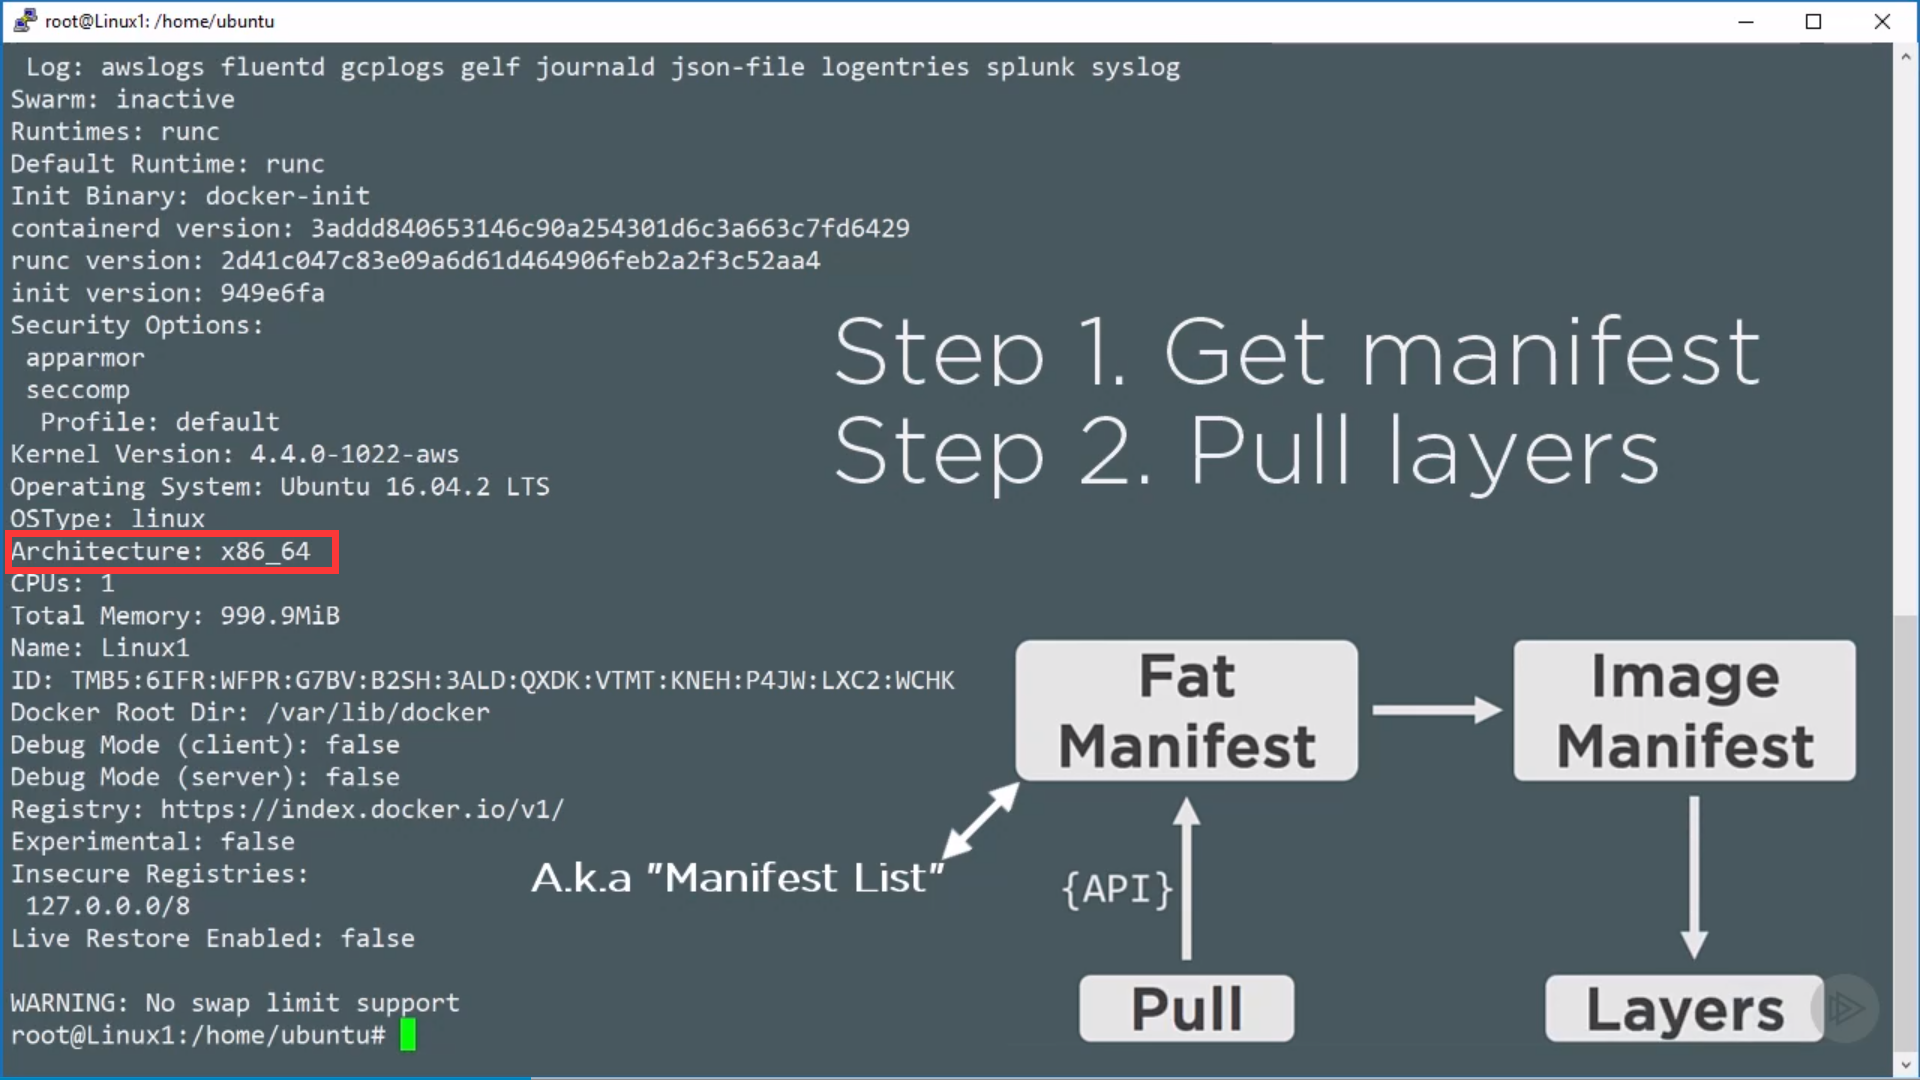
Fat manifest is specified by OS architecture, to get image manifest:
Referencing by hash to avoid mismatch between the image asking for and the image got.
Using overlay2 as storage driver, those layers are stored at /var/lib/docker/overlay2. To see layers, run:
1
$ sudols -l /var/lib/docker/overlay2
to get content of layer, run:
1
$ sudols -l /var/lib/docker/overlay2/<sha256>
Layer structure, e.x.:
Base layer (OS files and objects)
App codes
Updates …
-> a single unified file system.
Check images
1 2 3 4 5 6 7
$ docker image ls / $ docker images $ docker image ls --digests # get sha256 $ docker image ls --filter dangling=true# get <none>:<none> $ docker image ls --filter=reference="*:latest" $ docker image ls --format "{{.Size}}" $ docker image ls --format "{{.Repository}}: {{.Tag}}: {{.Size}}" $ docker image ls --format "{{json .}}"# print in json format
to see operation history of one image, run:
1
$ docker history redis
every non-zero size creates a new layer, the rests add something to image’s json config file.
to get configs and layers of one image, run:
1
$ docker image inspect redis
Delete images
1 2 3 4
$ docker image rm redis $ docker rmi alpine $ docker image prune # delete all dangle images $ docker image prune -a # delete all unused images, not used by any container
Registries
Images live in registries. When docker image pull <some-image>, defaultly pulling from Docker Hub.
Official images live in the top level of Docker Hub namespaces, e.x. docker.io/redis, docker.io/nginx. Can ignore registry name “docker.io/” by default, then do repo name “redis”, then do tag name “latest”, which is an image actually. So the full version is `docker image pull docker.io/redis:4.0.1
Unofficial ones, e.x. nigelpoulton/tu-demo
To pull all tags of images from repo, run
1
$ docker image pull <some-image> -a
Content hashes for host, compressed hashes(distribution hashes) for wire, to verify. UIDs used for storing layers are random.
run sha256 on content of layer -> layer’s hash as ID;
run sha256 on image config file -> image’s hash as ID.
Containerizing
Dockerfile
Dockerfile is list of instructions for building images with an app inside(document the app).
Good practice: put Dockerfile in root folder of app.
Good practice: LABEL maintainer="xxx@gmail.com"
notes:
CAPITALIZE instructions
<INSTRUCTION> <value>, e.x. FROM alpine
FROM always first instruction, as base image
RUN execute command and create layer
COPY copy code into image as new layer
instructions like WORKDIR are adding metadata instead of layers
ENTRYPOINT default app for image/container, metadata
CMD run-time arguments override CMD instructions, append to ENTRYPOINT
e.x.:
1 2 3 4 5 6 7 8 9 10 11 12 13 14 15
FROM alpine
LABEL maintainer="xyshell@bu.edu"
RUN apk add --update nodejs nodejs-npm
COPY . /src
WORKDIR /src
RUN npm install
EXPOSE8080
ENTRYPOINT ["node", "./app.js"] # relative to WORKDIR
FROM golang:1.7.3 AS builder WORKDIR /go/src/github.com/alexellis/href-counter/ RUN go get -d -v golang.org/x/net/html COPY app.go . RUN CGO_ENABLED=0 GOOS=linux go build -a -installsuffix cgo -o app .
FROM alpine:latest RUN apk --no-cache add ca-certificates WORKDIR /root/ COPY --from=builder /go/src/github.com/alexellis/href-counter/app . CMD ["./app"]
exiting by exit kills the process, if it’s the only one, container exits. However, ctrl+P+Q gets out of container without terminating its main process (can docker attach to it).
Remove containers
1 2
$ docker container rm <container> $ docker container rm $(docker container ls -aq) -f # remove all containers, force
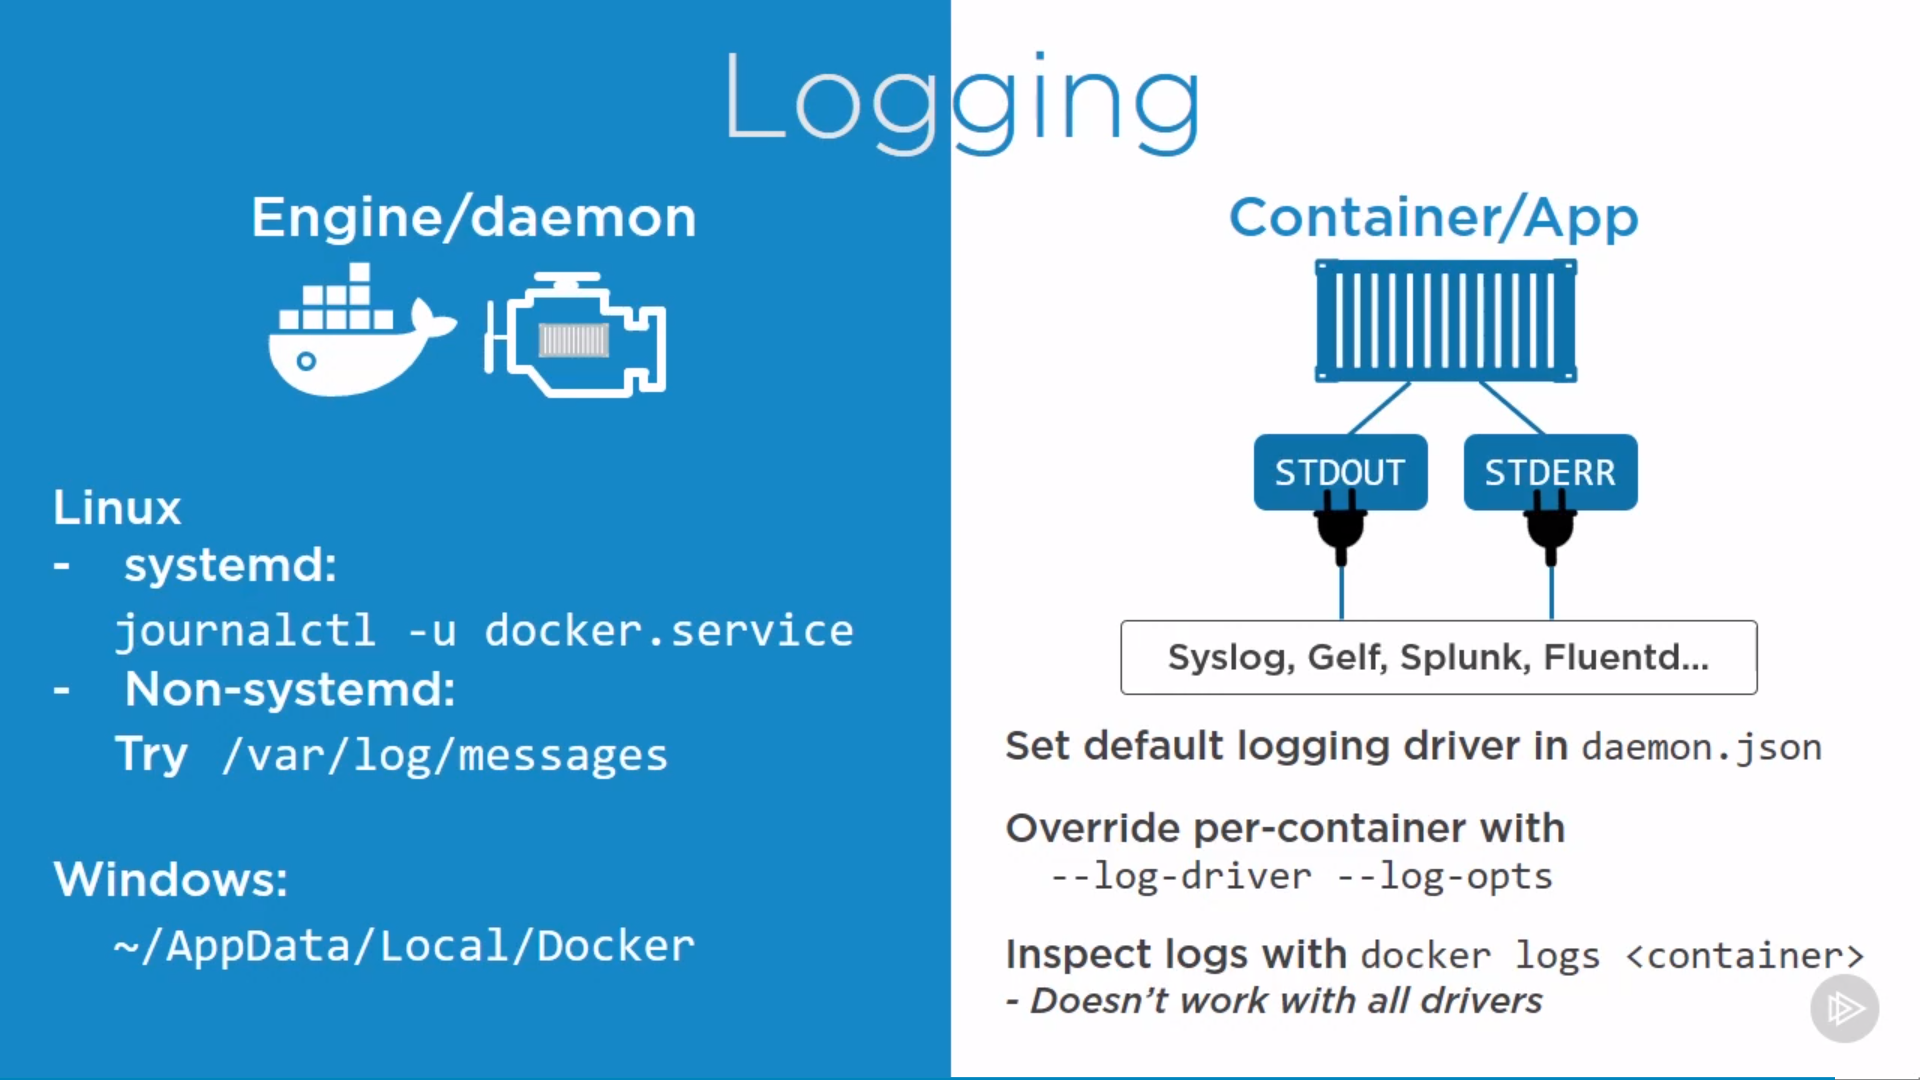
Log
Engine/daemon logs and Container/App logs
1
$ docker logs <container>
Swarm and Services
Swarm
swarm is a secure cluster of docker nodes, including “secure cluster” and “orchestrator”
can do native swarm work and kubernetes on swarm cluster
single-engine mode: install individual docker instances VS swarm mode: working on a cluster of docker instances.
then node labels used a placement constraint when creating service.
Orchestration intro
Services
There are two types of service deployments, replicated and global:
For a replicated service, you specify the number of identical tasks you want to run. For example, you decide to deploy an HTTP service with three replicas, each serving the same content.
A global service is a service that runs one task on every node. There is no pre-specified number of tasks. Each time you add a node to the swarm, the orchestrator creates a task and the scheduler assigns the task to the new node. Good candidates for global services are monitoring agents, an anti-virus scanners or other types of containers that you want to run on every node in the swarm.
Create service
1 2
$ docker service create --replicas 5 <service> # default replicated mode $ docker service create --mode global <service> # global mode
Check status
1 2 3 4 5 6
$ docker service ls# list all services $ docker service ps <service> # list all tasks $ docker service inspect <service> --pretty # details $ docker service inspect <service> | jq -r '.[].CreatedAt' $ docker service ps <service> --format "{{json .}}" --filter "desired-state=running" | jq -r .ID $ docker inspect <task> | jq -r '.[].Status.ContainerStatus.ContainerID'
Remove services
1
$ docker service rm $(docker service ls -q) # remove all services
check by docker service ls, check which nodes are running the service by docker service ps <service>, more details run docker service inspect <service>
switch to one node which runs this service and run docker network inspect <network-name>
check docker service ls to confirm (also check docker container ls), can locate other service in same overlay network by name, e.x.:
1 2 3
$ docker container exec -it <container> sh $ ping pong # sucesss $ ping -c 2 pong # -c 2: only two ping attempts.
Load Balancing
1 2 3 4 5 6 7
$ docker service create -d --name web --network overnet --replicas 1 -p 8080:80 nginx $ docker service inspect web --pretty Ports: PublishedPort = 8080 # Protocol = tcp TargetPort = 80 # PublishMode = ingress # default mode
ingress mode: publish a port on every node in the swarm — even nodes not running service replicas. then can access by any node in the network by port 8080.
The alternative mode is host mode which only publishes the service on swarm nodes running replicas. by adding mode=host to the --publish output, using --mode global instead of --replicas=5, since only one service task can bind a given port on a given node.
Volumes
running a new container automatically gets its own non-persistent, ephemeral graph driver storage (copy-on-write union mount, /var/lib/docker). However, volume is to store persistent data, entirely decoupled from containers, seamlessly plugs into containers.
a directory on the docker(also remote hosts or cloud providers by volume drivers), mounted into container at a specific mount point.
can exist not only on local storage of docker host, but also on high-end external systems like SAN and NAS. Pluggable by docker store drive.
Create Volumes
1
$ docker volume create <volume>
Check status
1 2
$ docker volume ls $ docker volume inspect <volume>
1 2 3 4 5 6 7 8 9 10 11
[ { "CreatedAt":"2020-06-10T16:29:30Z", "Driver":"local",// default "Labels":{}, "Mountpoint":"/var/lib/docker/volumes/myvol/_data",// inspect by ls -l /var/lib/docker/volumes/ "Name":"myvol", "Options":{}, "Scope":"local"// } ]
Delete volume
to delete a specific volume:
1
$ docker volume rm <volume>
rm an in-use volume causes error message.
to delete all unused volumes:
1
$ docker volume prune # delete unused volume
Attach volume
to attach volume to a container, either by --mount or -v:
1 2
$ docker run -d --name <container> --mount source=<volume>,target=/vol <image> $ docker run -d --name <container> -v <volume>:/vol <image>
note:
source=<volume>: if volume doesn’t exist for now, will be created.
target=/vol: where in the container to mount it, check by exec into container and ls -l /vol/
if the container has files or directories in the directory to be mounted, the directory’s contents are copied into the volume.
Then, container can write data to /vol (e.x. echo "some data" > /vol/newfile), accessible in /var/lib/docker/volumes/ as well, even if the container is removed.
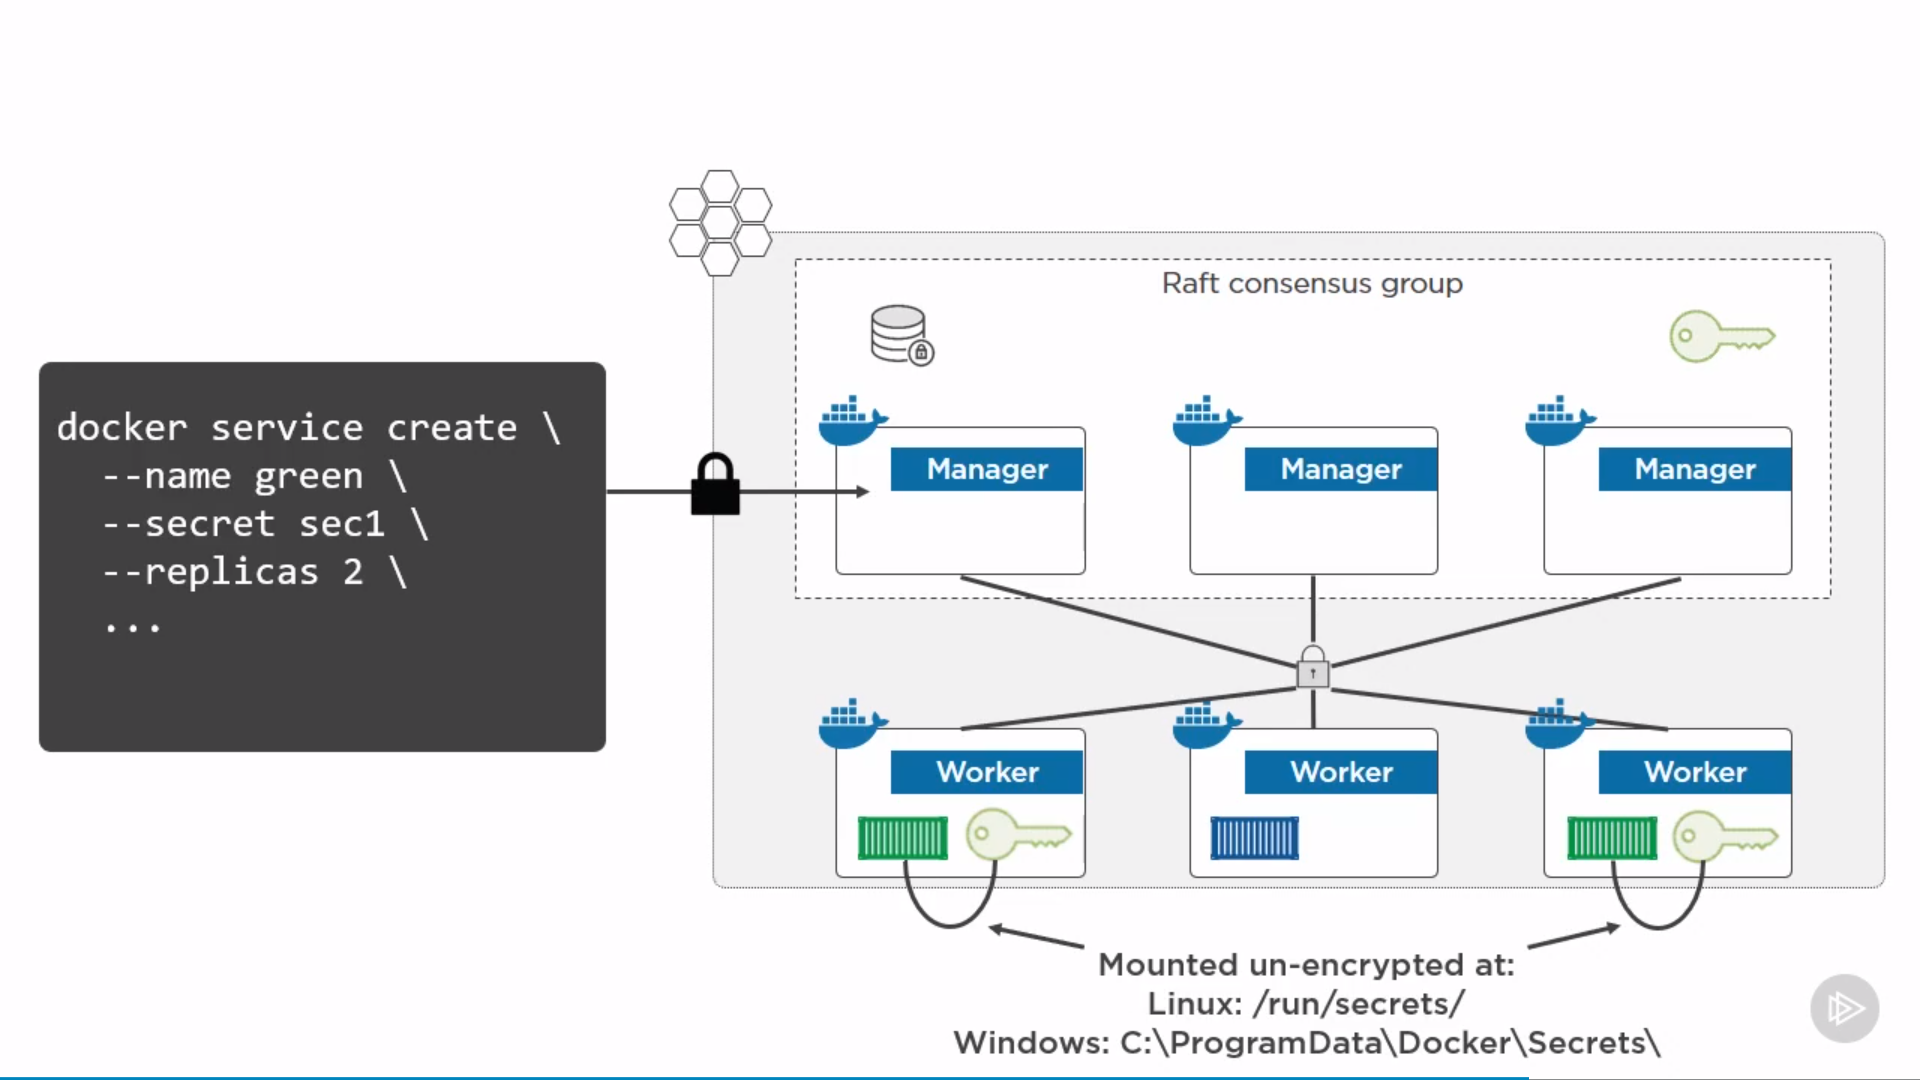
inpect by docker service inspect <service> and look at secrets section. exec into containers by docker container exec -it <container> sh, find secret by ls -l /run/secrets, accessible
can’t delete an in-use secret by docker secret rm <secret>, need to delete service first.
Docker Compose and Stack
Docker compose
Install on linux
Download the current stable release of Docker Compose:
version:"3.5"# mandatory services:# application services web-fe:# create a web front-end container called web-fe build:.# build a new image by Dockerfile in '.' to create container for web-fe command:pythonapp.py# Override CMD in Dockerfile, which has Python and app.py ports: -target:5000# container port published:5000# host port networks: -counter-net# already exist or to be defined volumes: -type:volume source:counter-vol# already exist or to be defined target:/code# mount to container redis:# create an in-memory database container called redis image:"redis:alpine"# pulled from Docker Hub. networks: counter-net:
networks:# create new networks, bridge by default counter-net:
$ docker-compose up # docker-compose.yml in current folder $ docker-compose up & # ctrl+c doesn't kill container $ docker-compose up -d # run in daemon $ docker-compose -f prod-equus-bass.yml up # -f flag
check the current state of the app by docker-compose ps.
list the processes running inside of each
service (container) by docker-compose top.
Stop, Restart and Delete App
stop without deleting:
1
$ docker-compose stop
could restart by:
1
$ docker-compose restart
If changed app after stopping, these changes won’t apply in restarted app. Need to re-deploy.
delete a stopped Compose app and networks:
1
$ docker-compose rm
stop and delete containers and networks by:
1
$ docker-compose down
Stack
swarm only
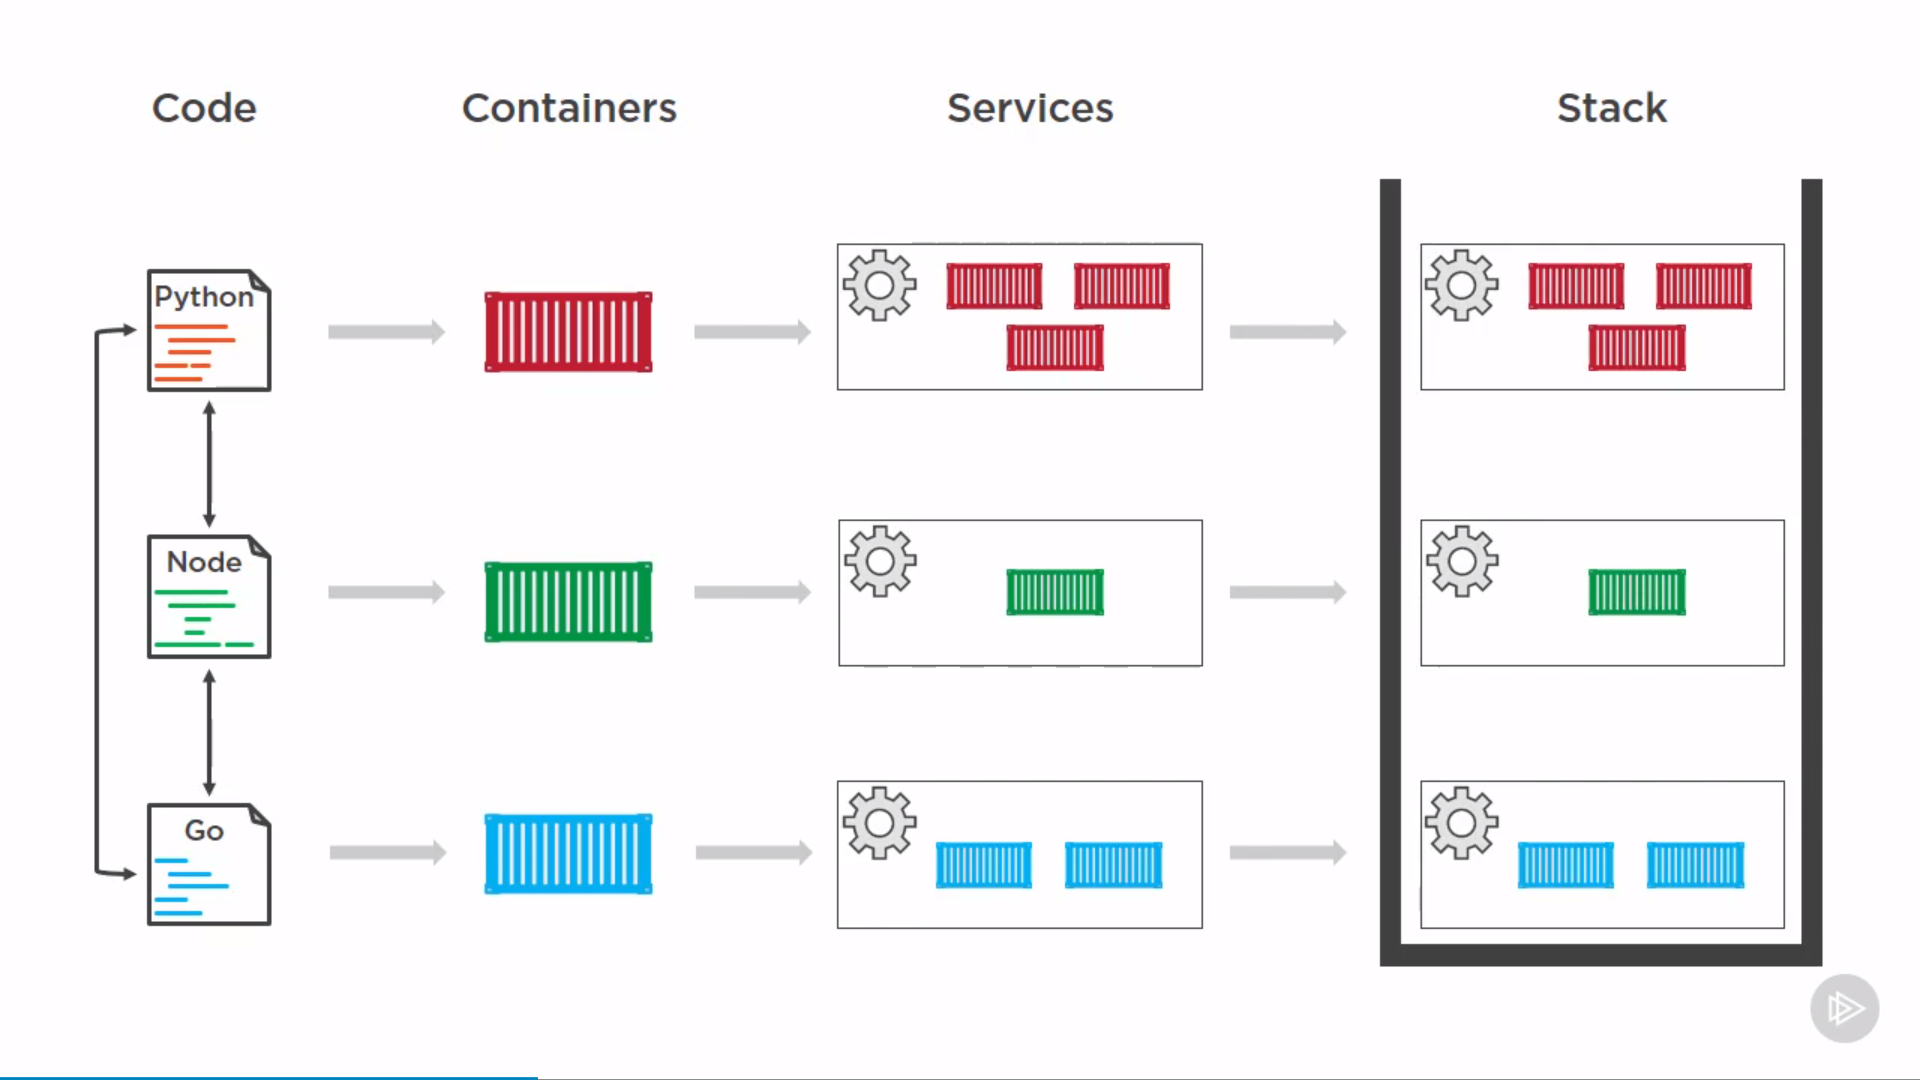
stacks manage a bunch of services as a single app, highest layer of docker application hierarchy.
can run on Docker CLI, Docker UCP, Docker Cloud.
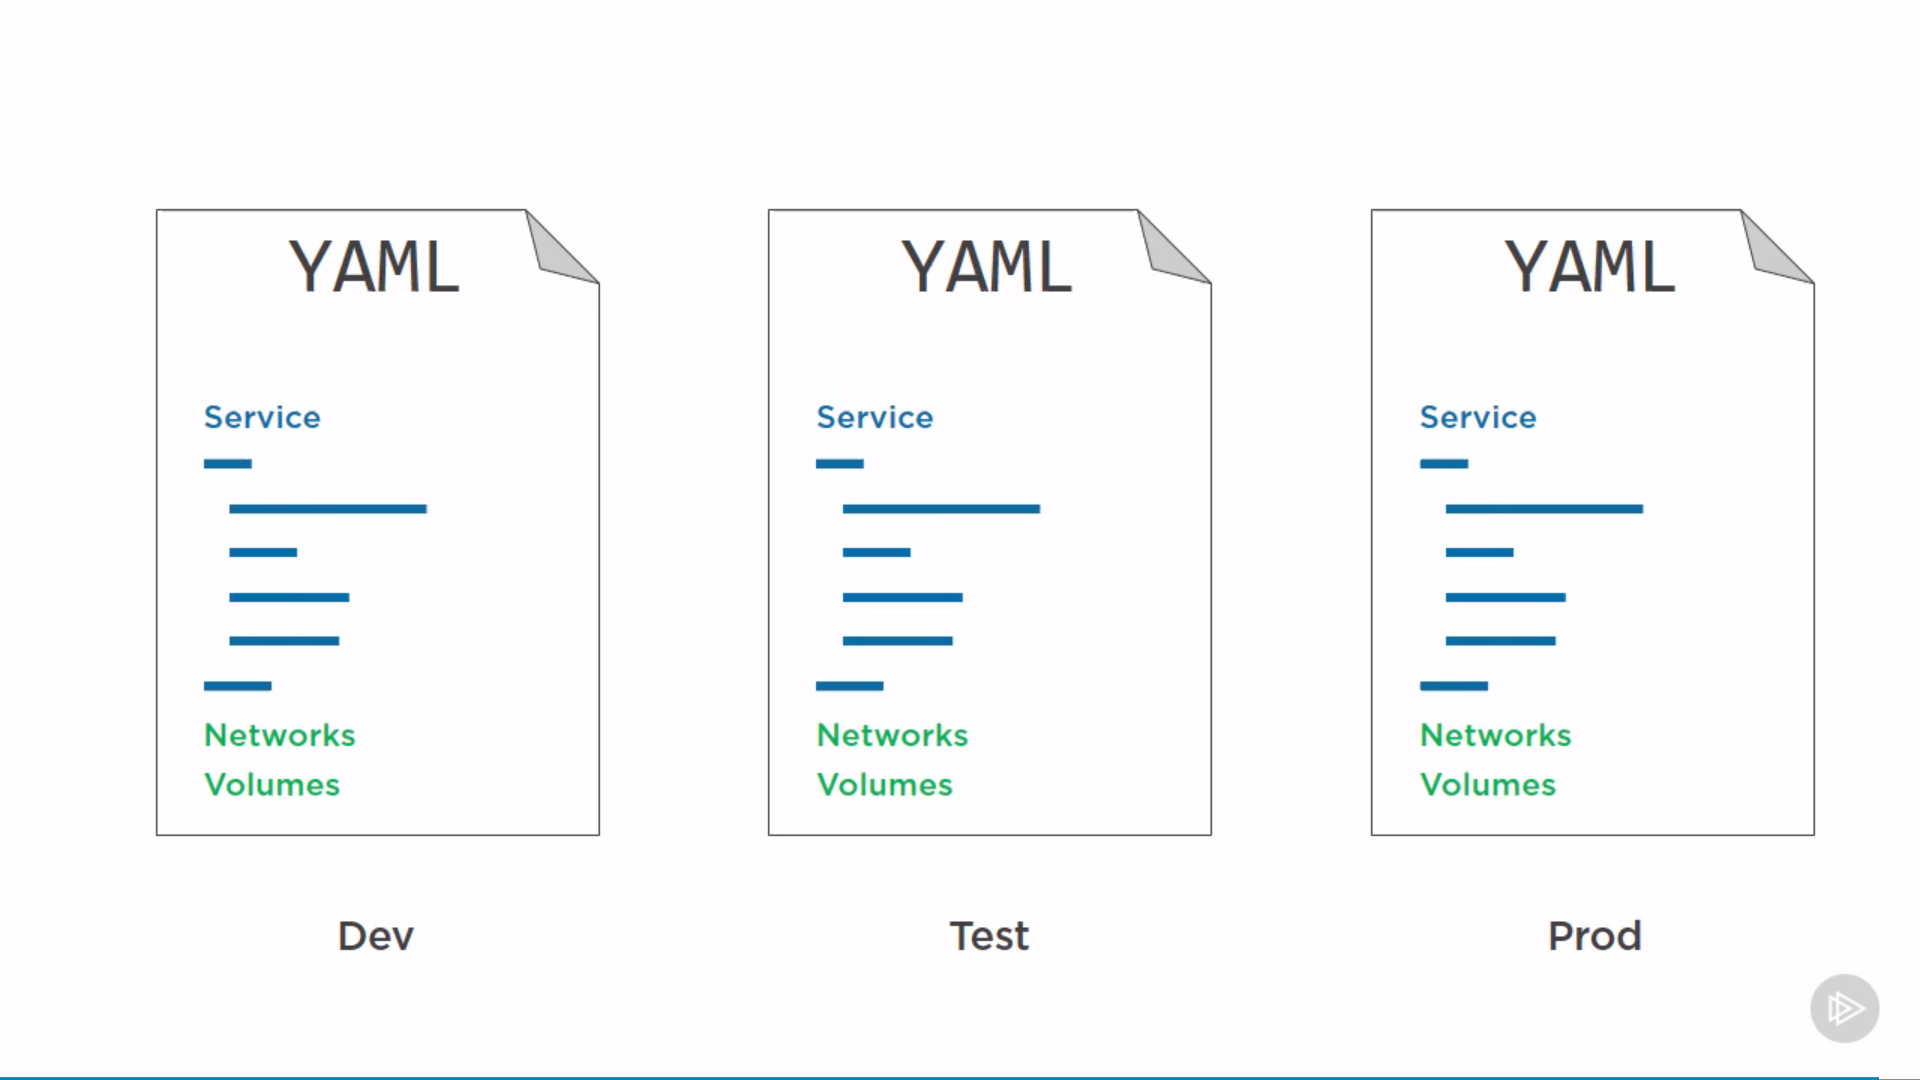
docker-stack.yml: YAML config file including version, services, network, volumes, documenting the app. Can do version control.
update_config: parallelism:2# update two replicas at-atime failure_action:rollback# [pause, continue, rollback]
services.<service>.deploy.restart-policy:
1 2 3 4 5
restart_policy: condition:on-failure# non-zero exit code delay:5s# between each of the restart attempts max_attempts:3 window:120s# wait up to 120 seconds to decide if the restart worked
services.<service>.stop_grace_period:
1
stop_grace_period:1m30s# for PID 1 to handle SIGTERM, default 10s, then SIGKILL.
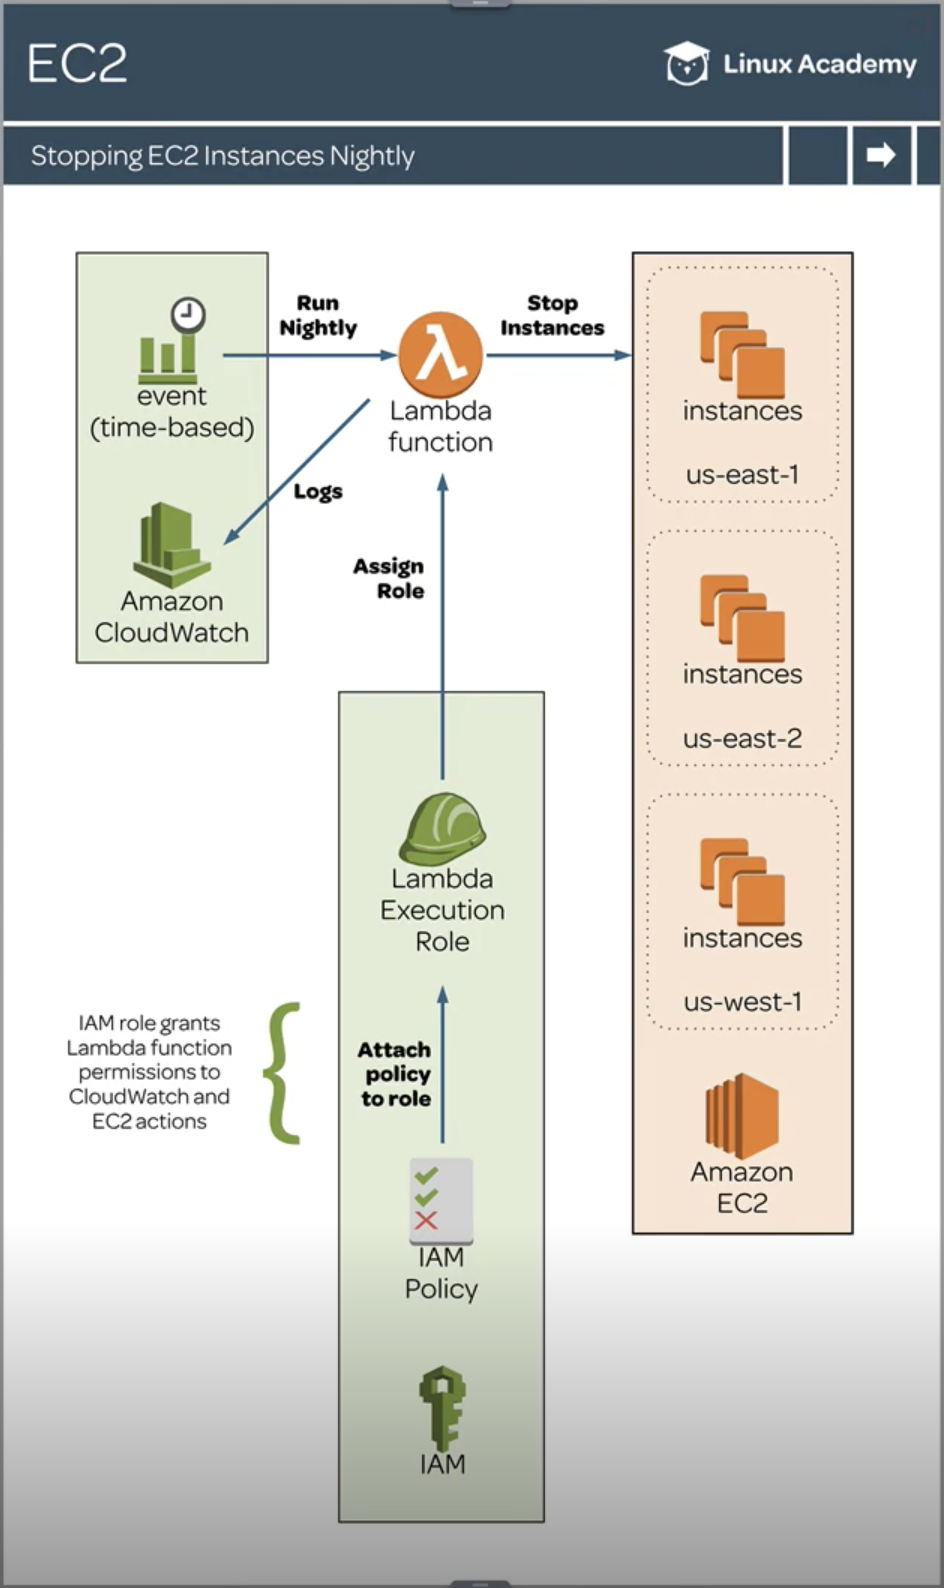
deflambda_handler(event, context): ec2_client = boto3.client('ec2') # get list of regions regions = [region['RegionName'] for region in ec2_client.describe_regions()['Regions']] # iterate over each region for region in regions: ec2 = boto3.resource('ec2', region_name=region) print('Region:', region) # get only running instances instances = ec2.instances.filter( Filters=[ {'Name': 'instance-state-name', 'Values': ['running']} ] ) # stop instances for instance in instances: instance.stop() print('stopped instance:', instance.id)
account_id = boto3.client('sts').get_caller_identity().get('Account') ec2 = boto3.client('ec2') regions = [region['RegionName'] for region in ec2.describe_regions()['Regions']]
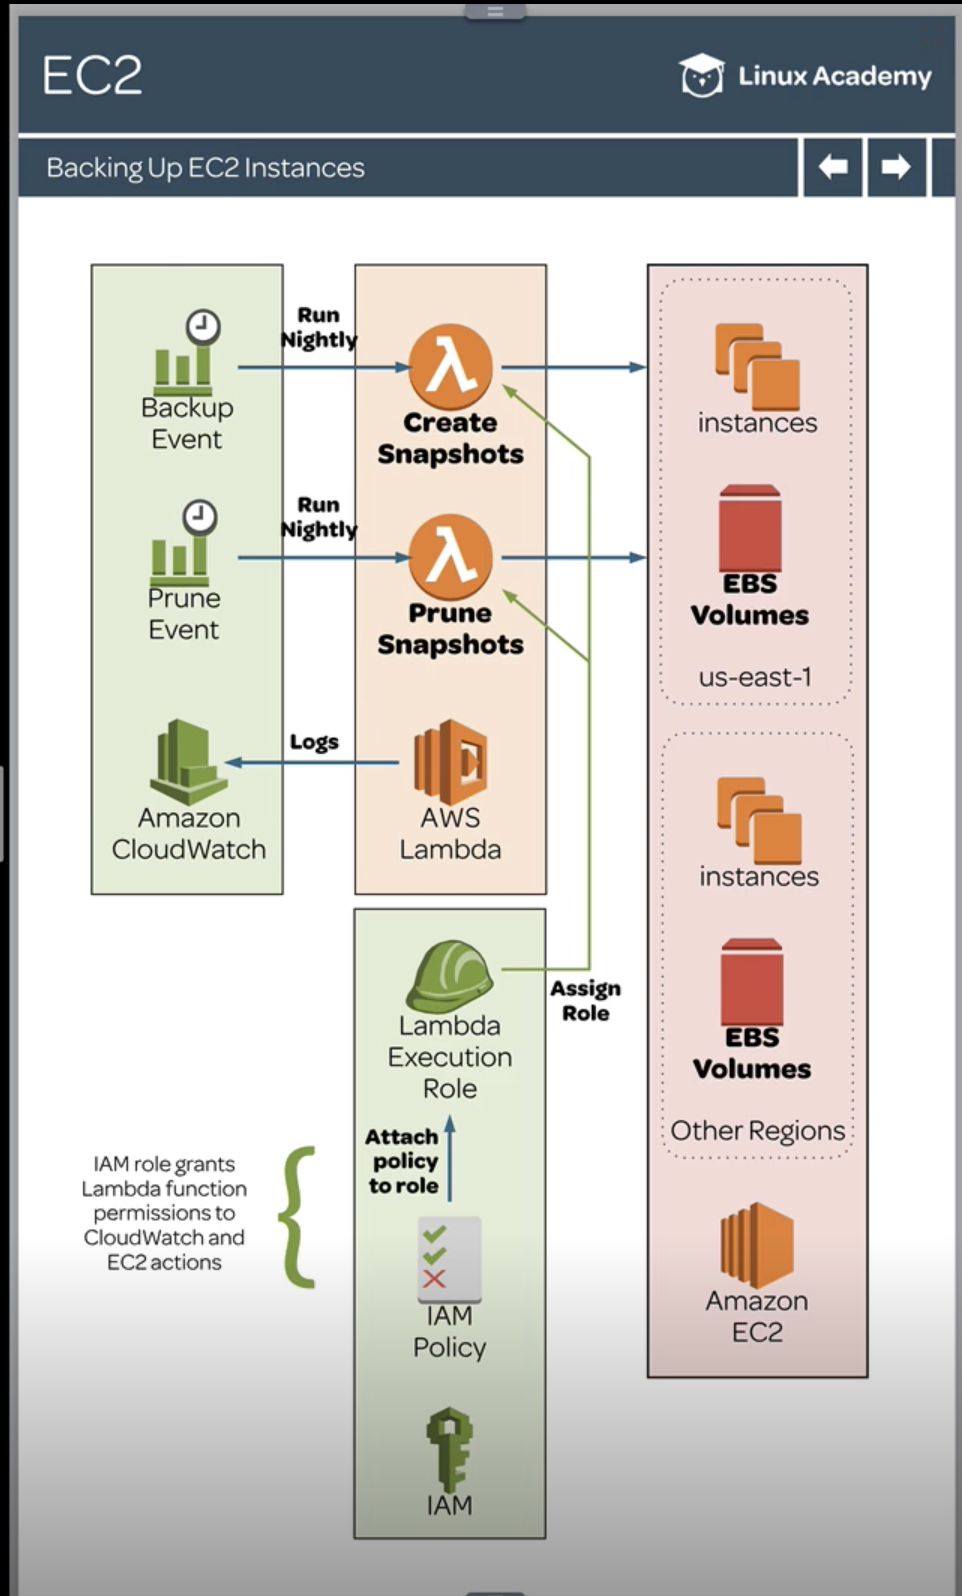
for region in regions: print("Region:", region) ec2 = boto3.client('ec2', region_name=region) response = ec2.describe_snapshots(OwnerIds=[account_id]) snapshots = response["Snapshots"]
# Sort snapshots by date ascending snapshots.sort(key=lambda x: x["StartTime"])
# Remove snapshots we want to keep (i.e. 3 most recent) snapshots = snapshots[:-3]
for snapshot in snapshots: id = snapshot['SnapshotId'] try: # EBS might be using this snapshot print("Deleting snapshot:", id) ec2.delete_snapshot(SnapshotId=id) except Exception as e: print("Snapshot {} in use, skipping.".format(id)) continue
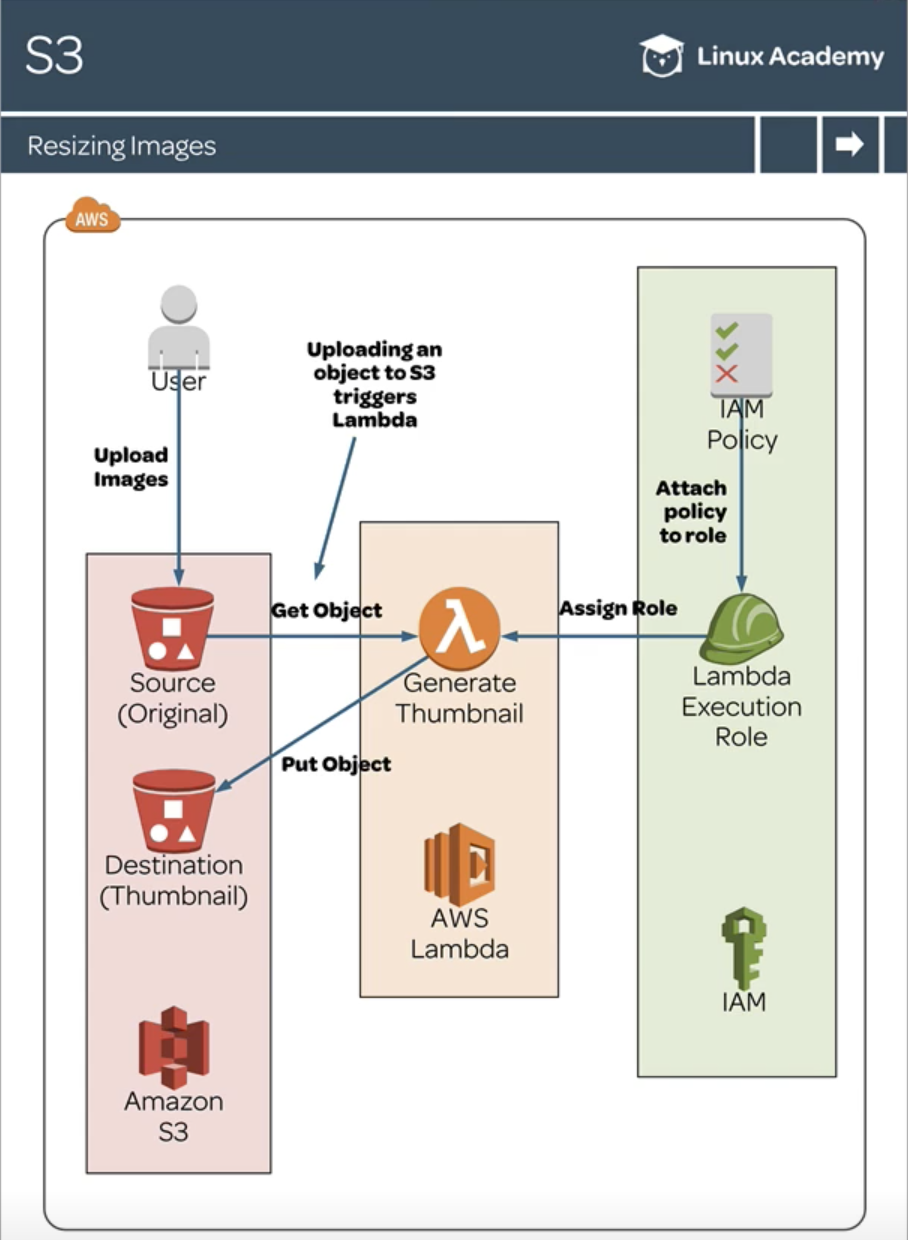
withopen("moviedata.json") as json_file: movies = json.load(json_file, parse_float=decimal.Decimal) for movie in movies: year = int(movie['year']) title = movie['title'] info = movie['info']
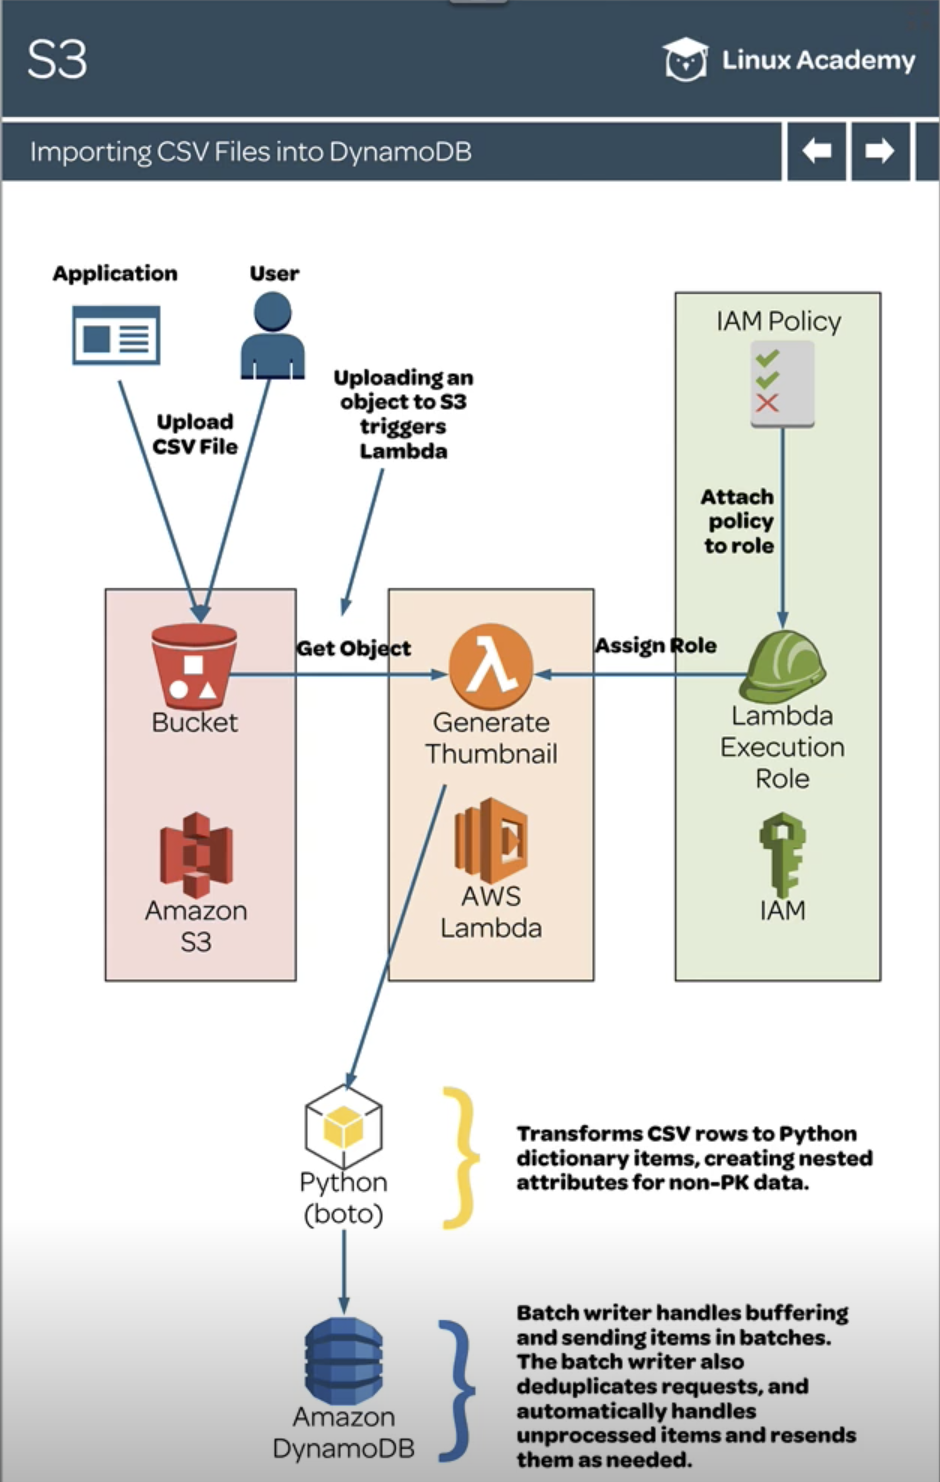
for record in event['Records']: source_bucket = record['s3']['bucket']['name'] key = record['s3']['object']['key'] with tempfile.TemporaryDirectory() as tmpdir: download_path = os.path.join(tmpdir, key) s3.download_file(source_bucket, key, download_path) items = read_csv(download_path)
with table.batch_writer() as batch: for item in items: batch.put_item(Item=item)
defread_csv(file): items = [] withopen(file) as csvfile: reader = csv.DictReader(csvfile) for row in reader: data = {} data['Meta'] = {} data['Year'] = int(row['Year']) data['Title'] = row['Title'] orNone data['Meta']['Length'] = int(row['Length'] or0) data['Meta']['Subject'] = row['Subject'] orNone data['Meta']['Actor'] = row['Actor'] orNone data['Meta']['Actress'] = row['Actress'] orNone data['Meta']['Director'] = row['Director'] orNone data['Meta']['Popularity'] = row['Popularity'] orNone data['Meta']['Awards'] = row['Awards'] == 'Yes' data['Meta']['Image'] = row['Image'] orNone data['Meta'] = {k: v for k, v in data['Meta'].items() if v isnotNone} items.append(data) return items
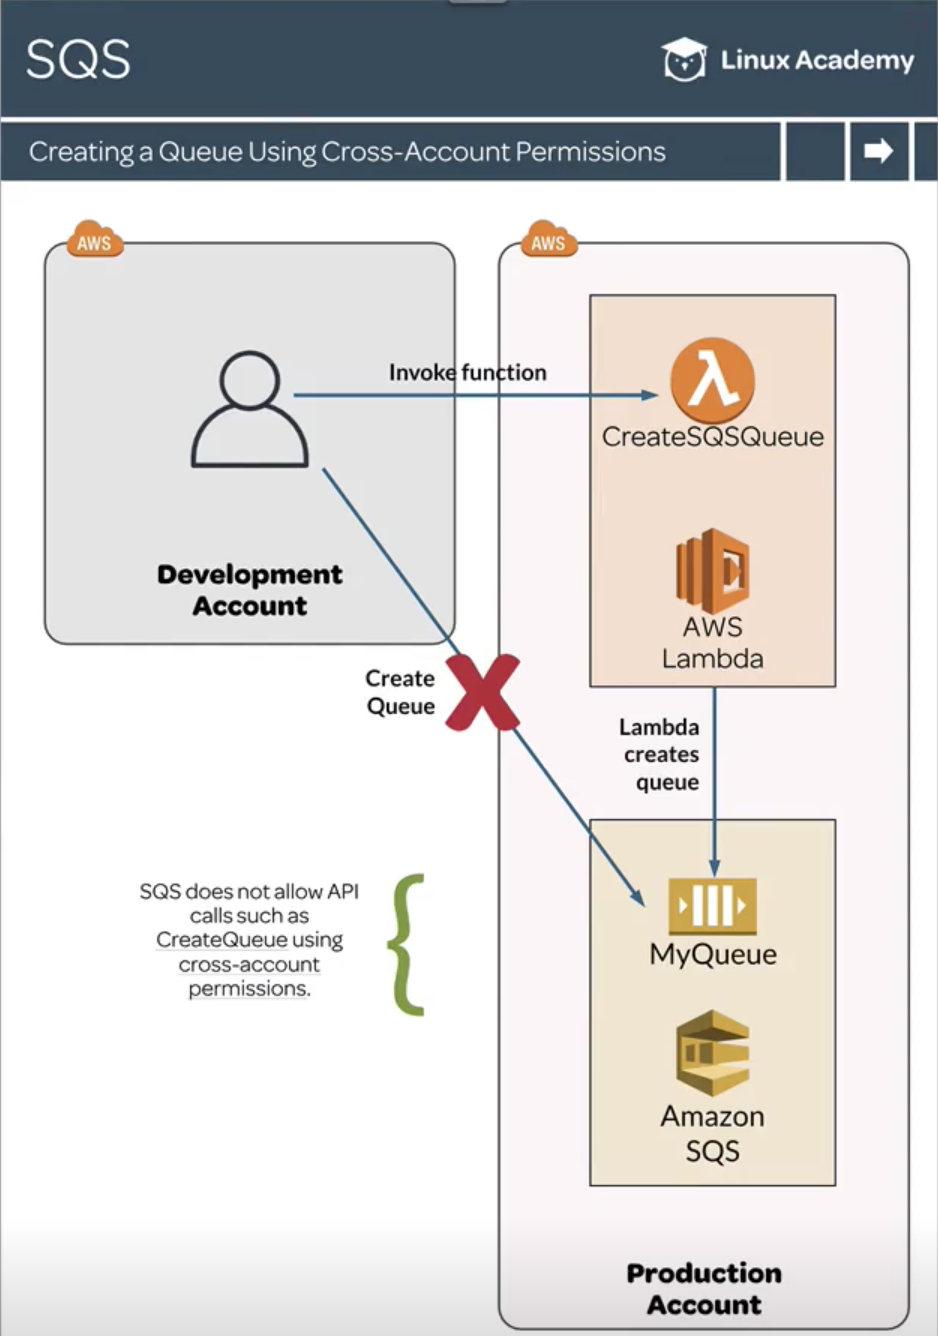
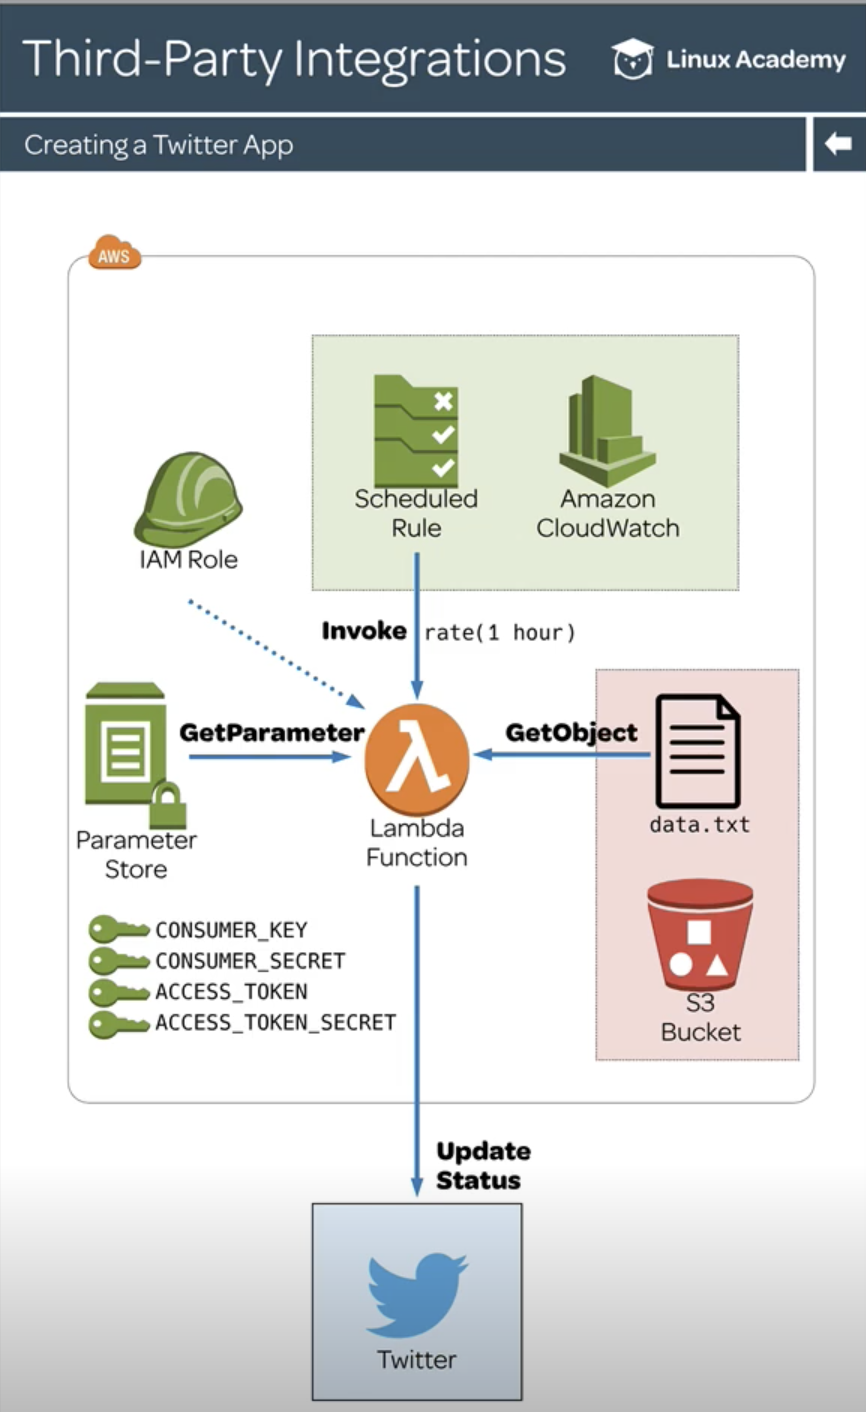
SQS does not allow API calls such as CreateQueue using cross-account permissions. A workaround is to create and invoke a Lambda function in another account in order to call that API.
Create AWS CLI Profiles
Development account admin:
1
2
3
4
aws configure --profile devadmin Production account admin:
aws configure --profile prodadmin
Create a Lambda Function in the Production Account
Function name: CreateSQSQueue
See lambda_function.py and assign the role lambda_execution_role.json.
Assign Permissions to the Lambda Function
Add permissions to the production Lambda function that allow it to be invoked by the development account user: