Docker Note
Install Docker
On Debian
uninstall old versions:
1 | $ sudo apt-get remove docker docker-engine docker.io containerd runc |
1 | $ sudo apt-get update |
Verfiy key with the fingerprint:
1 | sudo apt-key fingerprint 0EBFCD88 |
For x86_64 / amd64 architecture:
1 | $ sudo add-apt-repository \ |
1 | $ sudo apt-get update |
Run hello world demo
1 | $ sudo docker run hello-world |
Avoid sudo when running docker:
1 | $ sudo nano /etc/group |
add username to docker:x:999:<username>, e.x. docker:x:999:admin
Or:
1 | sudo usermod -a -G docker <username> |
On Ubuntu by Shell Script
1 | $ wget -qO- https://get.docker.com/ | sh |
add user accout to local unix docker group, to avoid sudo:
1 | sudo usermod -aG docker <username> # e.x. admin |
Launching a Docker container
1 | nano Dockerfile |
1 | ############################## |
1 | docker build -t "webserver" . |
Docker Engine Architecture
Big Picture
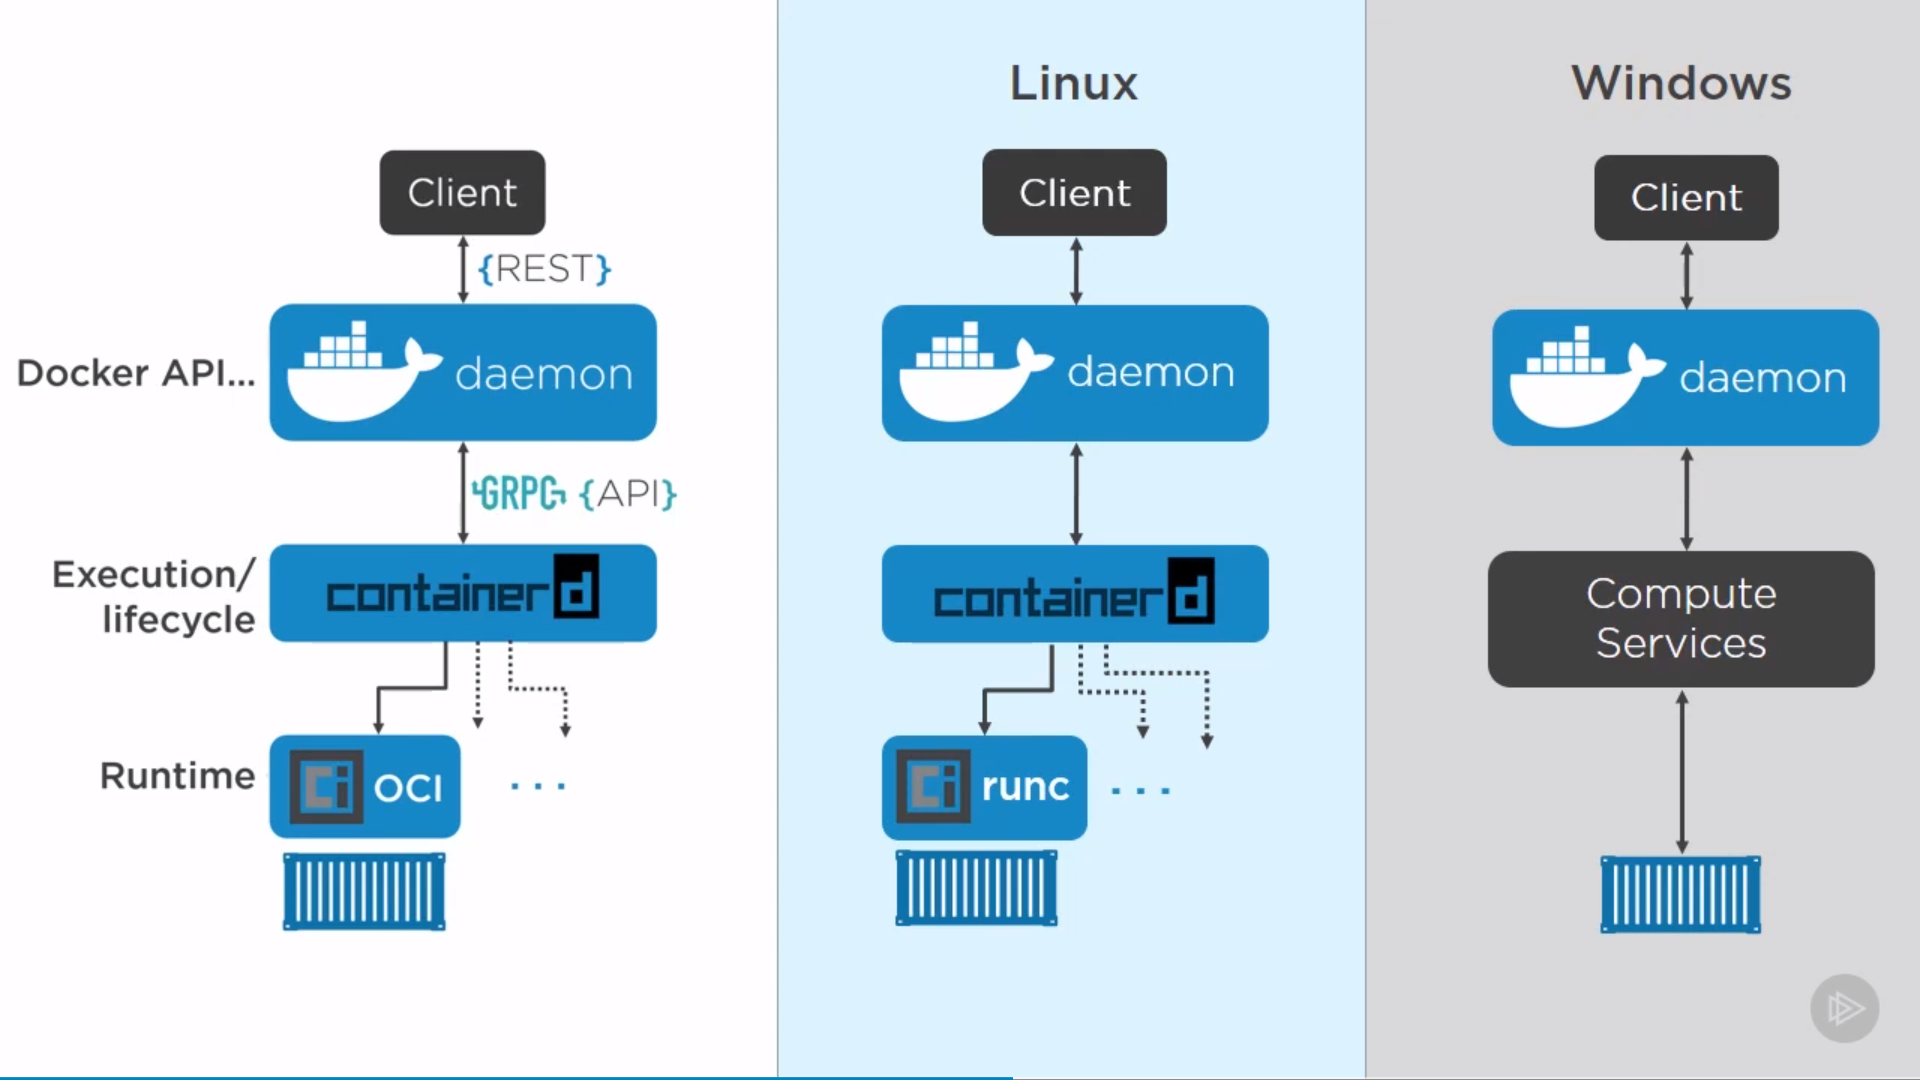
Example of creating a container
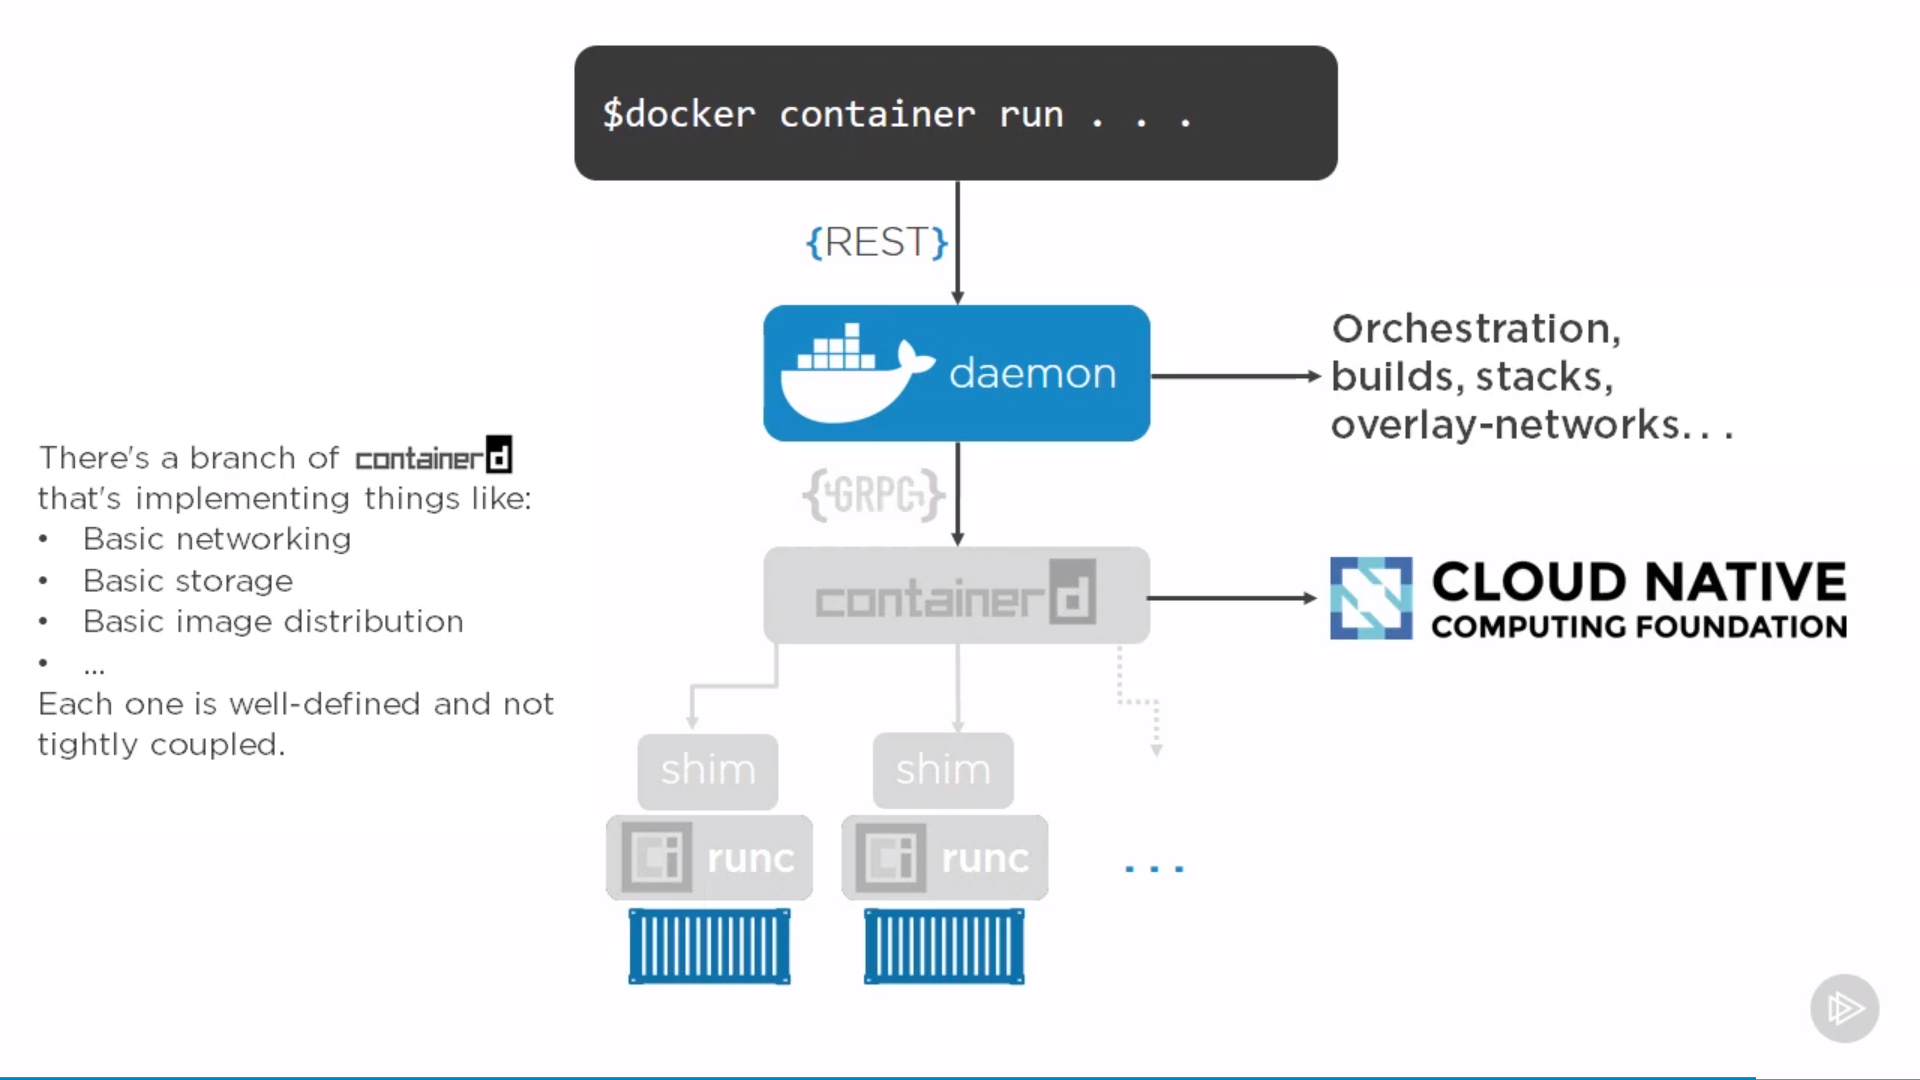
“Daemon” can restart without affecting on containers, which means upgrading doesn’t kill containers, same for “containerd”. Can restart them, leaving all containers running, when come back, they re-discover running containers and reconnect to the shim.
Docker on Windows: Native and Hyper-V
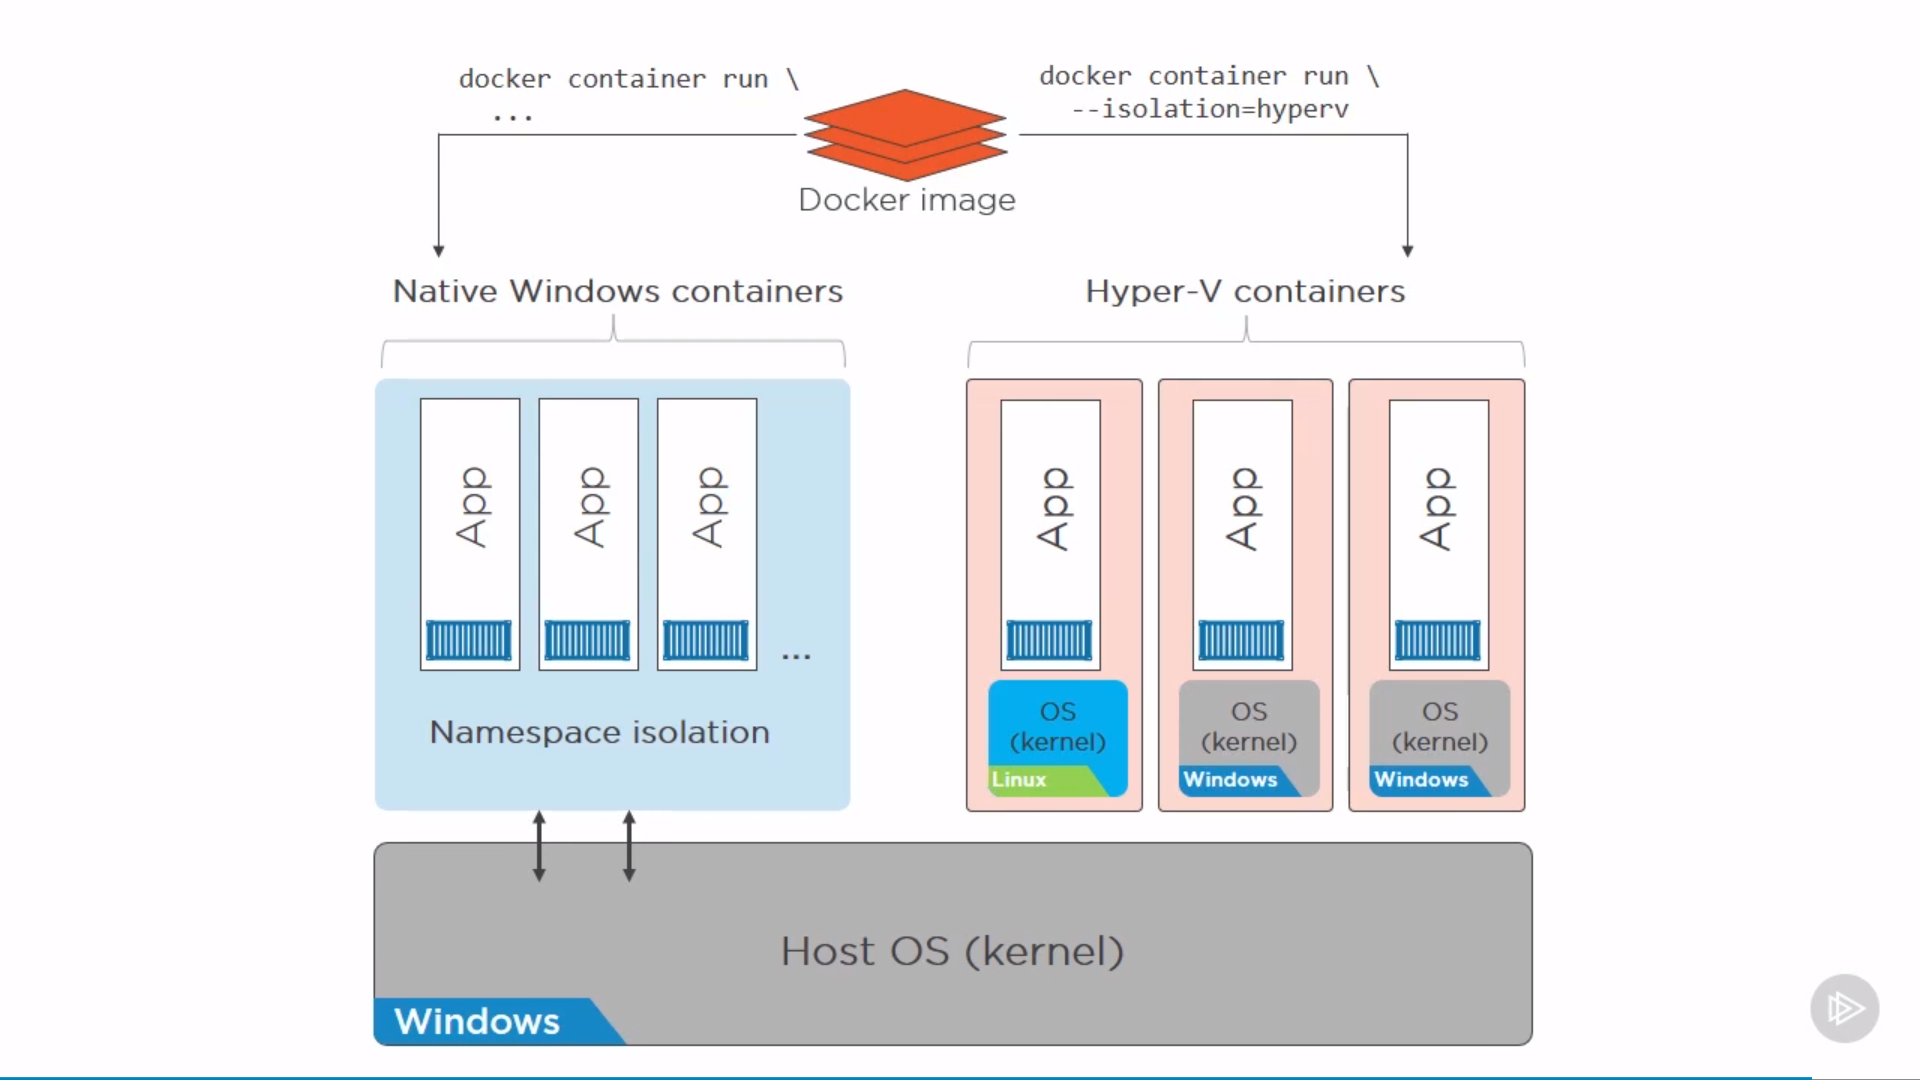
only low level difference, APIs for users are the same.
The idea is by VM isolation of Hyper-V(lightweight VM) might be better or more secure than Namespaces. Also, can run different OS in VM.
Docker Images
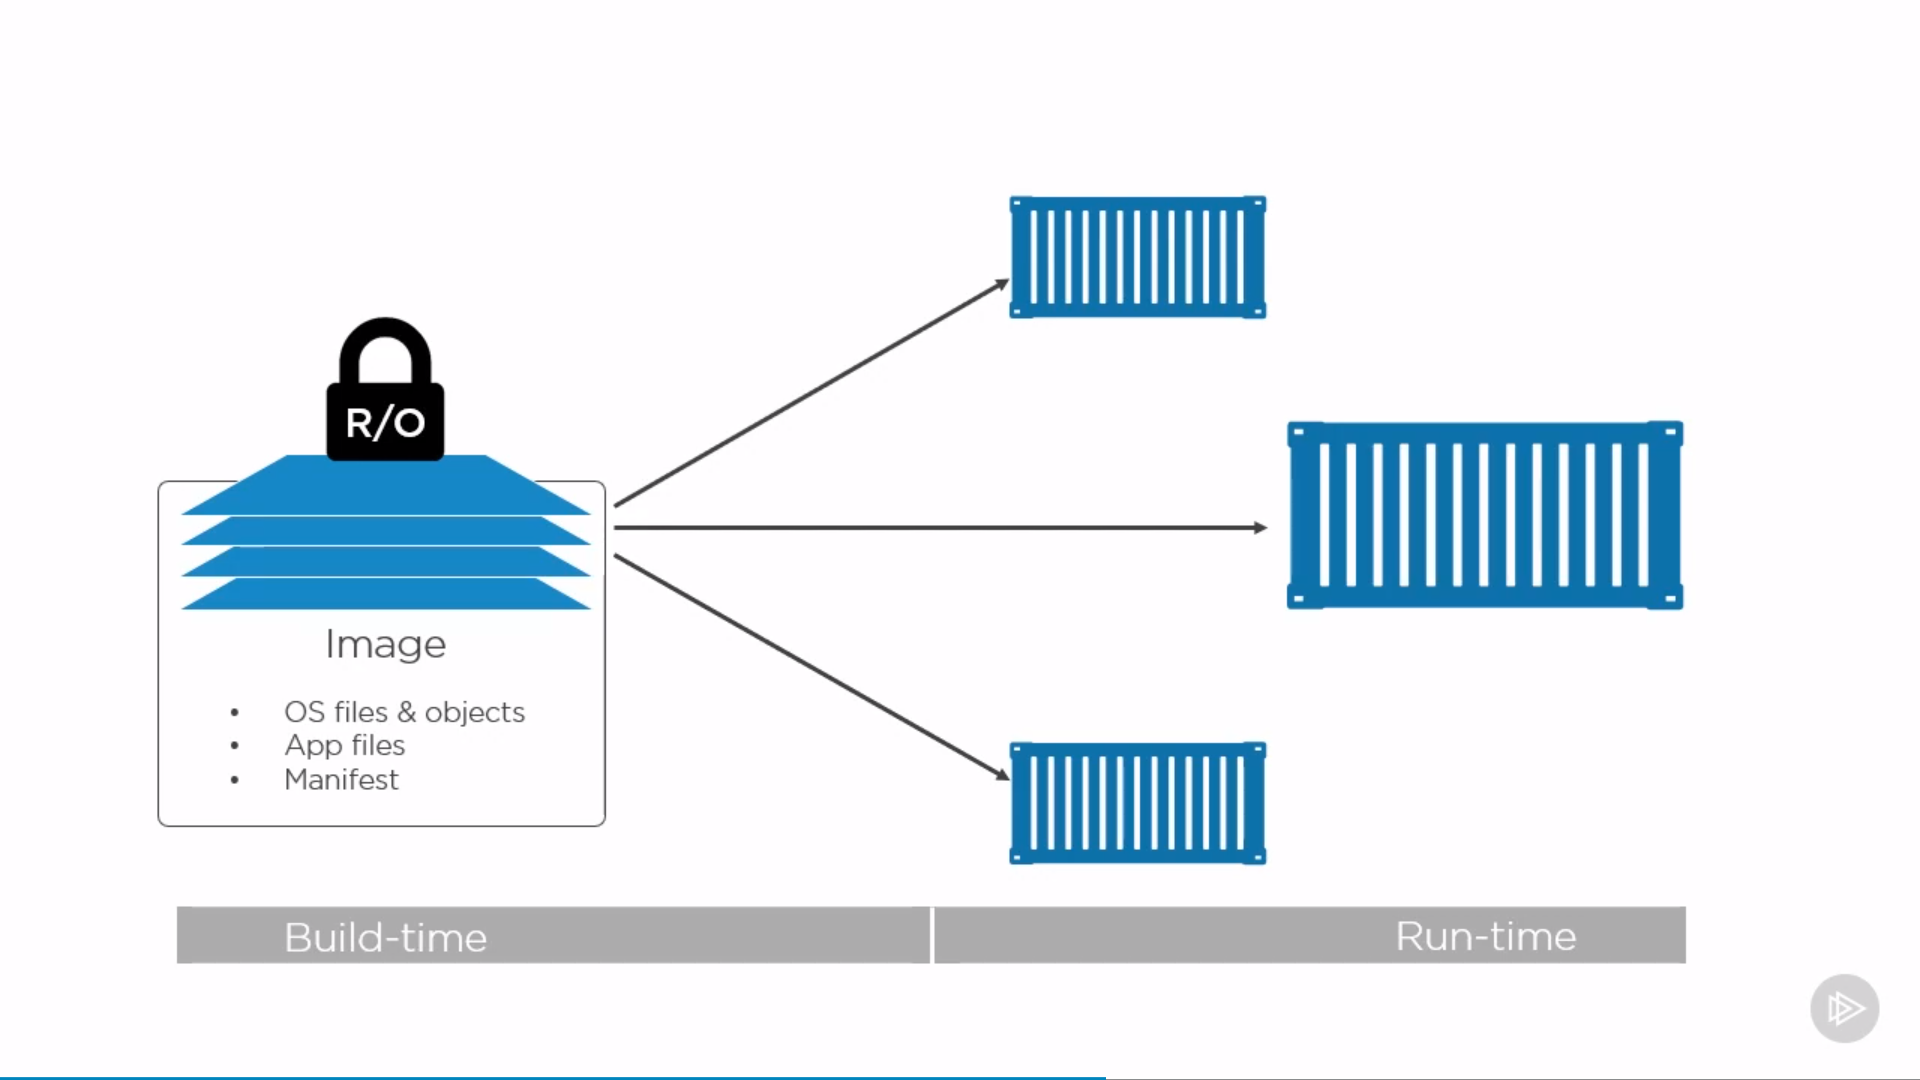
Image is read-only template for creating application containers. Independent layer loosely connected by a manifest file(config file).
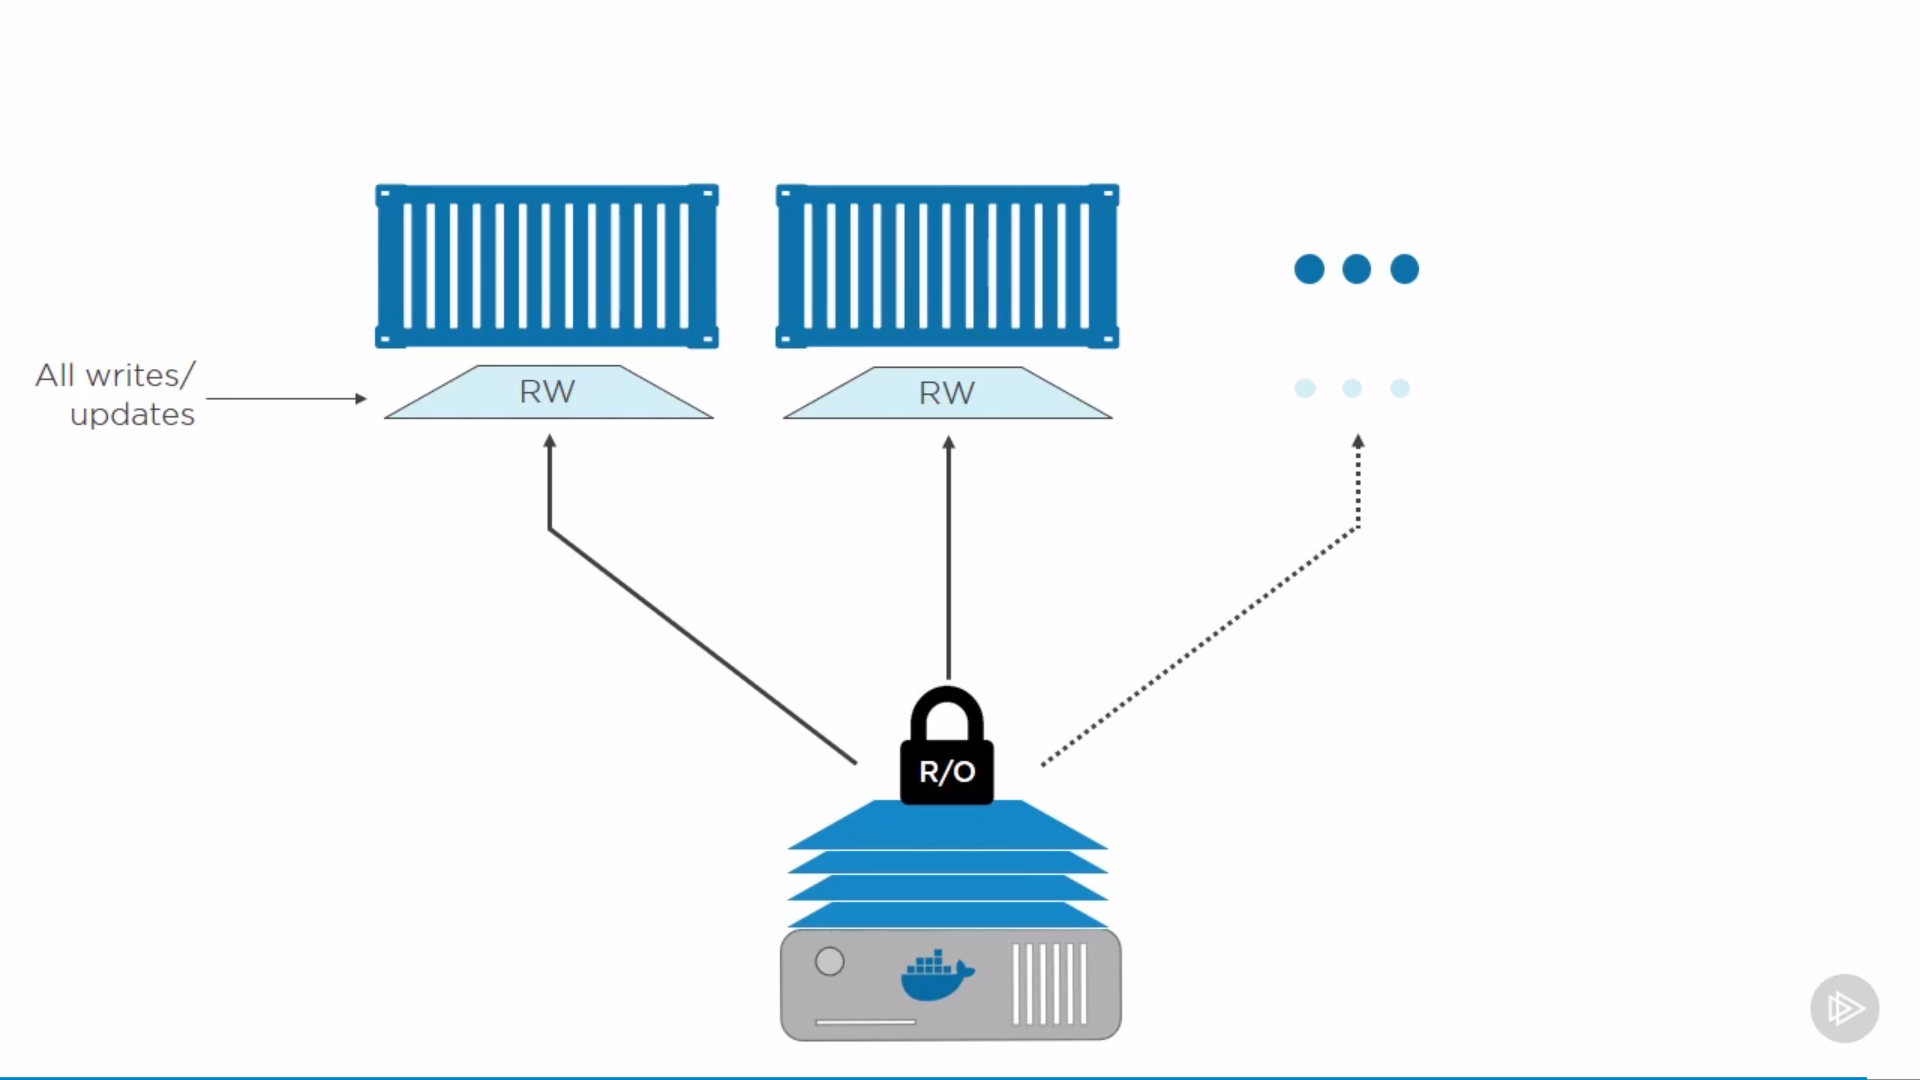
Every container can also write by copying read-only layer(files in it) to its writable layer, and do changes there.
Pull a docker image
1 | $ docker image pull redis |
In fact, we are pulling layers:
1 | Using default tag: latest |
Fat manifest is specified by OS architecture, to get image manifest:
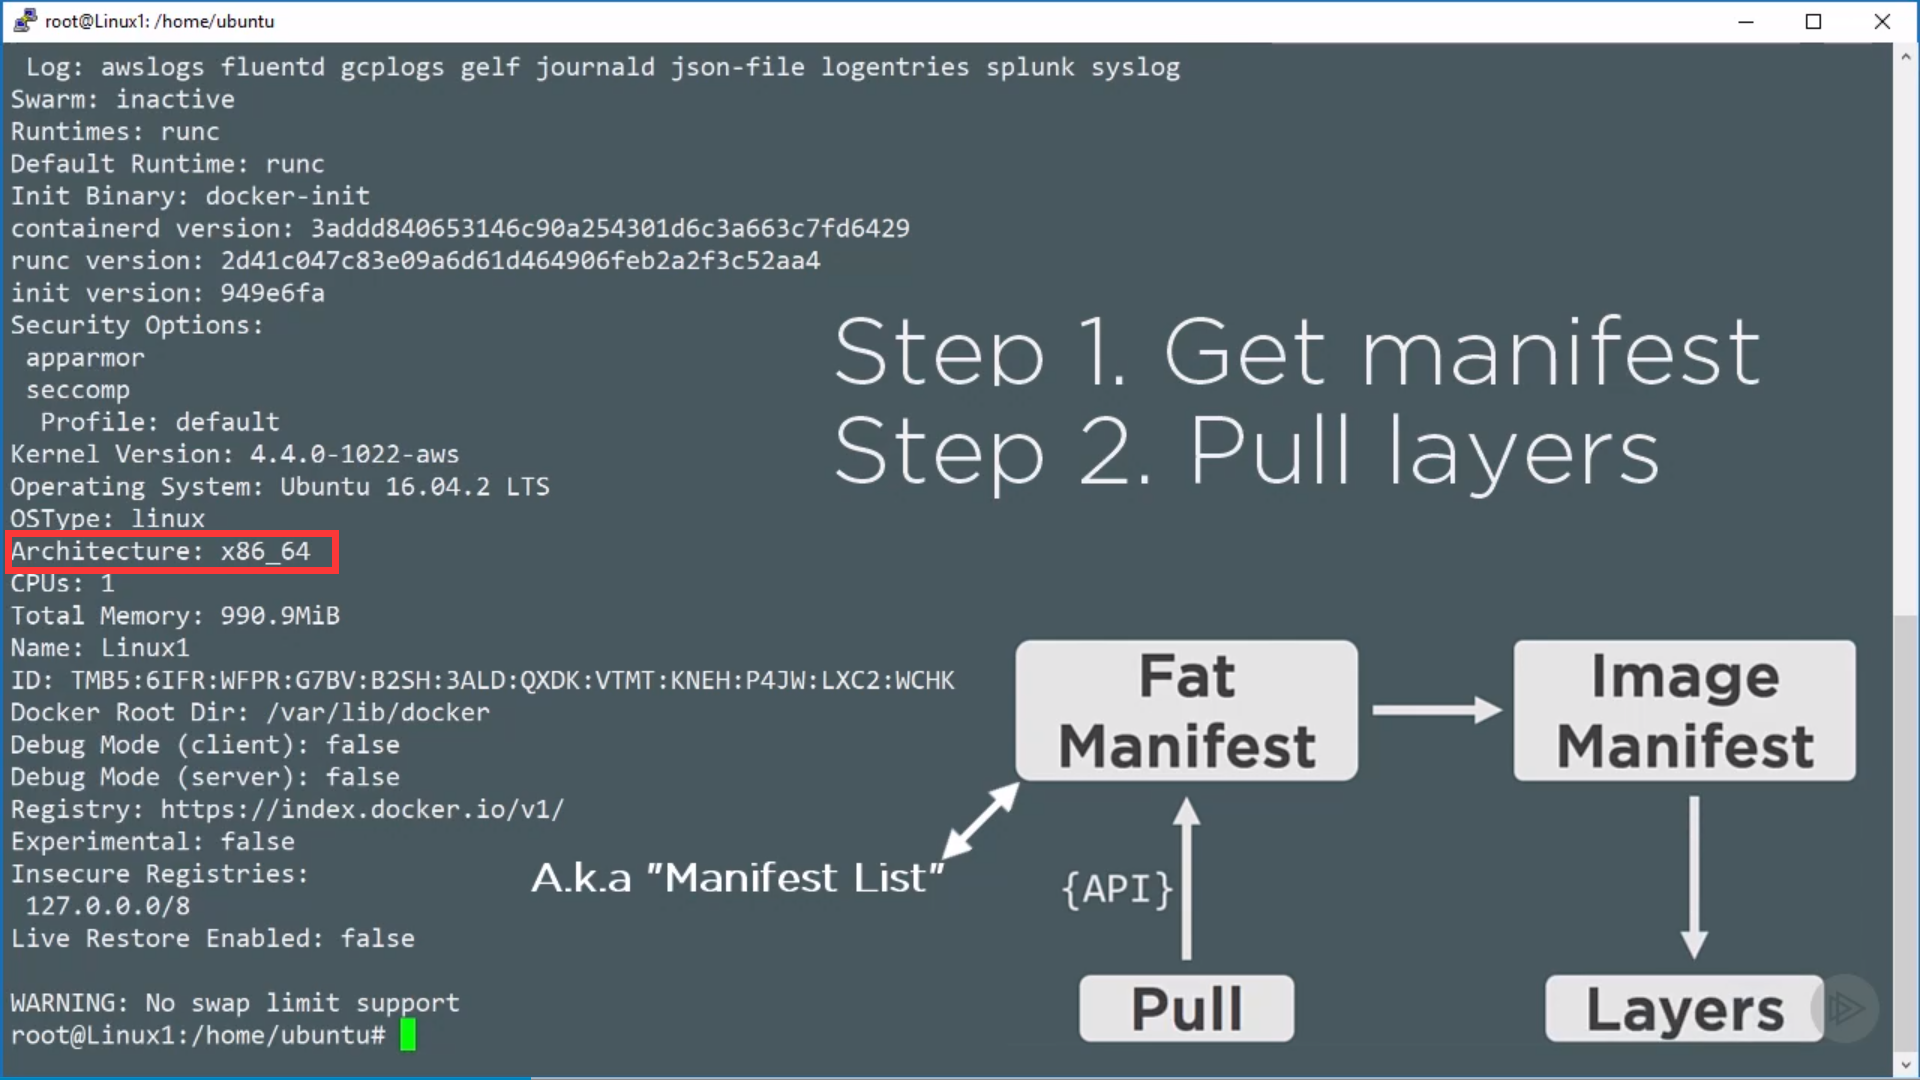
Referencing by hash to avoid mismatch between the image asking for and the image got.
Using overlay2 as storage driver, those layers are stored at /var/lib/docker/overlay2. To see layers, run:
1 | $ sudo ls -l /var/lib/docker/overlay2 |
to get content of layer, run:
1 | $ sudo ls -l /var/lib/docker/overlay2/<sha256> |
Layer structure, e.x.:
- Base layer (OS files and objects)
- App codes
- Updates …
-> a single unified file system.
Check images
1 | $ docker image ls / $ docker images |
to see operation history of one image, run:
1 | $ docker history redis |
every non-zero size creates a new layer, the rests add something to image’s json config file.
to get configs and layers of one image, run:
1 | $ docker image inspect redis |
Delete images
1 | $ docker image rm redis |
Registries
Images live in registries. When docker image pull <some-image>, defaultly pulling from Docker Hub.
Official images live in the top level of Docker Hub namespaces, e.x. docker.io/redis, docker.io/nginx. Can ignore registry name “docker.io/” by default, then do repo name “redis”, then do tag name “latest”, which is an image actually. So the full version is `docker image pull docker.io/redis:4.0.1
Unofficial ones, e.x. nigelpoulton/tu-demo
To pull all tags of images from repo, run
1 | $ docker image pull <some-image> -a |
Content hashes for host, compressed hashes(distribution hashes) for wire, to verify. UIDs used for storing layers are random.
run sha256 on content of layer -> layer’s hash as ID;
run sha256 on image config file -> image’s hash as ID.
Containerizing
Dockerfile
Dockerfile is list of instructions for building images with an app inside(document the app).
Good practice: put Dockerfile in root folder of app.
Good practice: LABEL maintainer="xxx@gmail.com"
notes:
- CAPITALIZE instructions
<INSTRUCTION> <value>, e.x.FROM alpineFROMalways first instruction, as base imageRUNexecute command and create layerCOPYcopy code into image as new layer- instructions like
WORKDIRare adding metadata instead of layers ENTRYPOINTdefault app for image/container, metadataCMDrun-time arguments override CMD instructions, append toENTRYPOINT
e.x.:
1 | FROM alpine |
code: https://github.com/nigelpoulton/psweb
Build image
1 | $ docker image build -t <image-name> . # current folder |
1 | $ docker image build -t psweb https://github.com/nigelpoulton/psweb.git # git repo |
docker image ls to check it exists.
During each step, docker spins up temporary containers, once the following layer is built, the container is removed.
Run container
1 | $ docker container run -d --name <app-name> -p 8080:8080 <image> # detach mode |
Multi-stage Builds
use multiple FROM statements in Dockerfile.
Each FROM instruction can use a different base, and each of them begins a new stage of the build.
can selectively copy artifacts from one stage to another, leaving behind everything you don’t want in the final image.
FROM ... AS ...COPY --from==...
example 1:
1 | FROM node:latest AS storefront |
source: https://github.com/dockersamples/atsea-sample-shop-app/blob/master/app/Dockerfile
example 2:
1 | FROM golang:1.7.3 AS builder |
source: https://docs.docker.com/develop/develop-images/multistage-build/#name-your-build-stages
When building image, don’t have to build the entire Dockerfile including every stage. Can specify a target build stage, and stop at that stage.
1 | $ docker build --target builder -t alexellis2/href-counter:latest . |
Docker containers
Most atomic unit in docker is container.
microservices instead of monolith, glue by APIs. Containers should be as small and simple as possible. Single process per container.
modernize traditional apps:
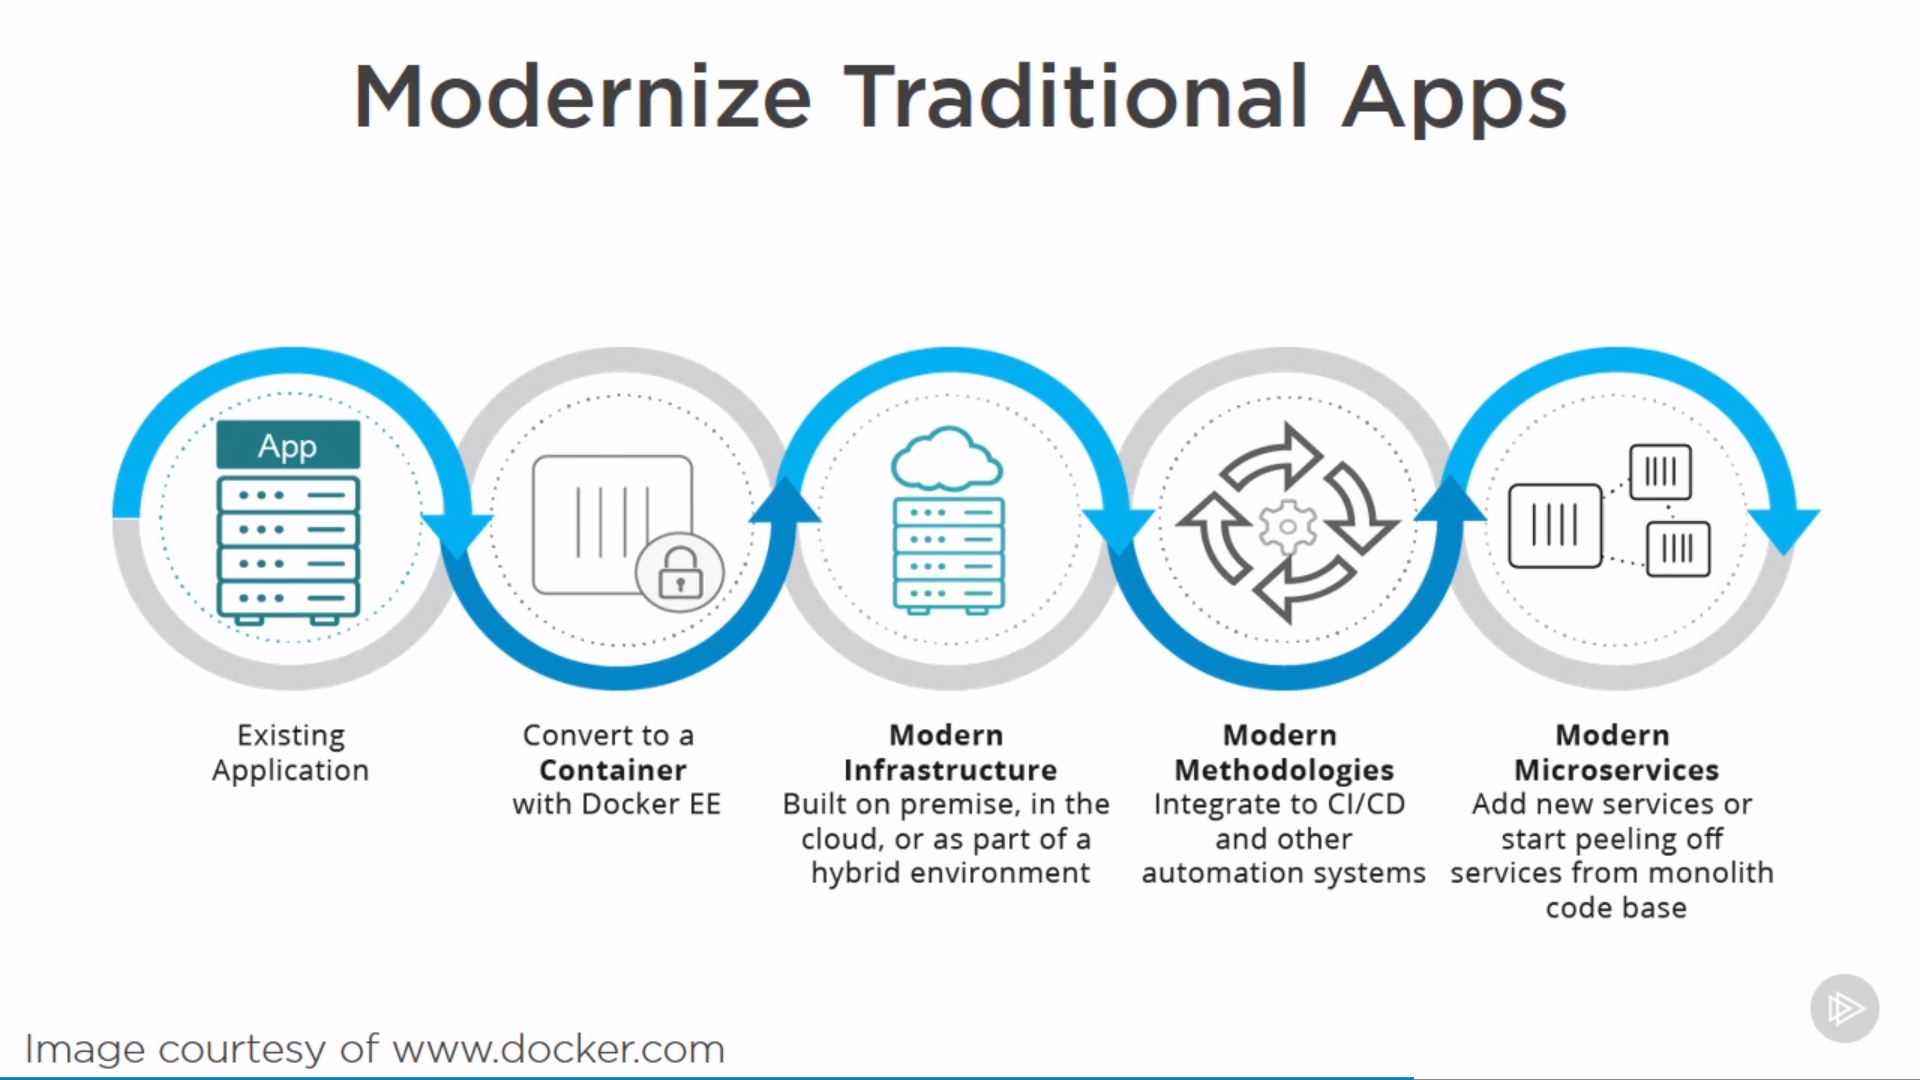
container should be ephemeral and immutable.
Check status
1 | $ docker ps / $ docker container ls # running containers |
Run containers
1 | $ docker container run ... / docker run ... |
Stop containers
Stopping a container sends signal to main process in the container (PID1), gives 10s before force stop.
Stopping and restarting a container doesn’t destory data.
1 | $ docker container stop <container> |
Start containers
1 | $ docker container start <container> |
Enter containers
execing into a container starts a new process
1 | $ docker container exec -it <container> sh |
exiting by exit kills the process, if it’s the only one, container exits. However, ctrl+P+Q gets out of container without terminating its main process (can docker attach to it).
Remove containers
1 | $ docker container rm <container> |
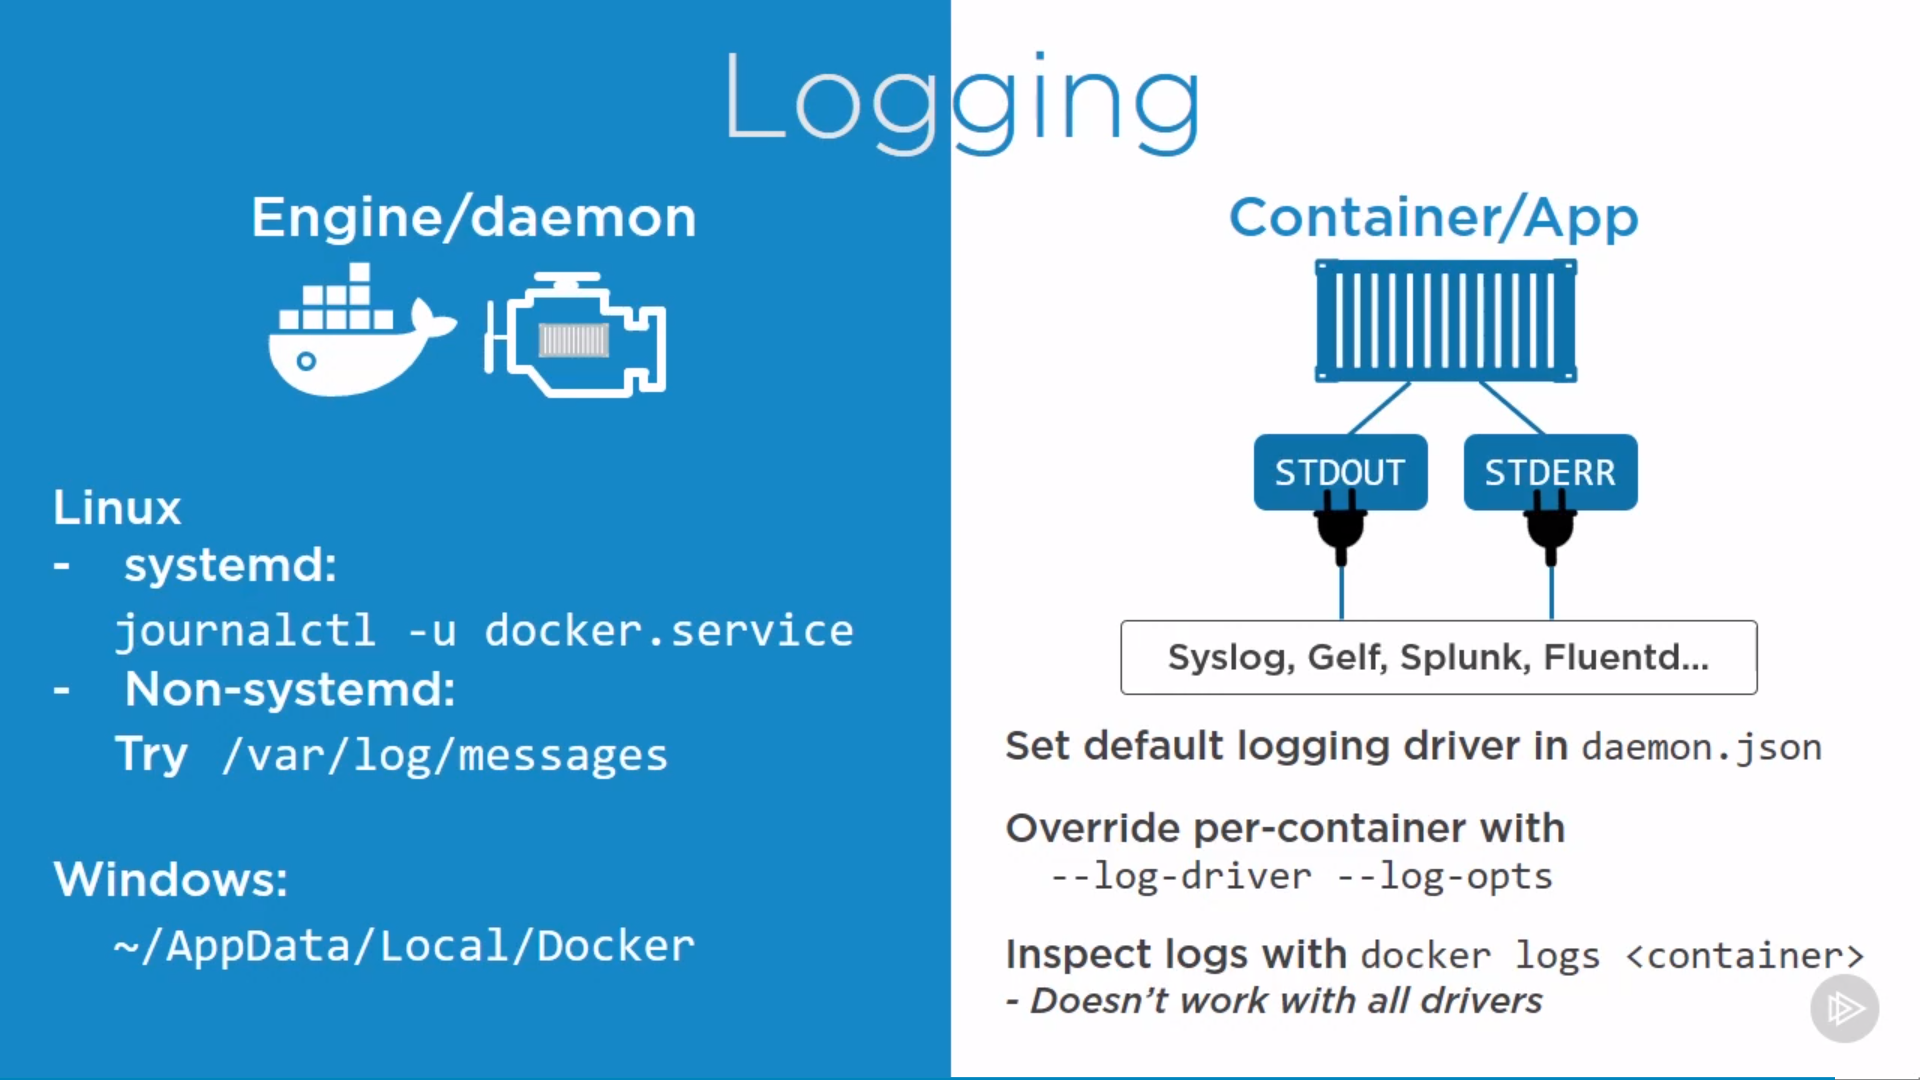
Log
Engine/daemon logs and Container/App logs
1 | $ docker logs <container> |
Swarm and Services
Swarm
swarm is a secure cluster of docker nodes, including “secure cluster” and “orchestrator”
can do native swarm work and kubernetes on swarm cluster
single-engine mode: install individual docker instances VS swarm mode: working on a cluster of docker instances.
1 | $ docker system info # Swarm: inactive/active |
Single docker node to swarm mode
1 | $ docker swarm init |
if it’s the first manager of swarm, it’s automatically elected as its leader(root CA).
- issue itself a client certificate.
- Build a secure cluster store(ETD) and automatically distributed to every other manager in the swarm, encrypted.
- default certificate rotation policy.
- a set of cryptographic join tokens, one for joining new managers, another for joining new workers.
on manager node, query cluster store to check all nodes:
1 | $ docker node ls # lists all nodes in the swarm |
Join another manager and workers
1 | $ docker swarm join |
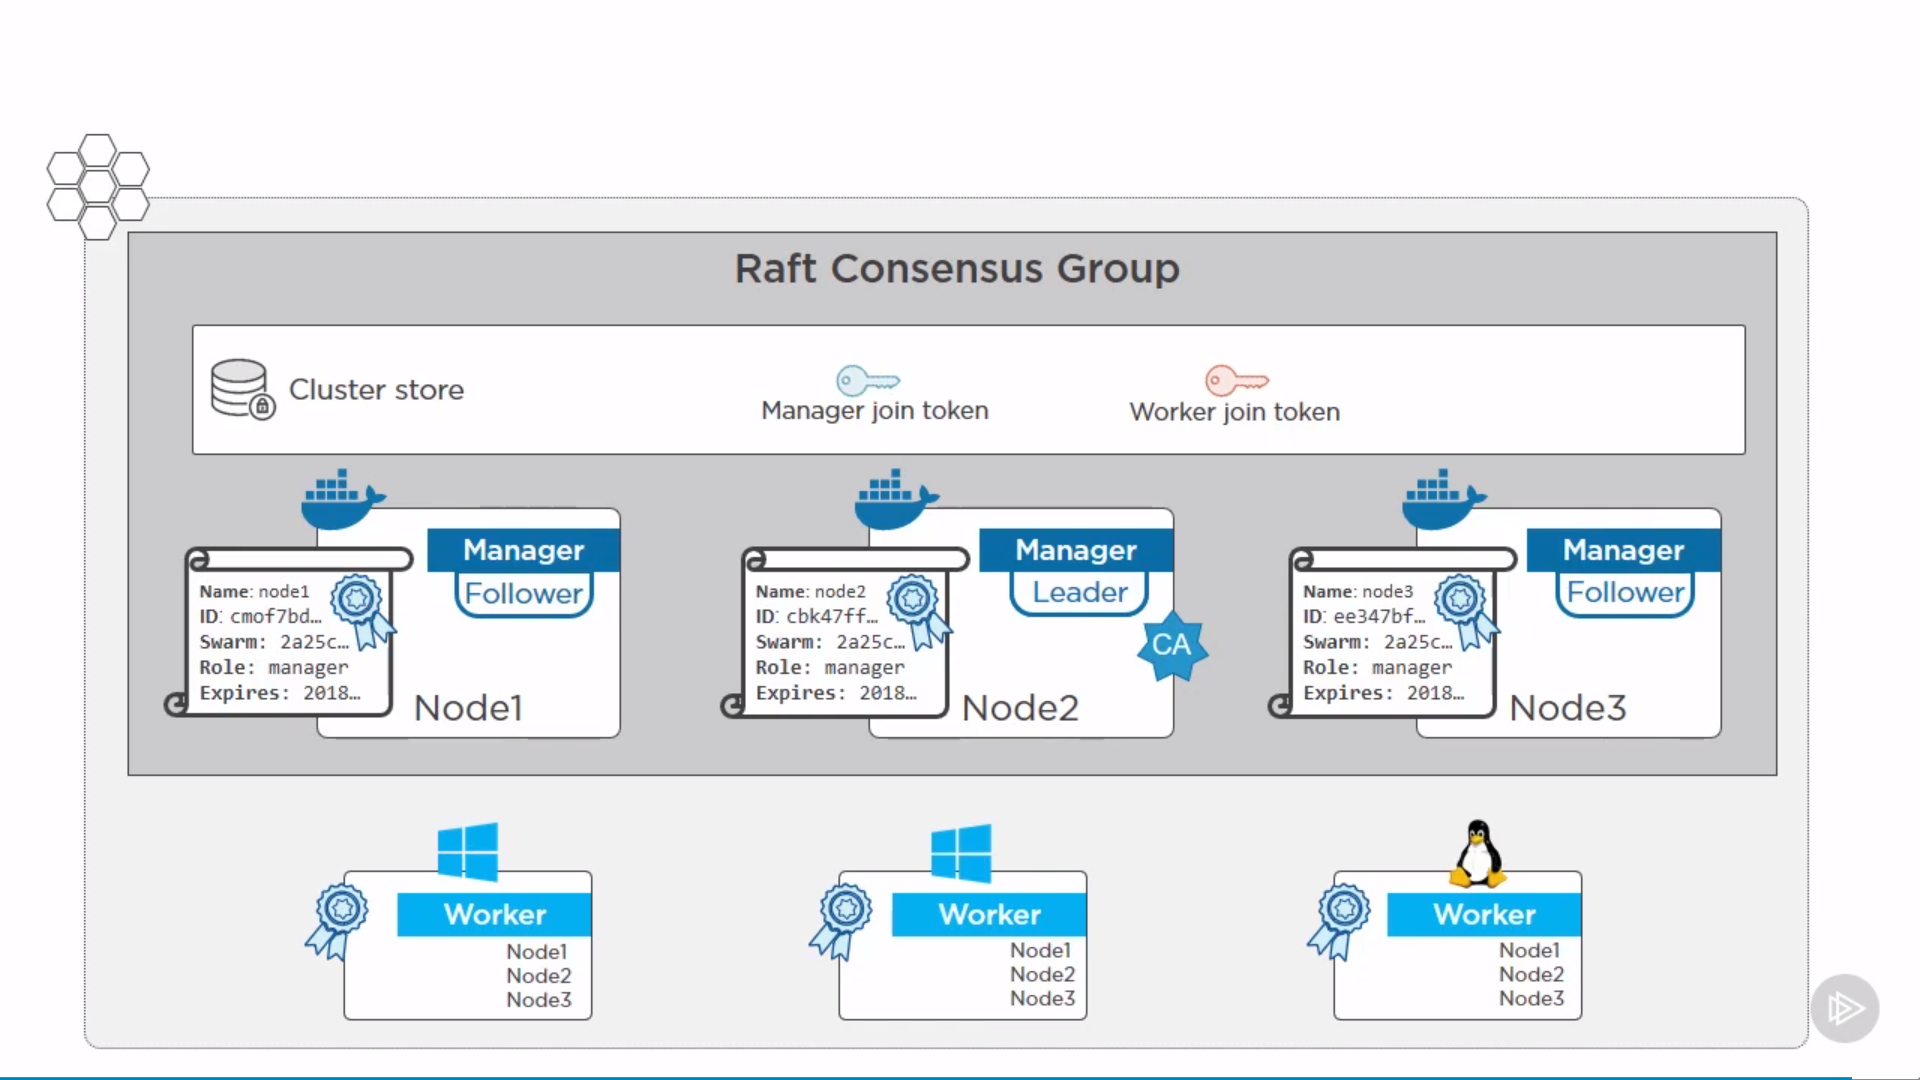
Every swarm has a single leader manager, the rest are follower managers.
Commands could be issued to any manager, hitting a follower manager will proxy commands to the leader.
If the leader fails, another one gets selected as a new leader.
Best practice: ideal number of managers is 3, 5, 7. Make sure its odd number, to increase chance of achieving quorum.
Connect managers by fast and reliable network. e.x. in AWS, put in same region, could cross availability zones.
Workers doesn’t join cluster store, which is just for managers.
Workers have a full list of IPs for all managers. If one manager dies, workders talk to another.
get join token:
1 | $ docker swarm join-token manager |
note:
- SWMTKN: identifier
- 36xjju: cluster identifier, hash of cluster certificate (same for same swarm cluster)
- 2pvht1 or 5rzpk8: determines worker or manager (could change by rotation)
switch to another node:
1 | $ docker swarm join --token ... |
to rotate token(change password):
1 | $ docker swarm join-token --rotate worker |
The existing managers and workers stay unaffected.
to get client certificates:
1 | $ sudo openssl x509 -in /var/lib/docker/swarm/certificates/swarm-node.crt -text |
in Subject field:
1 | Subject: O = pn6210vdux6ppj3uef0kqn8cv, OU = swarm-manager, CN = dkyneha22mdz384n3b3mdvjk7 |
note:
- O: organization, swarm ID
- OU: organizational unit, node’s role(swarm-manager/workder)
- CN: canonical name, cryptographic node ID
Remmove swarm node
1 | $ docker node demote <NODE> # To demote the node |
Autolock swarm
- prevents restarted managers(not applied to workers) from automatically re-joining the swarm
- pervents accidentally restoring old copies of the swarm
1 | $ docker swarm init --autolock # autolock new swarm |
Then if manager restarts by:
1 | $ sudo service docker restart |
Inspecting the cluster by docker node ls gives raft logs saying swarm is encrypted.
re-join the swarm by:
1 | $ docker swarm unlock |
check again by docker node ls to confirm.
Update certificate expiry time
1 | docker swarm update --cert-expiry 48h |
check by docker system info:
1 | CA Configuration: |
Update a node
Add label metadata to a node by:
1 | $ docker node update --label-add foo worker1 |
then node labels used a placement constraint when creating service.
Orchestration intro
Services
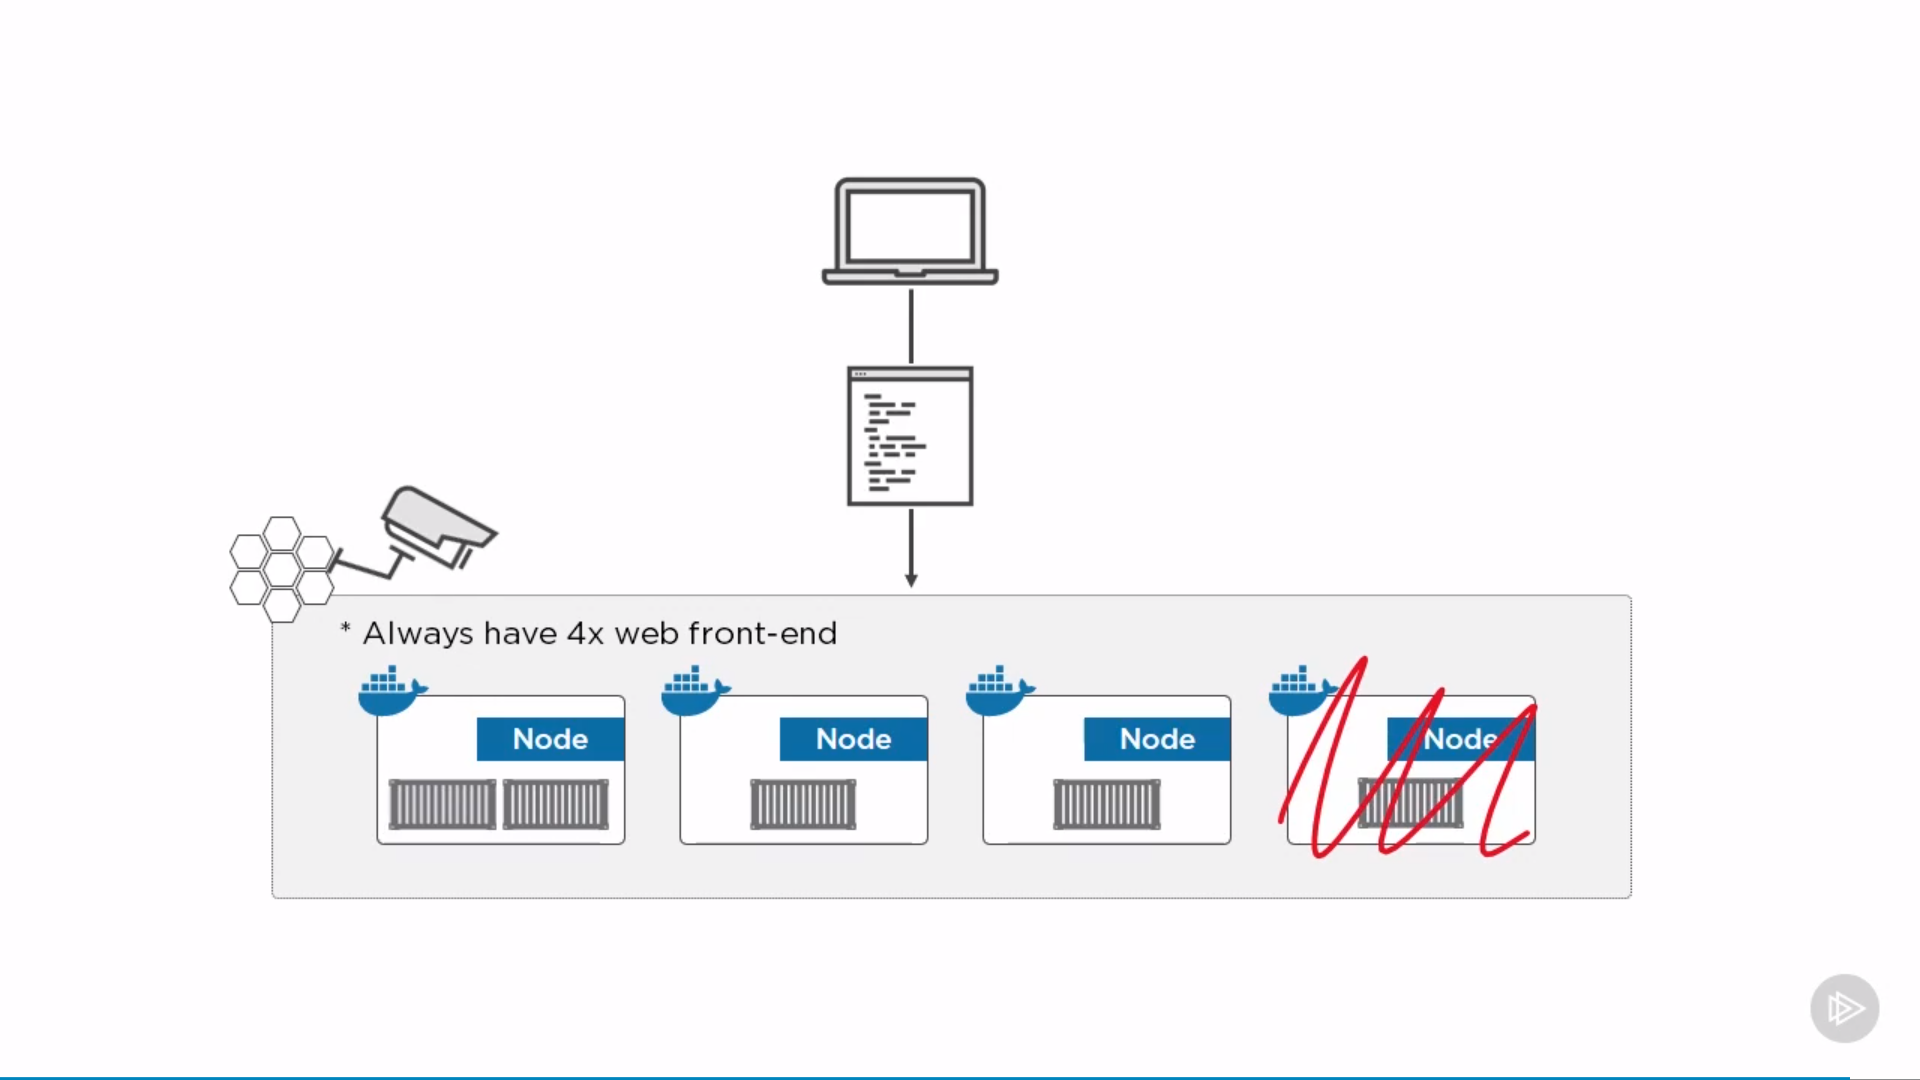
There are two types of service deployments, replicated and global:
- For a replicated service, you specify the number of identical tasks you want to run. For example, you decide to deploy an HTTP service with three replicas, each serving the same content.
- A global service is a service that runs one task on every node. There is no pre-specified number of tasks. Each time you add a node to the swarm, the orchestrator creates a task and the scheduler assigns the task to the new node. Good candidates for global services are monitoring agents, an anti-virus scanners or other types of containers that you want to run on every node in the swarm.
Create service
1 | $ docker service create --replicas 5 <service> # default replicated mode |
Check status
1 | $ docker service ls # list all services |
Remove services
1 | $ docker service rm $(docker service ls -q) # remove all services |
Update services
rescale services by:
1 | $ docker service scale <service>=20 |
update service’s image by:
1 | $ docker service update \ |
then update parallelism and update delay settings are now part of the service definition.
update service’s network by:
1 | $ docker service update \ |
Logs
1 | $ docker service logs <service> |
Container Networking
See the current network:
1 | $ docker network ls |
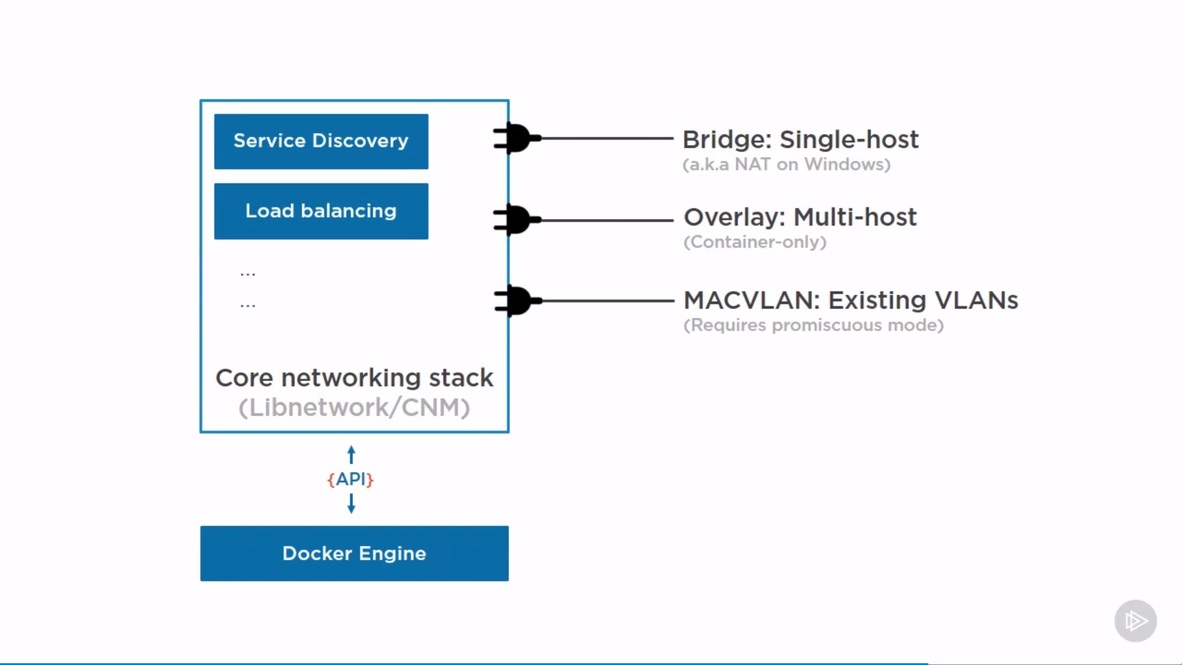
Every container goes onto bridge (nat on Windows) network by default.
Network types
containers talk to each other, VMs, physicals and internet. Vice versa.
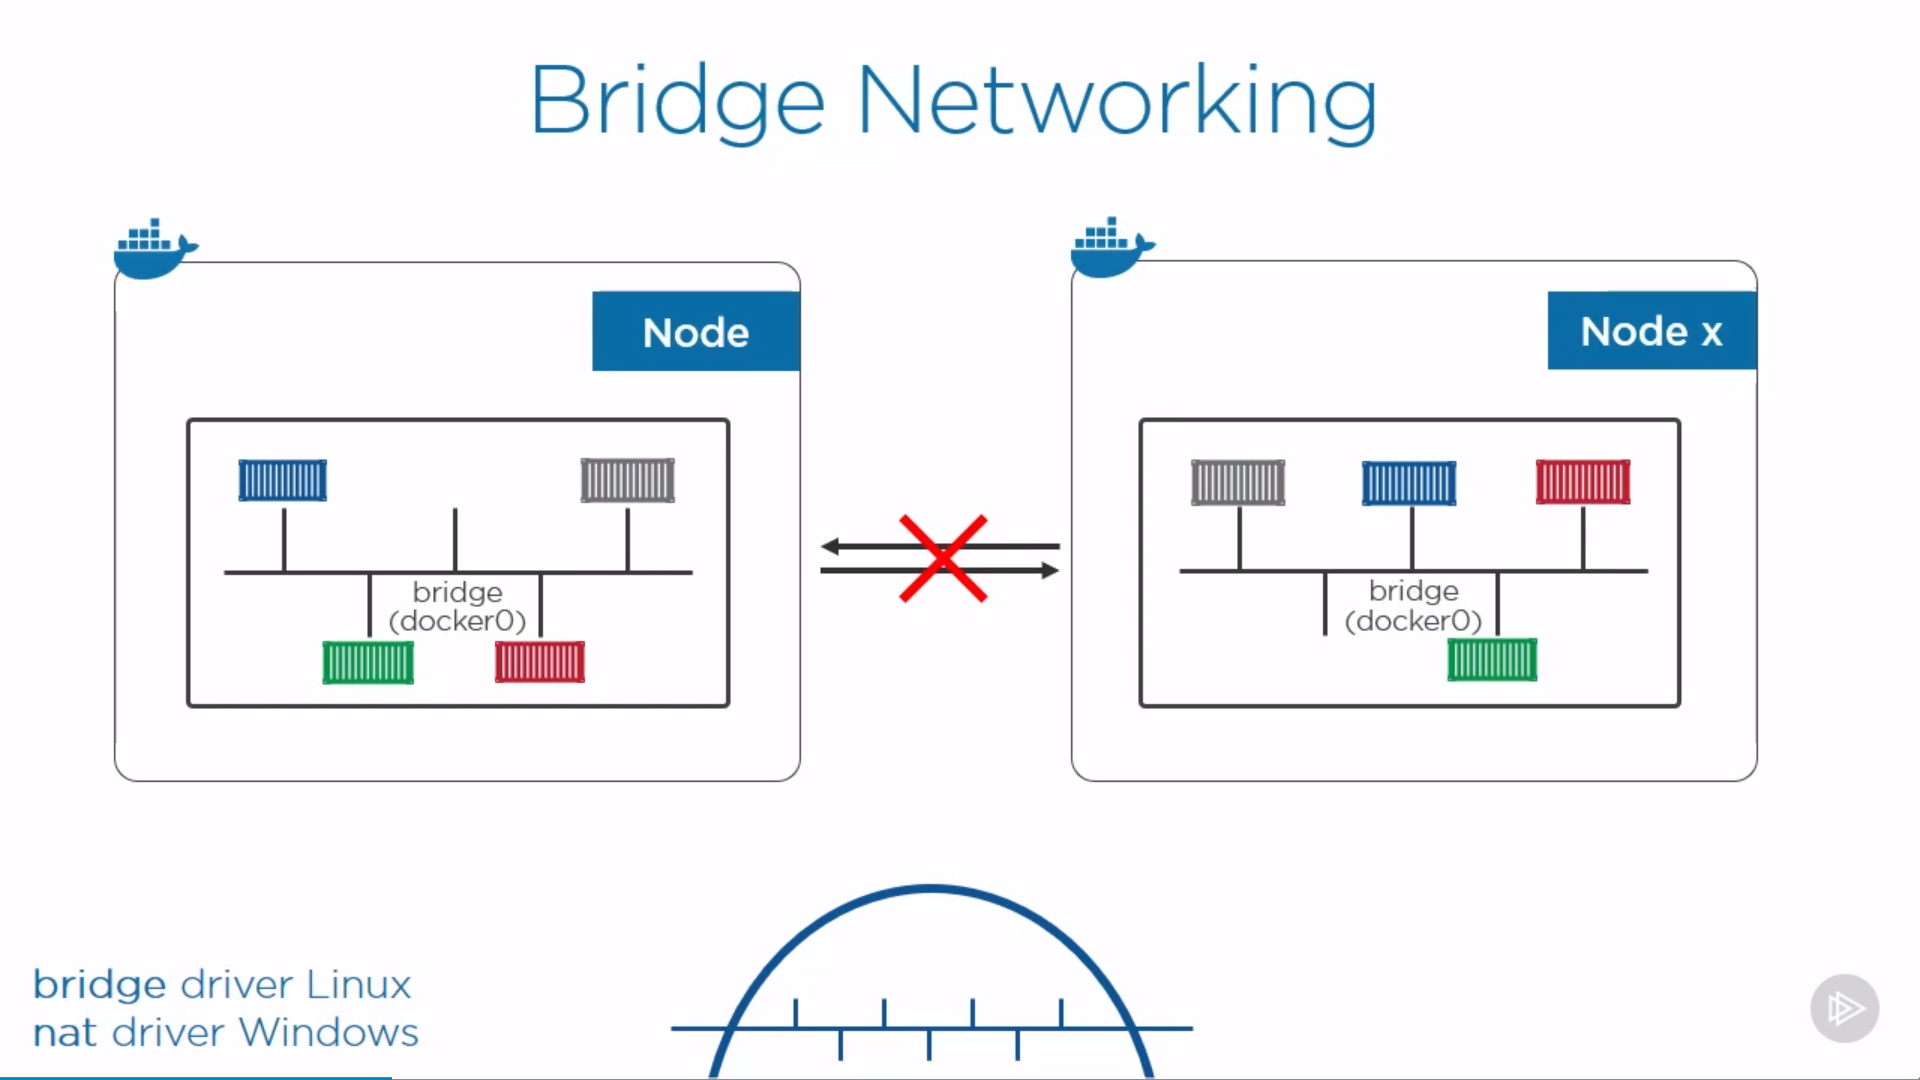
Bridge Networking
a.k.a single-host networking, docker0.
can only connect containers on the same host. Isolated layer-two network, even on the same host. Get in/out traffic by mapping port to the host.
1 | $ docker network inspect bridge # default bridge network |
1 | { |
create a container without specifying network by $ docker container run --rm -d alpine sleep 1d, then inspect again:
1 | { |
to talk to outside, need port mapping:
1 | $ docker container run --rm -d --name web -p 8080:80 nginx # host port 8080 to container port 80 |
show port mapping by:
1 | $ docker port <container> |
then can visit the web by localhost:8080
create a bridge network:
1 | $ docker network create -d bridge <network-name> |
check by docker network ls. To run containers in it:
1 | $ docker container run --rm -d --network <network-name> alpine sleep 1d |
to switch container between networks:
1 | $ docker network disconnect <network1> web # even when container is running |
Overlay Networking
a.k.a multi-host networking.
Single layer-two network spanning multiple hosts
1 | $ docker network create |
built-in overlay is container to container only (not applied to VM, physicals)
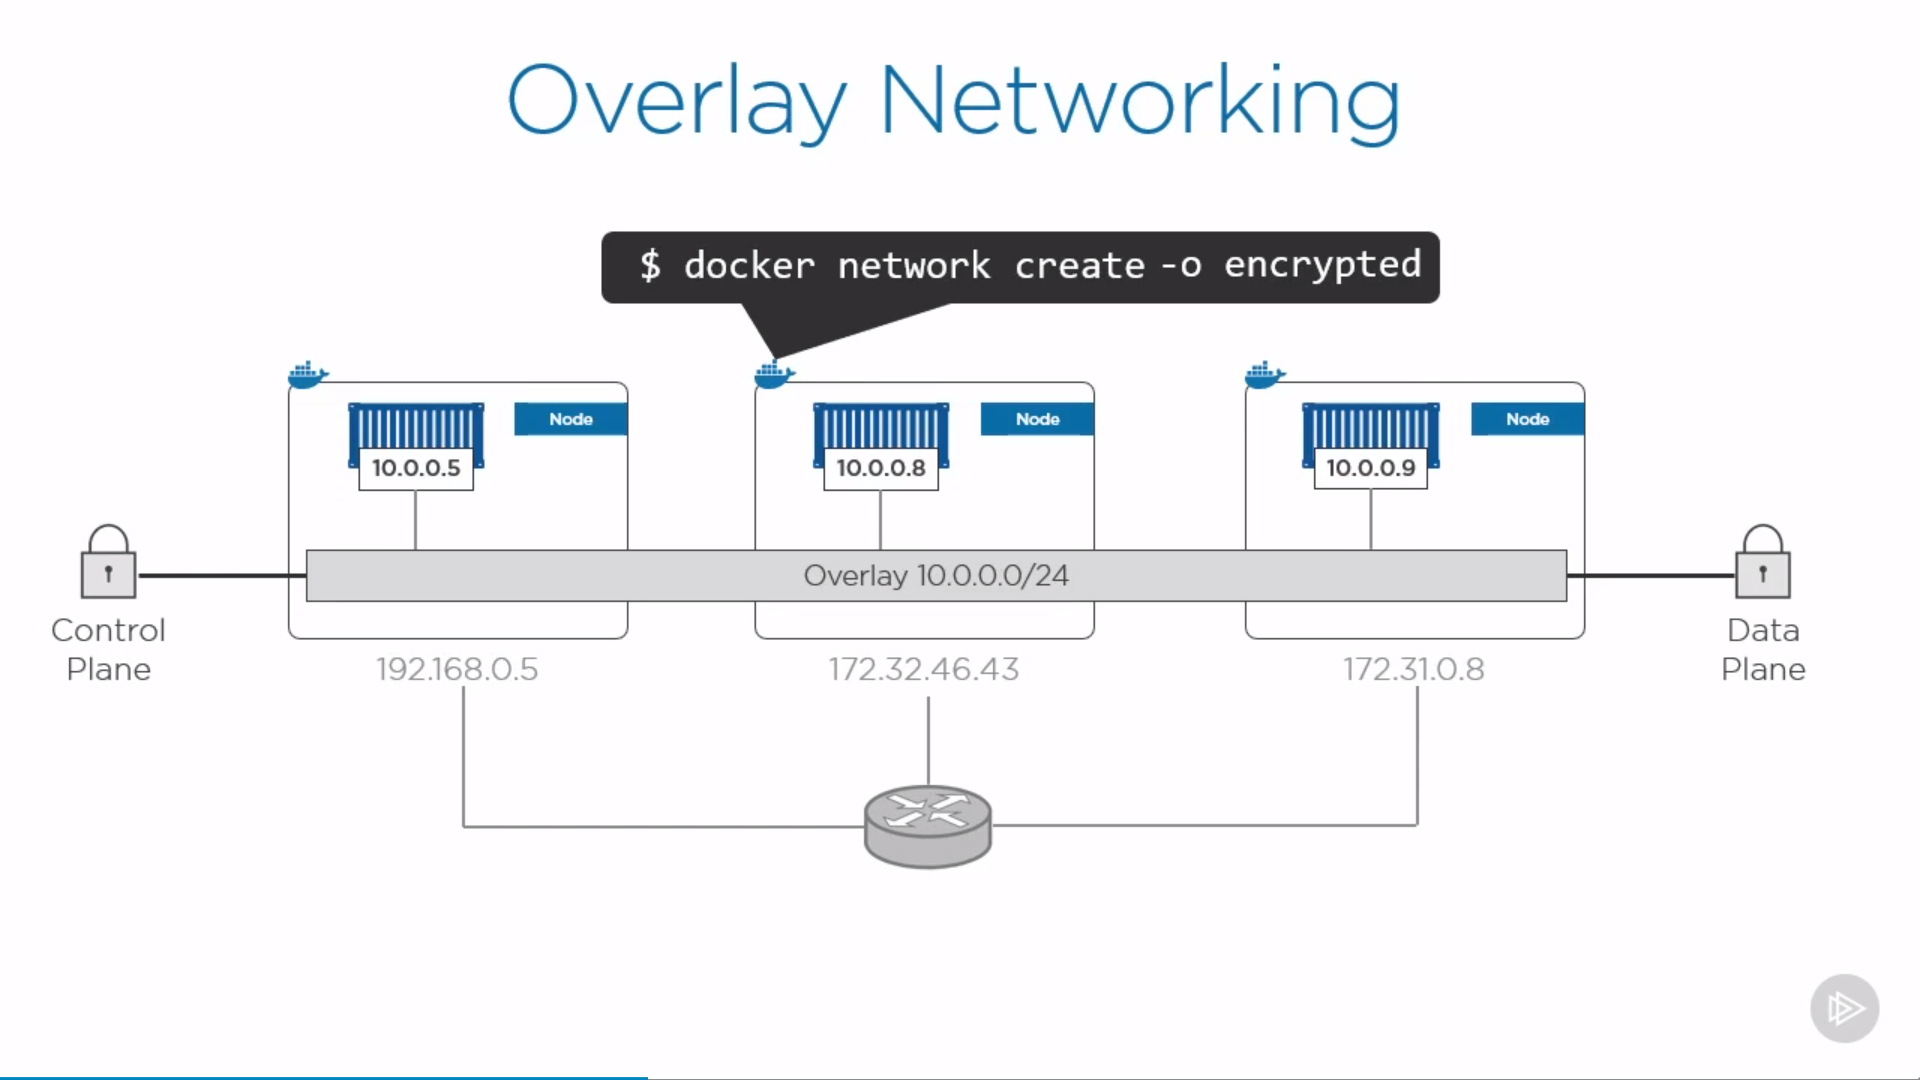
To create a overlay network:
1 | $ docker network create -d overlay <network-name> |
check by docker network ls, note its scope is “swarm”, which means availabel on every node in the swarm.
create a service to use this overlay network:
1 | $ docker service create -d --name <service> --replicas 2 --network overnet alpine sleep 1d # default replicated mode |
check by docker service ls, check which nodes are running the service by docker service ps <service>, more details run docker service inspect <service>
switch to one node which runs this service and run docker network inspect <network-name>
1 | { |
switch to the other node, exec into the container by docker container exec -it <container> sh, ping 10.0.1.4, check success.
MACVLAN
Containers also need to talk to VMs or physicals on existing VLANs.
Gives every container its own IP address and MAC address on the existing network (directly on the wire, no bridges, no port mapping)
requires promiscuous mode on the host. (cloud providers generally don’t allow. look for IPVLAN instead, which doesn’t require promiscuous mode)
Network services
-
Service discovery: locate services in a swarm
-
Load Balancing: access a service from any node in swarm (even nodes not hosting the service)
Service discovery
Every service gets a name, registered with swarm DNS, uses swarm DNS
1 | $ docker service create -d --name ping --network <overlay> --replicas 3 alpine sleep 1d |
check docker service ls to confirm (also check docker container ls), can locate other service in same overlay network by name, e.x.:
1 | $ docker container exec -it <container> sh |
Load Balancing
1 | $ docker service create -d --name web --network overnet --replicas 1 -p 8080:80 nginx |
ingress mode: publish a port on every node in the swarm — even nodes not running service replicas. then can access by any node in the network by port 8080.
The alternative mode is host mode which only publishes the service on swarm nodes running replicas. by adding mode=host to the --publish output, using --mode global instead of --replicas=5, since only one service task can bind a given port on a given node.
Volumes
running a new container automatically gets its own non-persistent, ephemeral graph driver storage (copy-on-write union mount, /var/lib/docker). However, volume is to store persistent data, entirely decoupled from containers, seamlessly plugs into containers.
a directory on the docker(also remote hosts or cloud providers by volume drivers), mounted into container at a specific mount point.
can exist not only on local storage of docker host, but also on high-end external systems like SAN and NAS. Pluggable by docker store drive.
Create Volumes
1 | $ docker volume create <volume> |
Check status
1 | $ docker volume ls |
1 | [ |
Delete volume
to delete a specific volume:
1 | $ docker volume rm <volume> |
rm an in-use volume causes error message.
to delete all unused volumes:
1 | $ docker volume prune # delete unused volume |
Attach volume
to attach volume to a container, either by --mount or -v:
1 | $ docker run -d --name <container> --mount source=<volume>,target=/vol <image> |
note:
source=<volume>: if volume doesn’t exist for now, will be created.target=/vol: where in the container to mount it, check by exec into container andls -l /vol/- if the container has files or directories in the directory to be mounted, the directory’s contents are copied into the volume.
check by docker inspect <container>:
1 | "Mounts": [ |
Then, container can write data to /vol (e.x. echo "some data" > /vol/newfile), accessible in /var/lib/docker/volumes/ as well, even if the container is removed.
–mount works with service as well.
Also useful in Dockerfile’s volume instruction.
Volume for service
1 | $ docker service create -d \ |
note:
- docker service create command does not support the -v or --volume
Read only volume
1 | $ docker run -d \ |
verfify by docker inspect nginxtest:
1 | "Mounts": [ |
Secrets
string <= 500k, swarm mode for services only(not containers)

note:
/run/secrets/: stay in memory
1 | $ docker secret create <secret> <file> |
check by docker secret ls. inspect by docker secret inspect <secret>
create a service, using secret:
1 | $ docker service create -d --name <service> --secret <secret> --replicas 2 ... |
inpect by docker service inspect <service> and look at secrets section. exec into containers by docker container exec -it <container> sh, find secret by ls -l /run/secrets, accessible
can’t delete an in-use secret by docker secret rm <secret>, need to delete service first.
Docker Compose and Stack
Docker compose
Install on linux
- Download the current stable release of Docker Compose:
1 | $ curl -L "https://github.com/docker/compose/releases/download/1.26.0/docker-compose-$(uname -s)-$(uname -m)" -o /usr/local/bin/docker-compose |
- Make it executable:
1 | $ chmod +x /usr/local/bin/docker-compose |
Compose files
Compose uses YAML files to define multi-service applications.
The default name for the Compose YAML file is docker-compose.yml
Flask app example:
1 | version: "3.5" # mandatory |
note:
- 4 top-level keys: version, services, networks, volumes, (secrets, configs…)
- use the driver property to specify different network types:
1 | networks: |
source: https://github.com/nigelpoulton/counter-app
Run compose app
1 | $ docker-compose up # docker-compose.yml in current folder |
check the current state of the app by docker-compose ps.
list the processes running inside of each
service (container) by docker-compose top.
Stop, Restart and Delete App
stop without deleting:
1 | $ docker-compose stop |
could restart by:
1 | $ docker-compose restart |
If changed app after stopping, these changes won’t apply in restarted app. Need to re-deploy.
delete a stopped Compose app and networks:
1 | $ docker-compose rm |
stop and delete containers and networks by:
1 | $ docker-compose down |
Stack
swarm only
stacks manage a bunch of services as a single app, highest layer of docker application hierarchy.

can run on Docker CLI, Docker UCP, Docker Cloud.
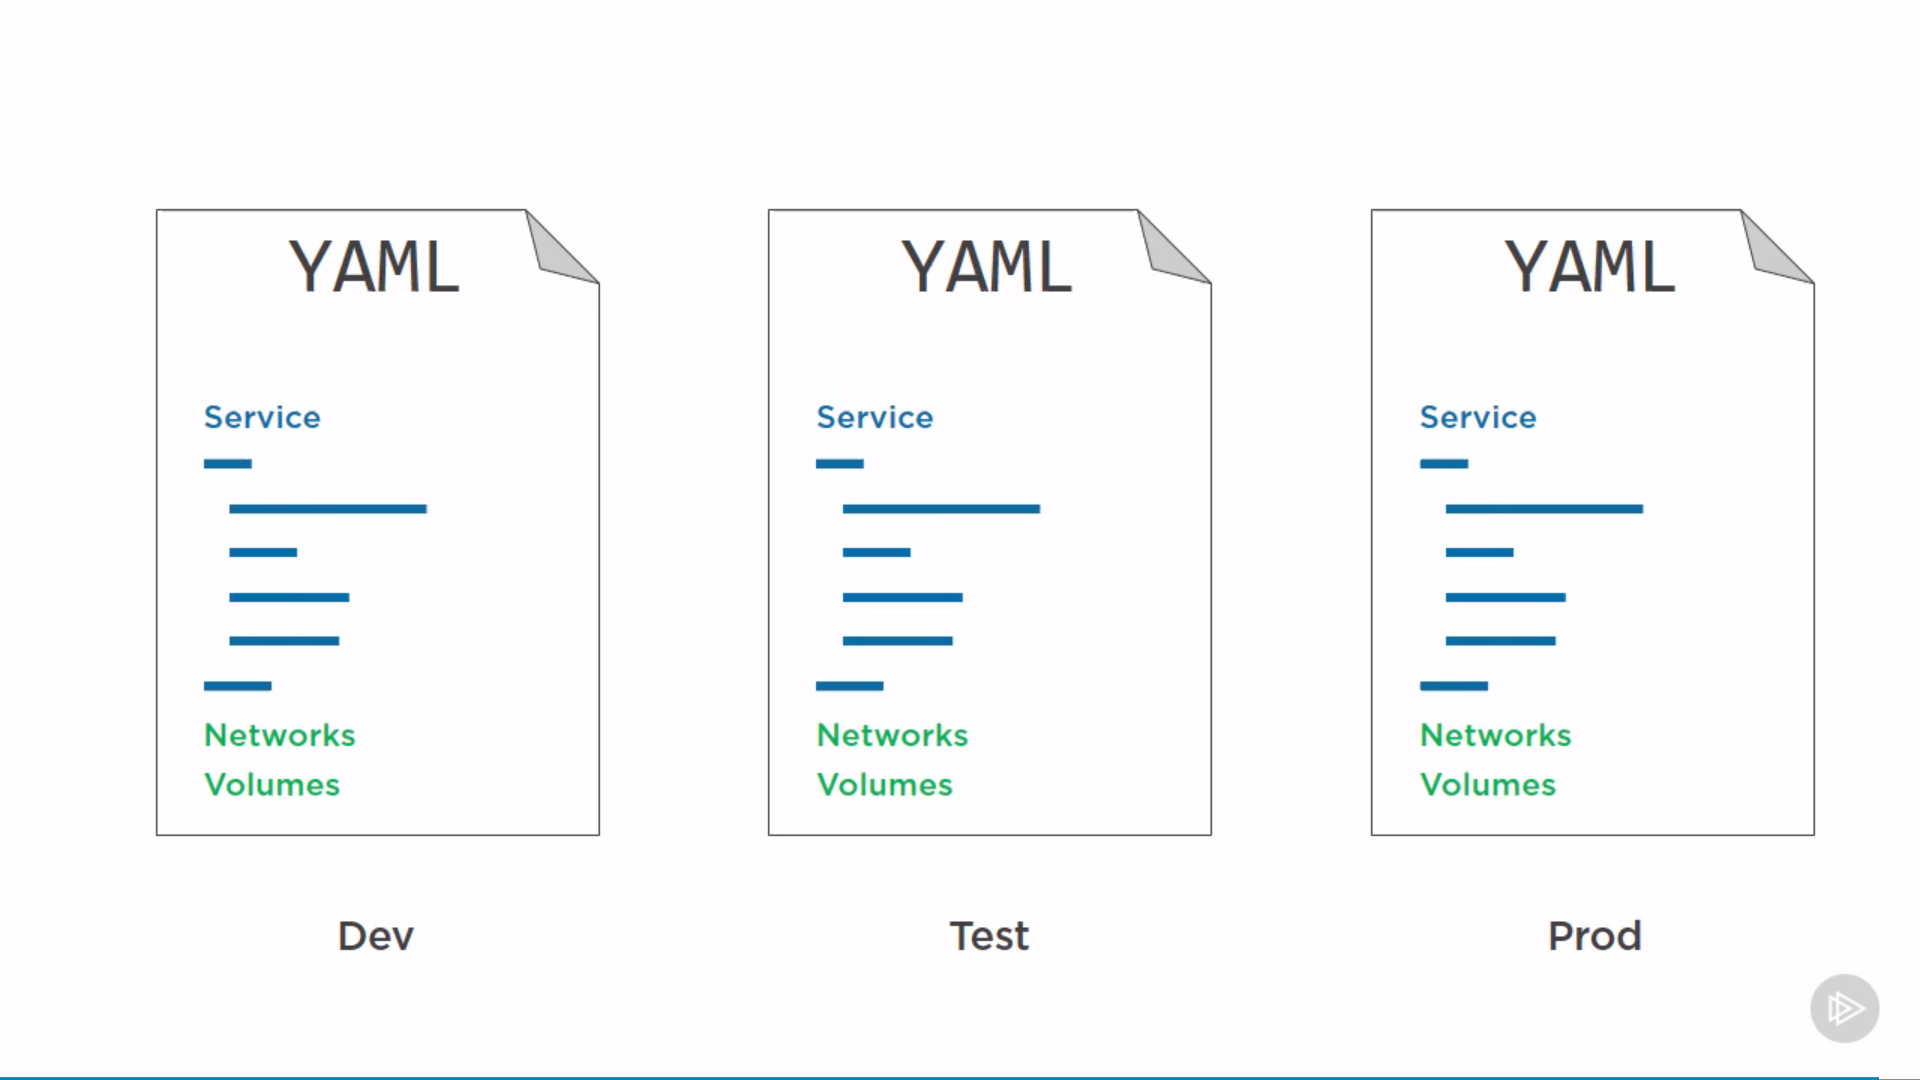
docker-stack.yml: YAML config file including version, services, network, volumes, documenting the app. Can do version control.
1 | version: "3" # >=3 |
source: https://github.com/dockersamples/example-voting-app/docker-stack.yml
Check Compose file version 3 reference
Placement constraints:
- Node ID: node.id == o2p4kw2uuw2a
- Node name: node.hostname == wrk-12
- Role: node.role != manager
- Engine labels: engine.labels.operatingsystem==ubuntu 16.04
- Custom node labels: node.labels.zone == prod1 zone: prod1
service.<service>.deploy.update_config:
1 | update_config: |
services.<service>.deploy.restart-policy:
1 | restart_policy: |
services.<service>.stop_grace_period:
1 | stop_grace_period: 1m30s # for PID 1 to handle SIGTERM, default 10s, then SIGKILL. |
Deploy the stack
1 | $ docker stack deploy -c <stackfile> <stack> # -c: --compose-file |
Check status
1 | $ docker stack ls |
Update stack
update config file, and re-deploy by:
1 | $ docker stack deploy -c <stackfile> <stack> |
will update every service in the stack.
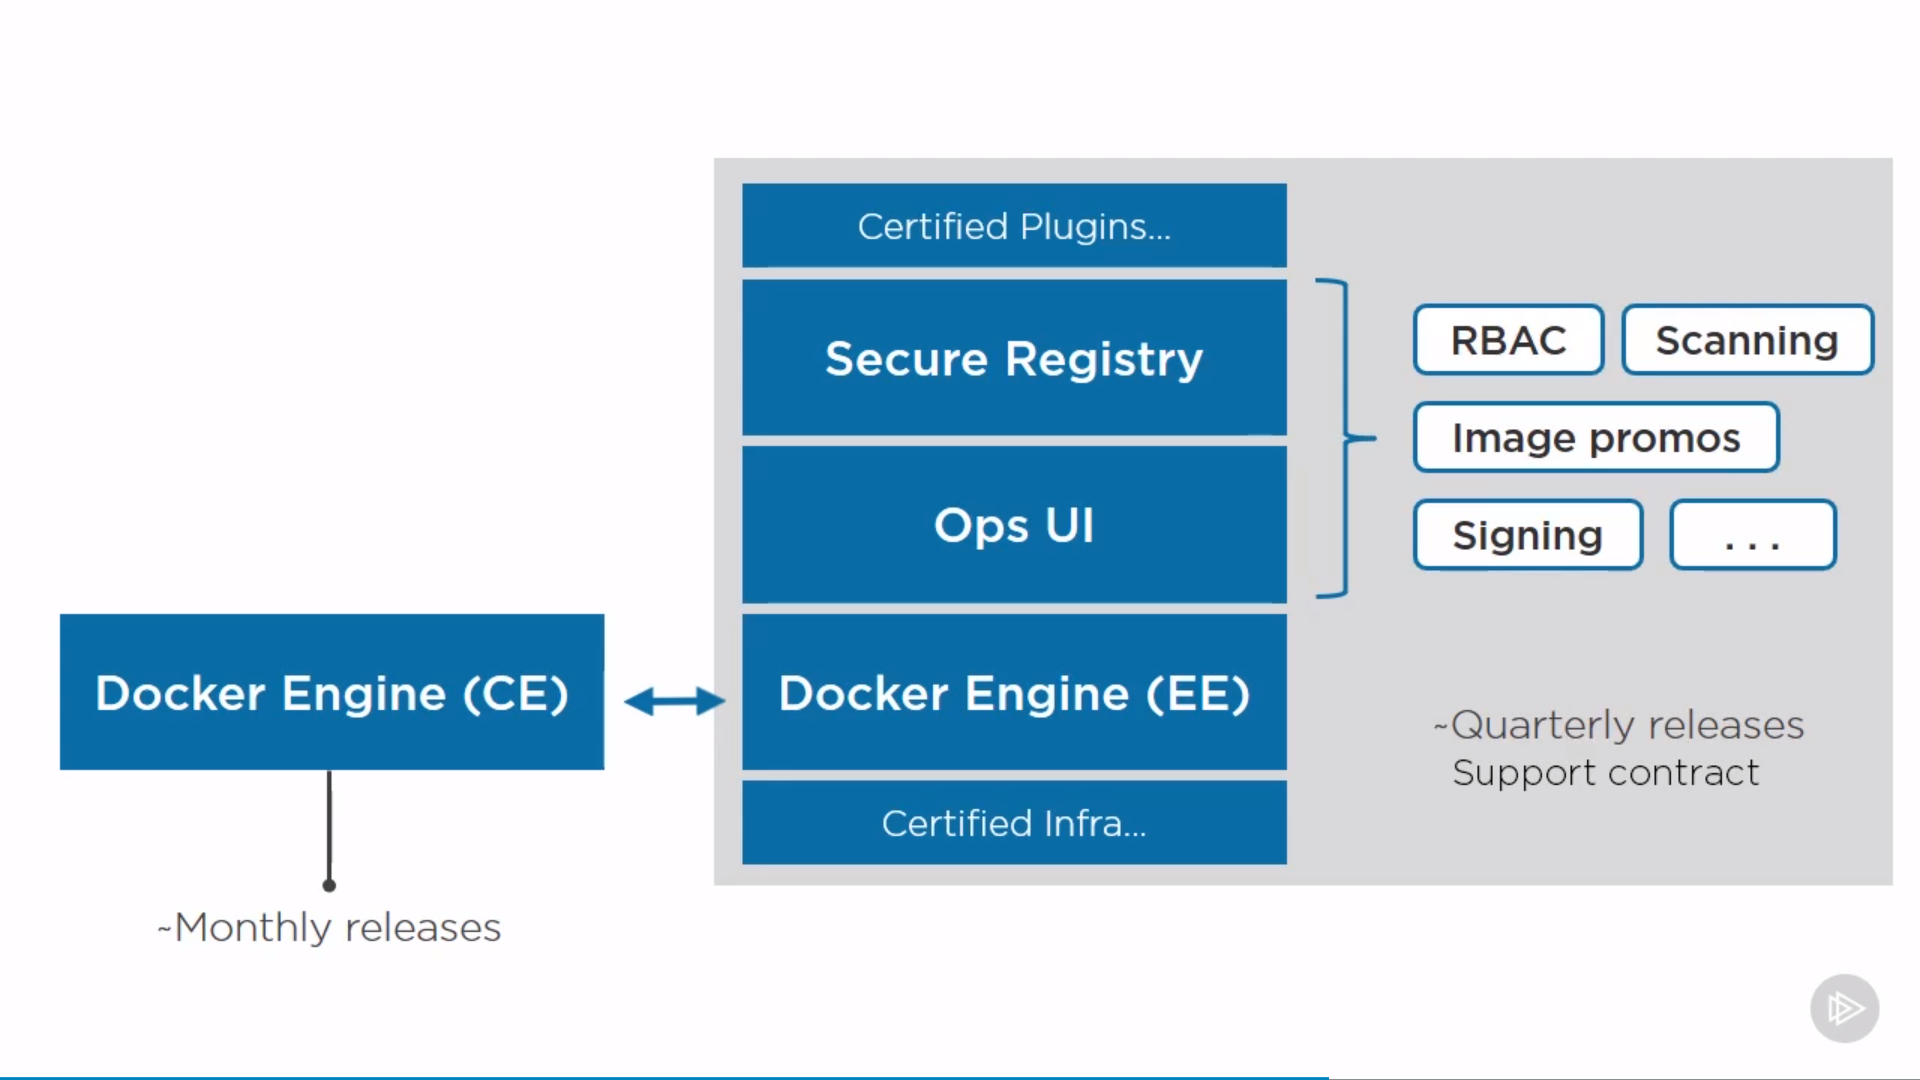
Enterprise Edition(EE)
- a hardened Docker Engine
- Ops UI
- Secure on-premises registry
Universal Control Plane(UCP)
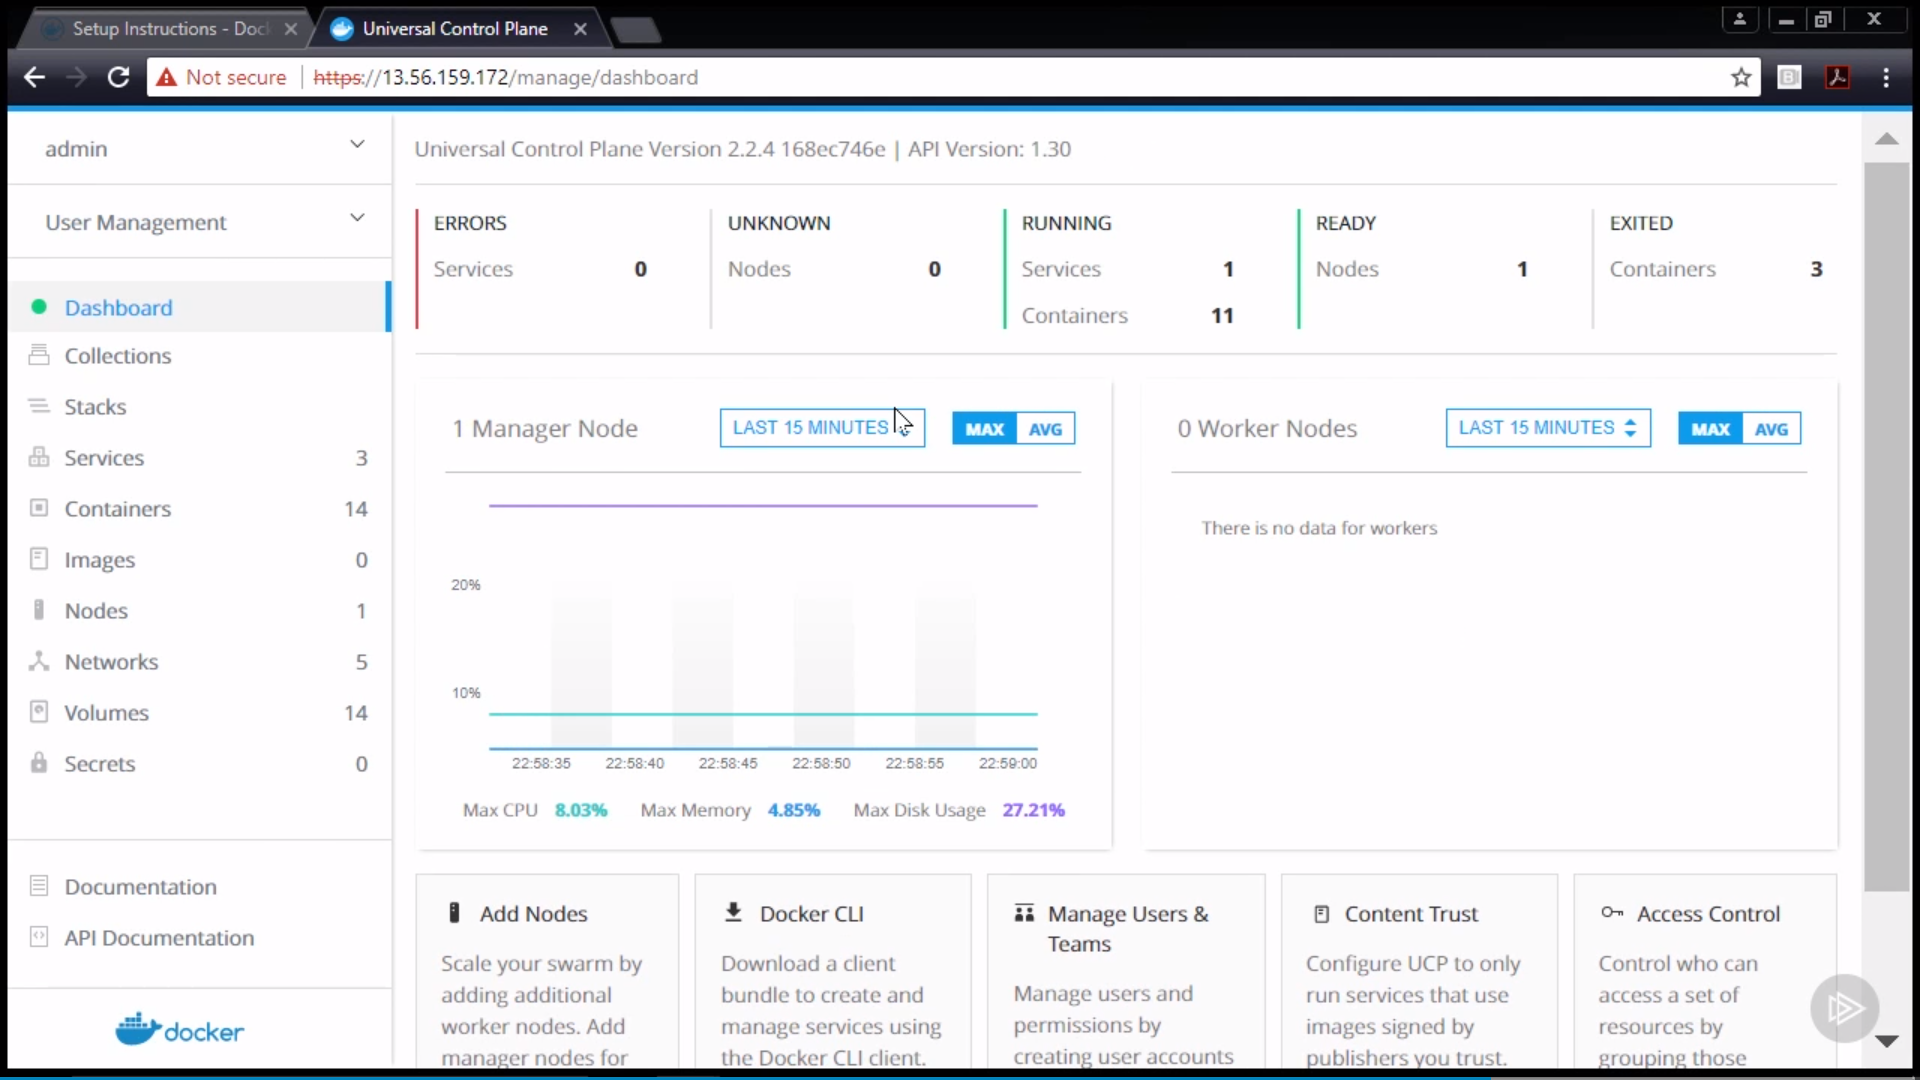
based on EE, the operations GUI from Docker Inc, to manage swarm and k8s apps.
Docker Trusted Registry(DTR)
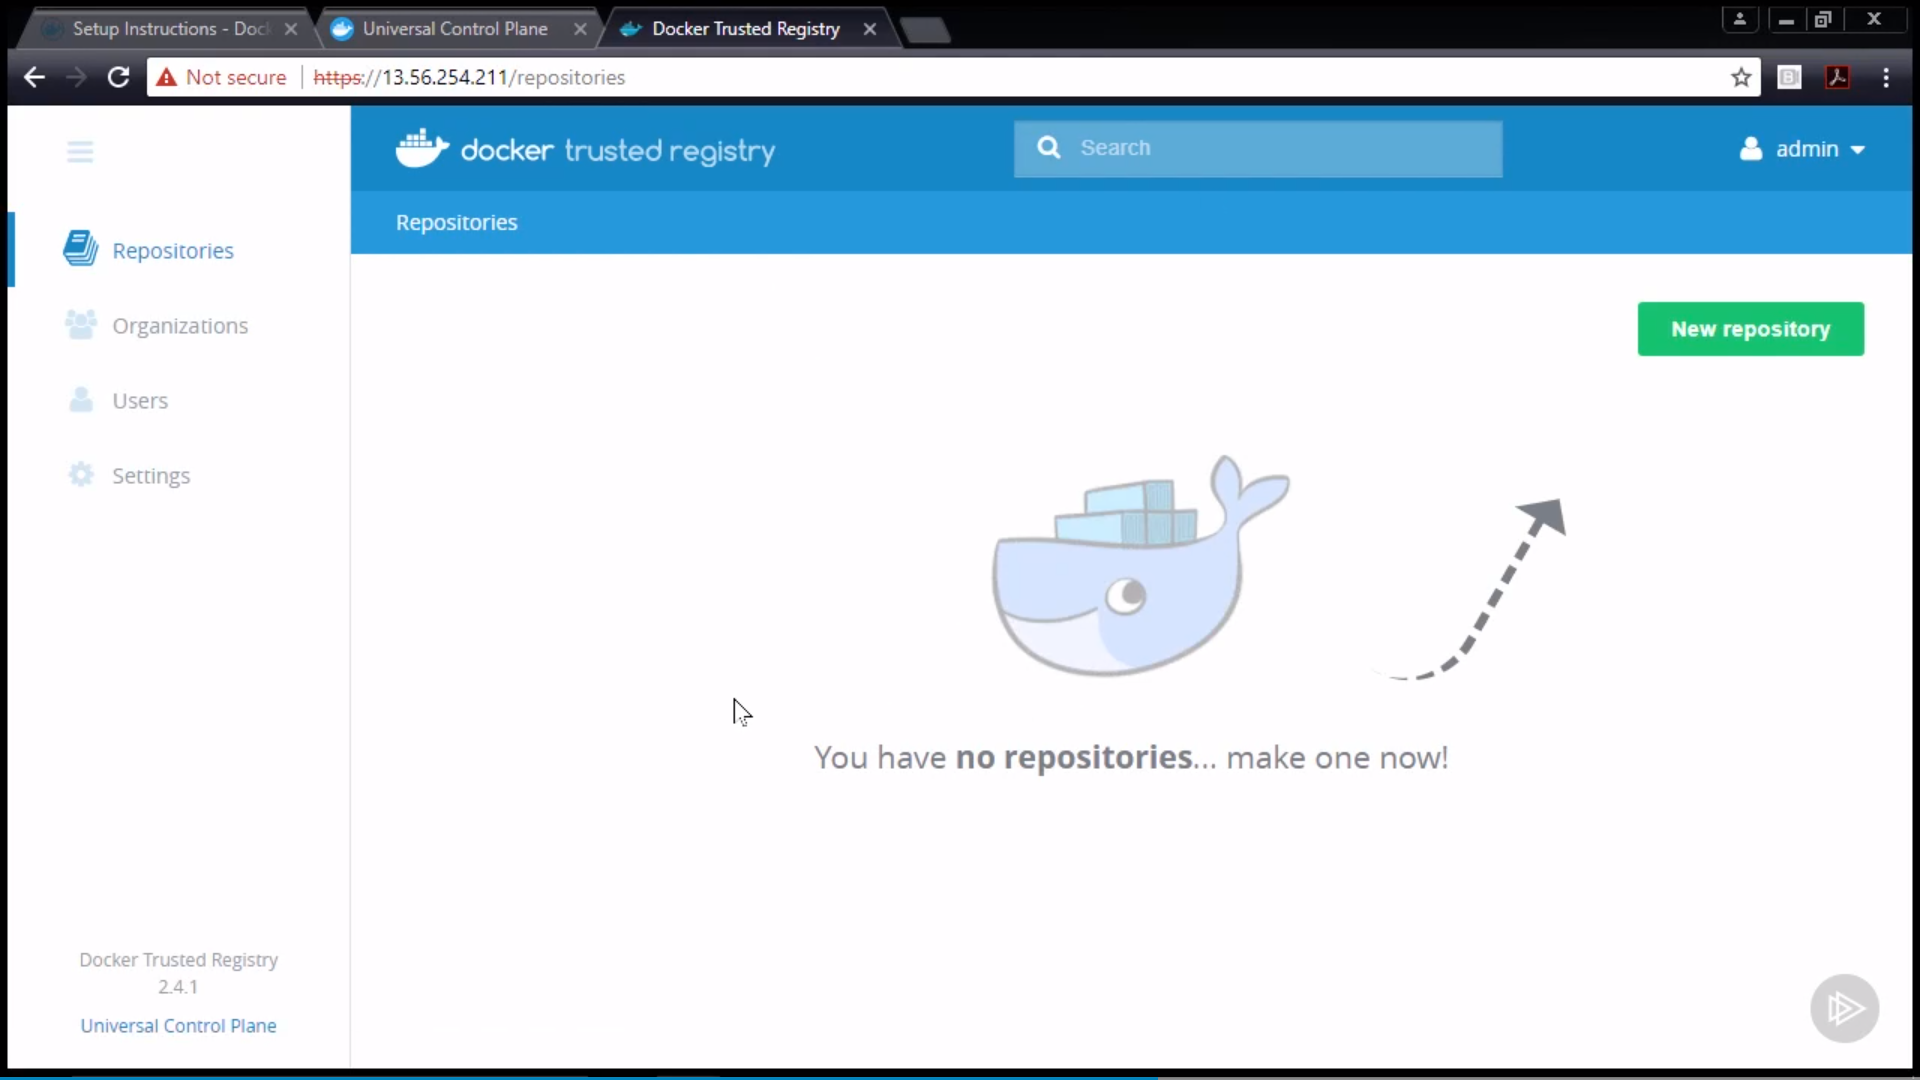
based on EE and UCP, a registry to store images, a containerized app.
Role-based Access Control(RBAC)
- subject: user, team
- role: permissions
- collection: resources(docker node)
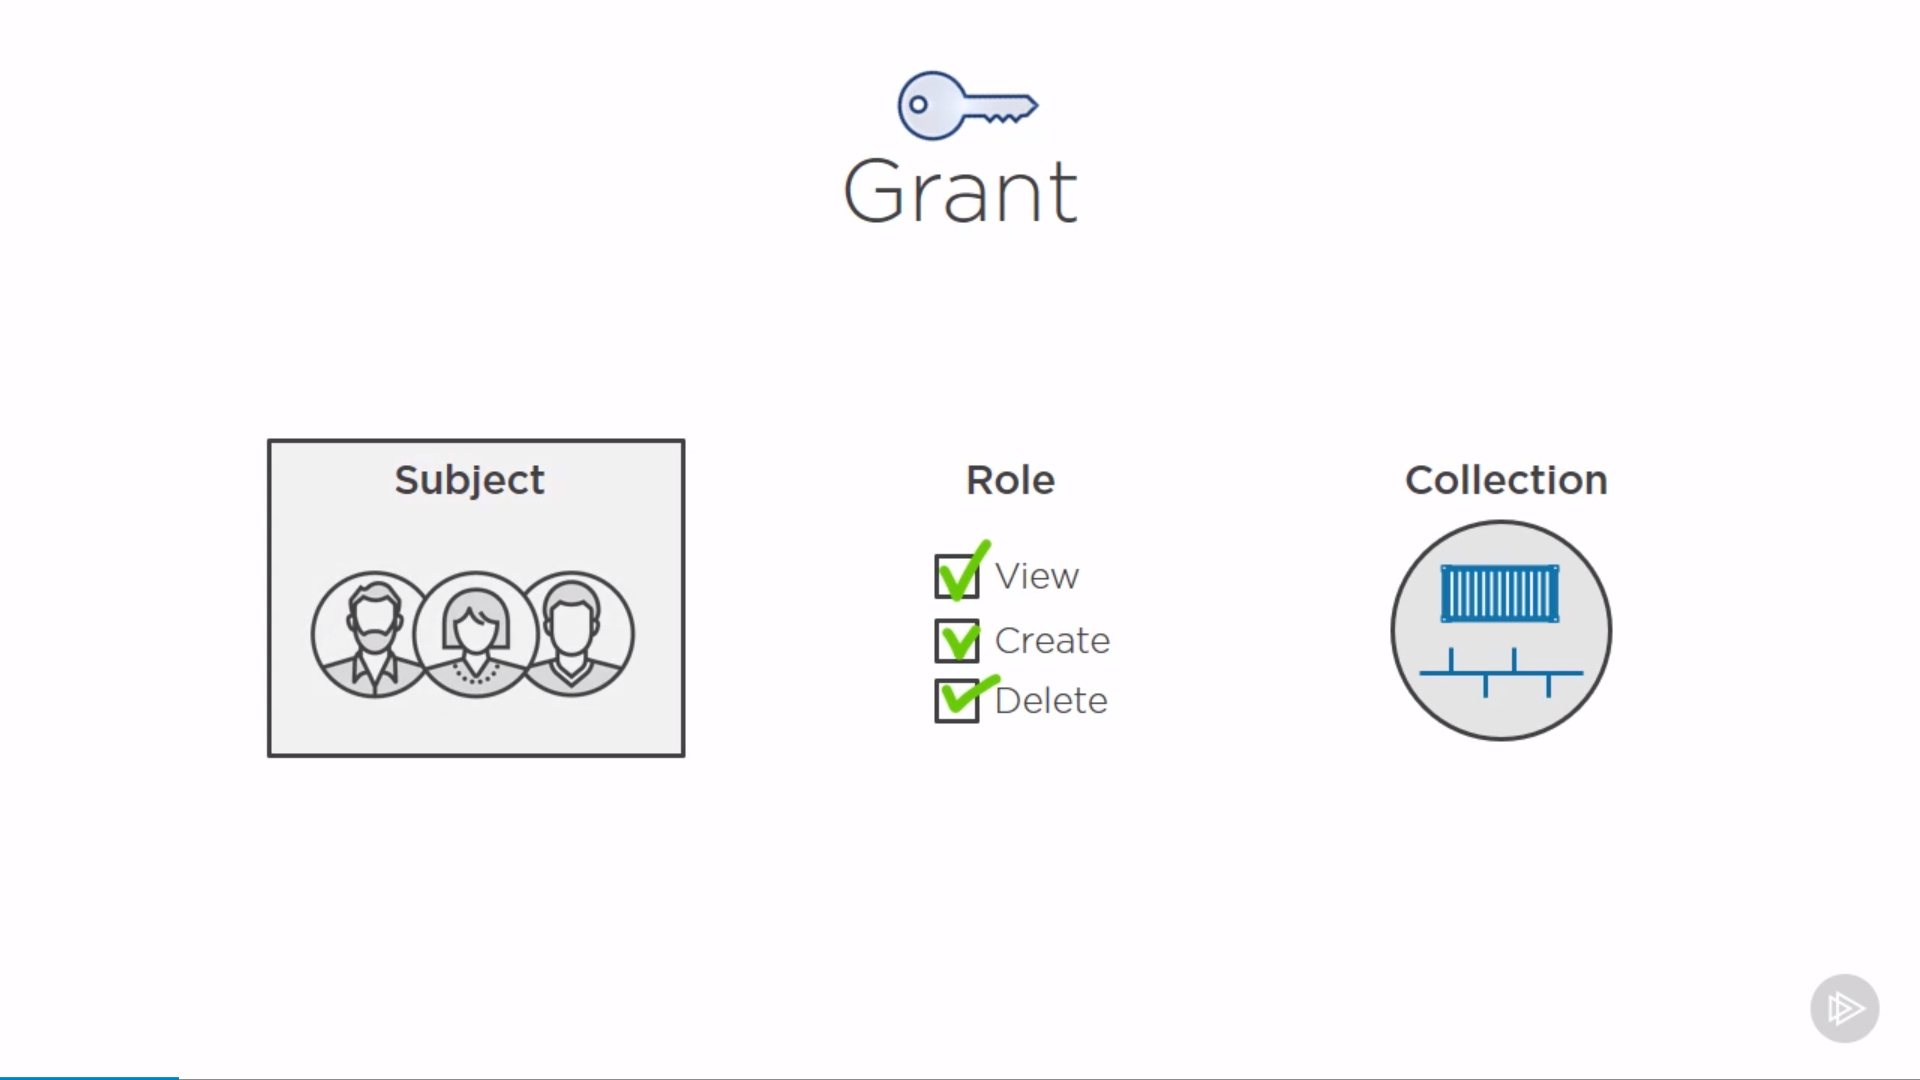
Image scanning
after update the image in local, need to push into registry.
Tag the updated image:
1 | $ docker image tag <image> <dtr-dns>/<repo>/<image>:latest |
check by docker image ls to see a new tagged image.
login:
1 | $ docker login <dtr-dns> # username, passwork, user needs permission to write in the repo |
ensure image scanning sets to “scan on push” in UCP’s DTR’s repo setting. Then push:
1 | $ docker image push <tagged-image> |
Check in DTR’s repo’s images’ vulnerabilities field.
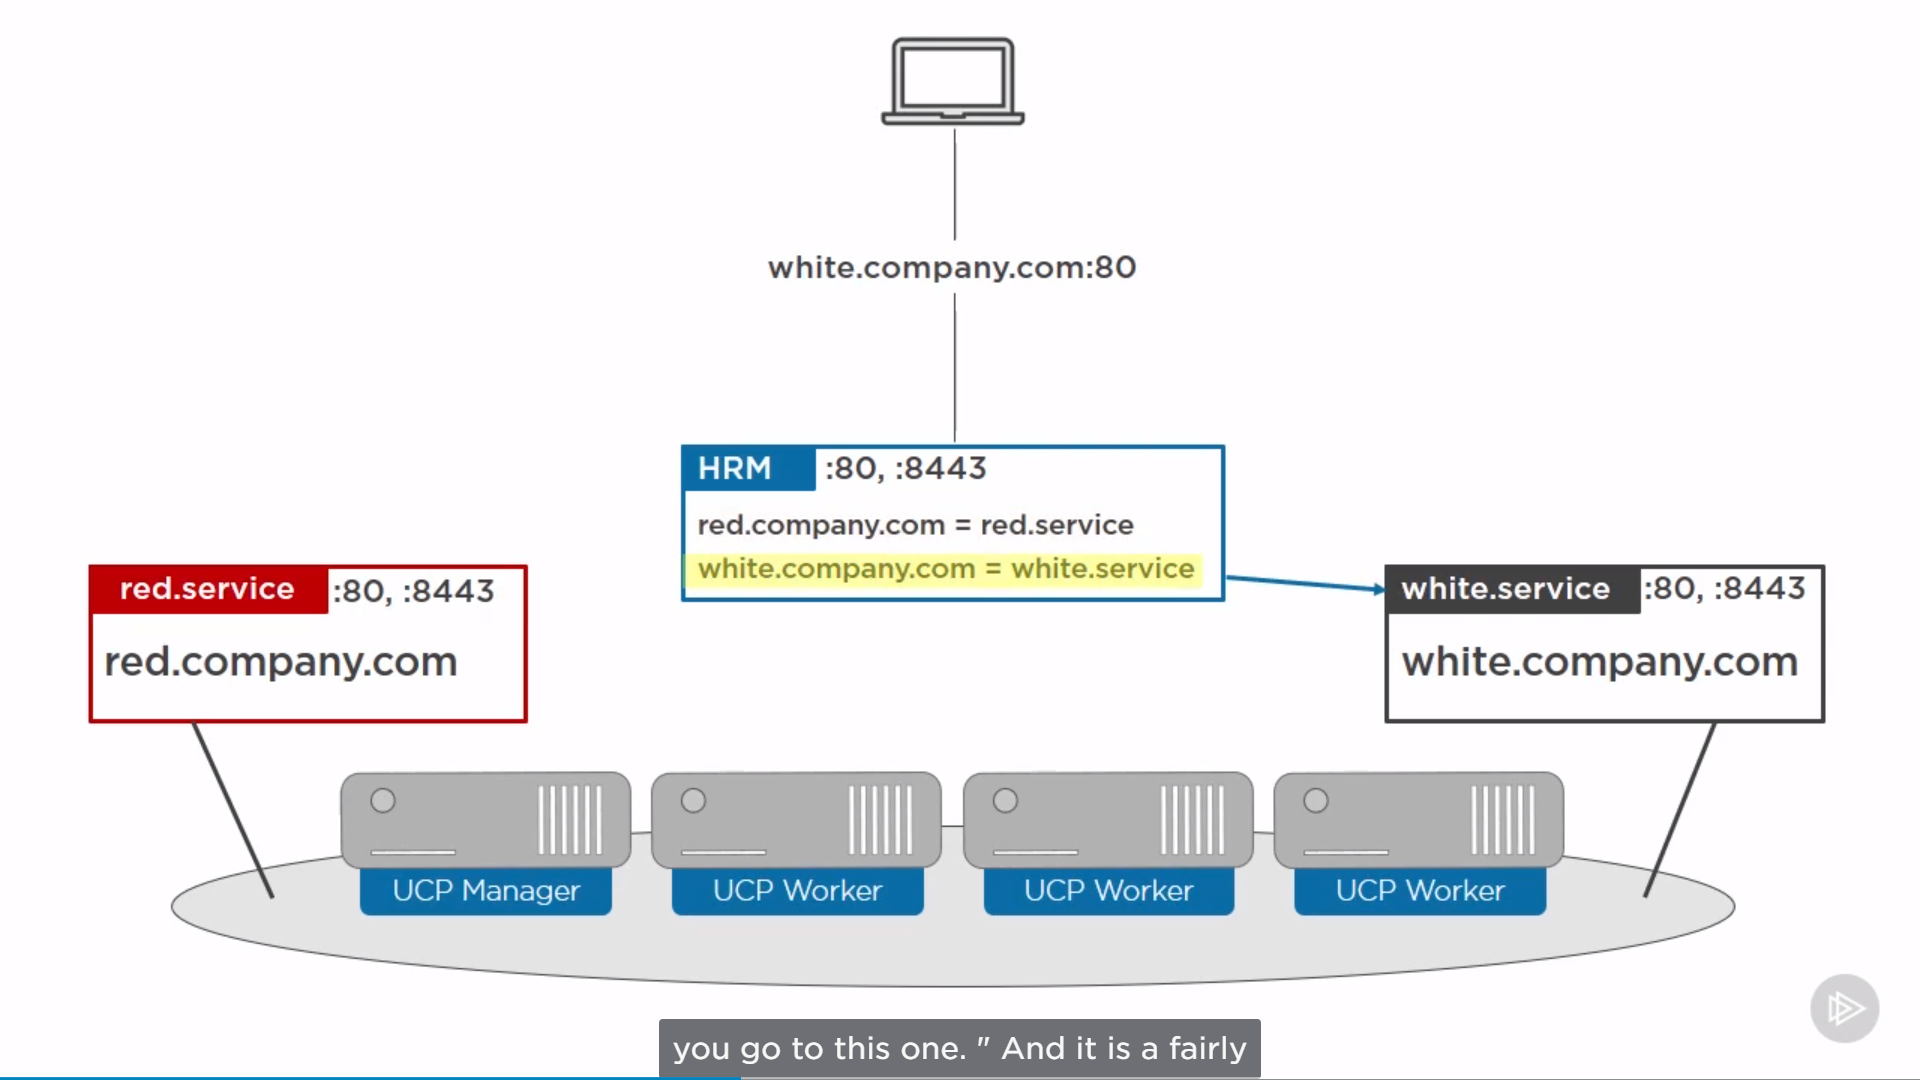
HTTP Routing Mesh(HRM)
For Docker CE’s Routing Mesh(Swarm-mode Routing Mesh), Transport layer(L4).
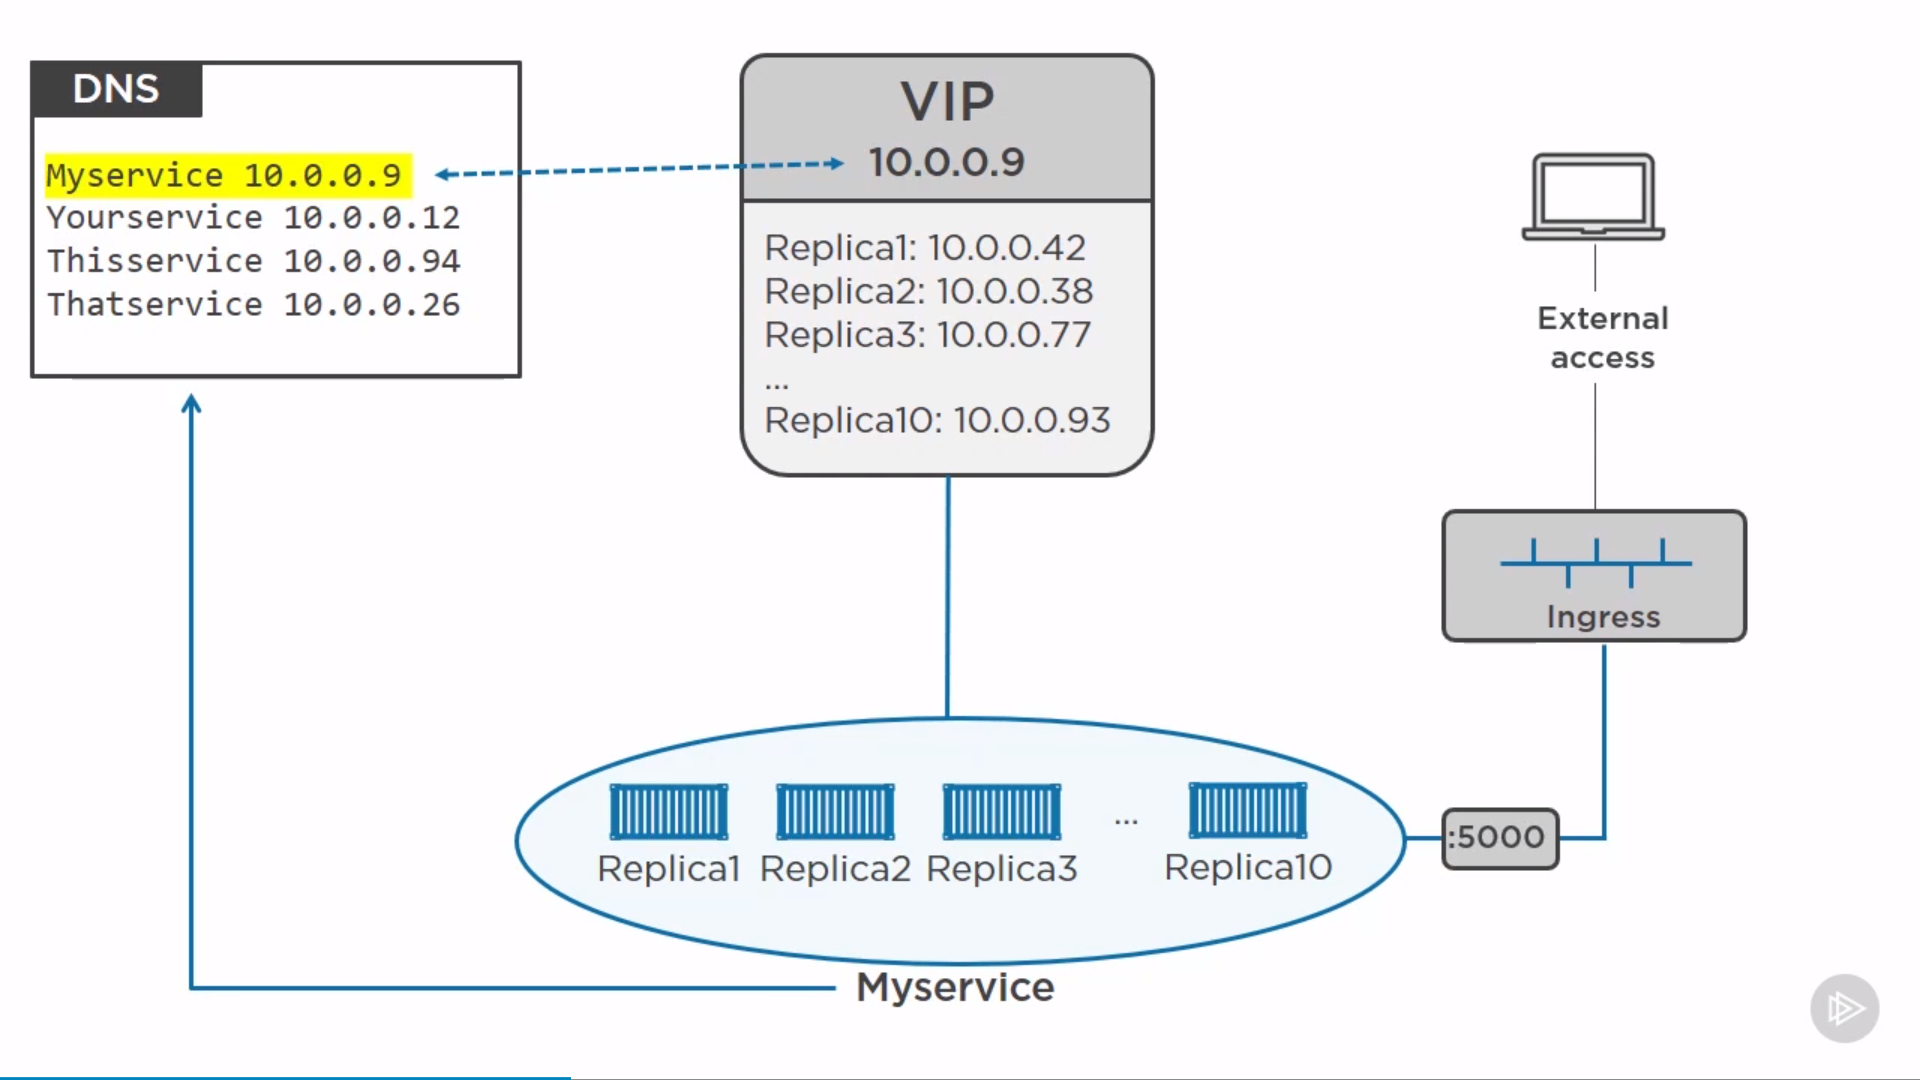
For Docker EE’s HRM, Application layer(L7). Route based on host header.
